In this new Adobe Illustrator tutorial you will learn how to draw a Spooky Black Cat character.
Follow this tutorial and learn how to draw a more or less Spooky Black Cat character. This tutorial is filled with details and you will learn how to use highlights to add dimension to your character. We’ll add bones and create a custom Pattern Brush for the tail and spine. You will be able to apply these techniques in other projects as well so let’s begin!
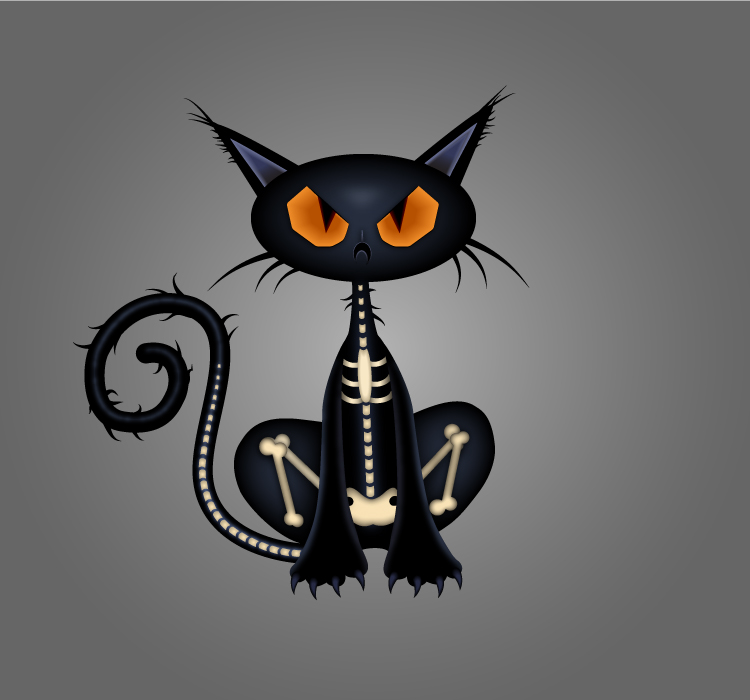
Final Image

Tutorial Details
- Program: Adobe Illustrator CS6 – CC 2017
- Difficulty: Intermediate
- Estimated Completion Time: 1 hour 30 minutes
Open a New Document
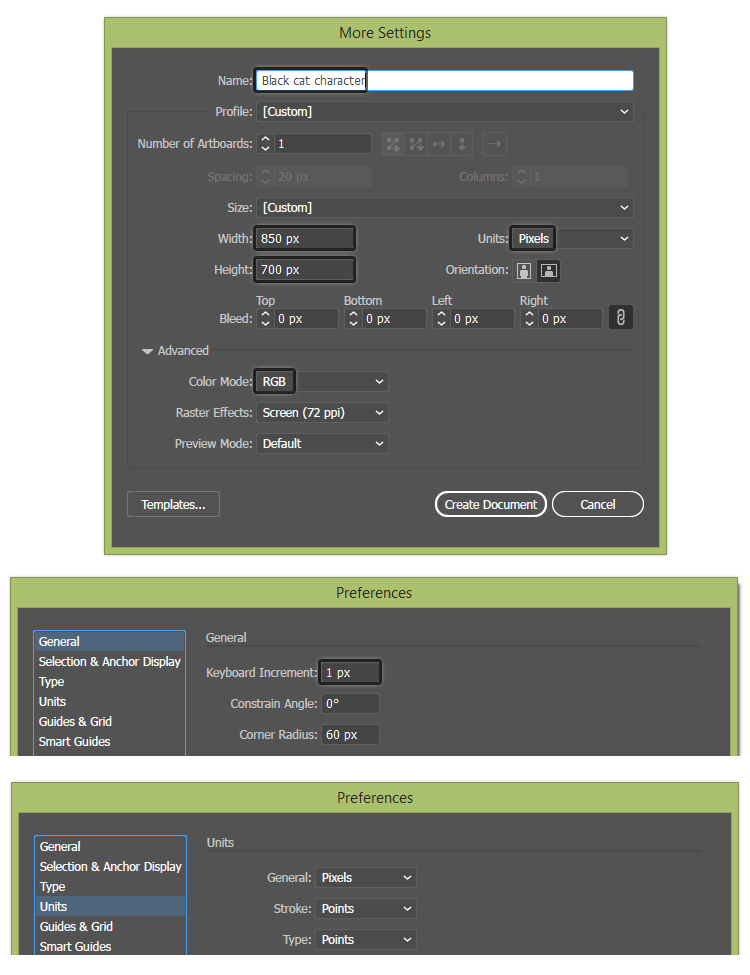
1. Launch Illustrator and open a new document. Type a name and set up the dimensions then select Pixels as Units and RGB as Color Mode. Next, go to Edit > Preferences > General and set the Keyboard Increment to 1 px and while there, also check the Units. These settings will help you throughout the drawing process.
Draw the Face of the Black Cat
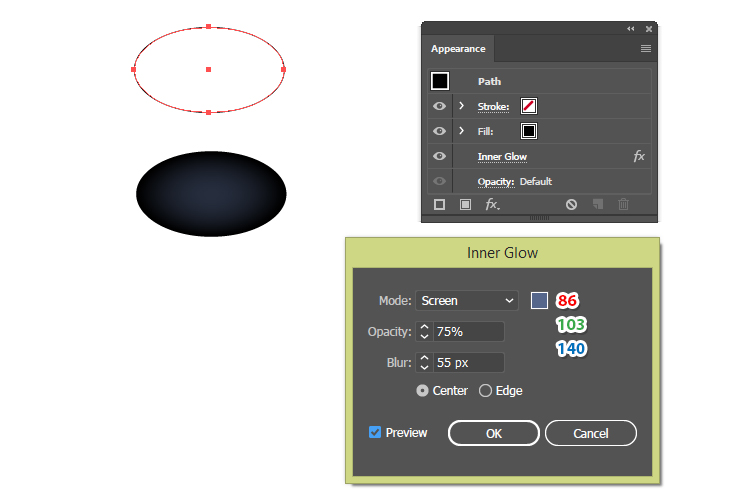
2. We are starting with the head. Grab the Ellipse Tool (L) and draw a 225 x 128 px ellipse on your artboard. Color it with black; then go to Effect > Stylize > Inner Glow and apply the settings shown to create a highlight in the center.
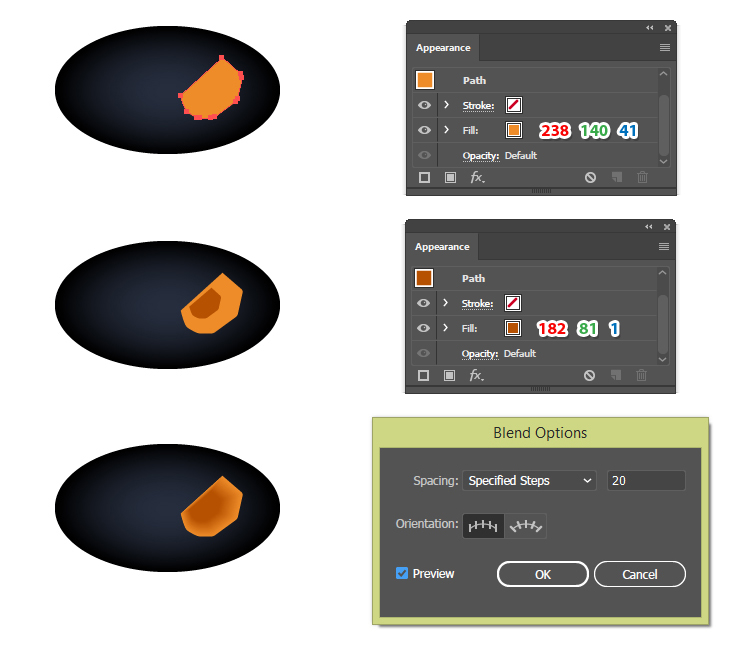
3. At this step we draw the right eye. Use the Pen Tool (P) to draw a shape like in the image below and color it with orange. Draw a similar but smaller shape on top and color it with a darker shade of orange.
Now, select both shapes and go to Object > Blend > Blend Options. Choose 20 Specified Steps and then go back to Object > Blend > Make (Alt-Control-B).
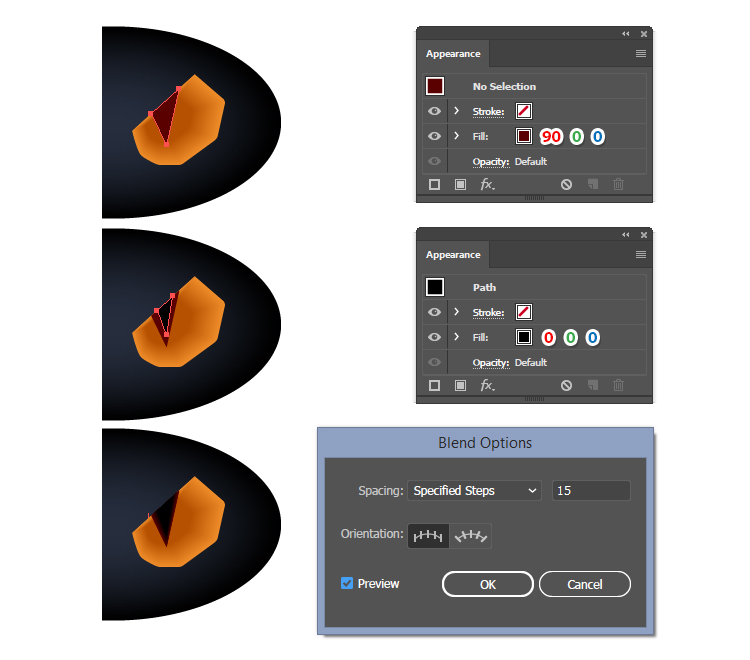
4. Still using the Pen Tool (P) draw a triangle shape filled with burgundy followed by a smaller triangle filled with black on top. Now, select both triangles and go to Object > Blend > Blend Options. Choose 15 Specified Steps and then go back to Object > Blend > Make (Alt-Control-B).
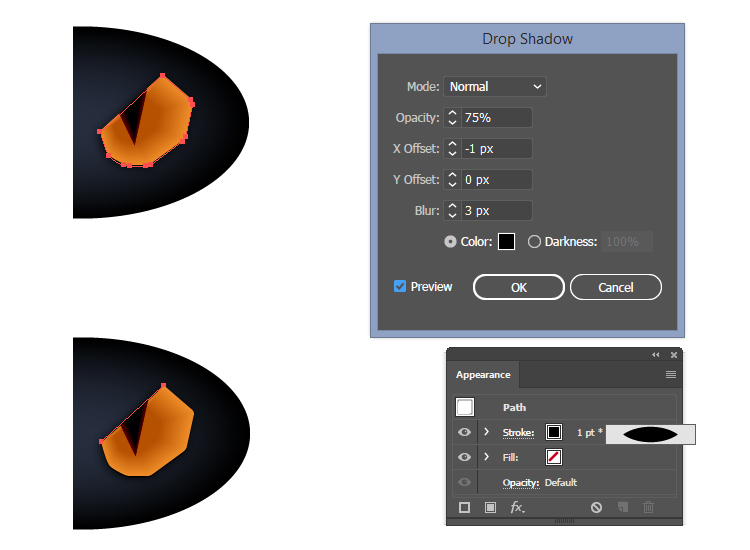
5. Use the Direct Selection Tool (A) to select only the bigger shape of the eye from the blend-group and then Copy and Paste in Place (Shift-Control-V) to make a copy of it. Go to Effect > Stylize > Drop Shadow and apply the settings shown to create a shadow; then send this shape behind the eye in the Layers panel.
Use the Pen Tool (P) to draw a straight path between the two top corner points. Select a 1 pt black Stroke and use the Width Profile 1 in the Stroke panel.
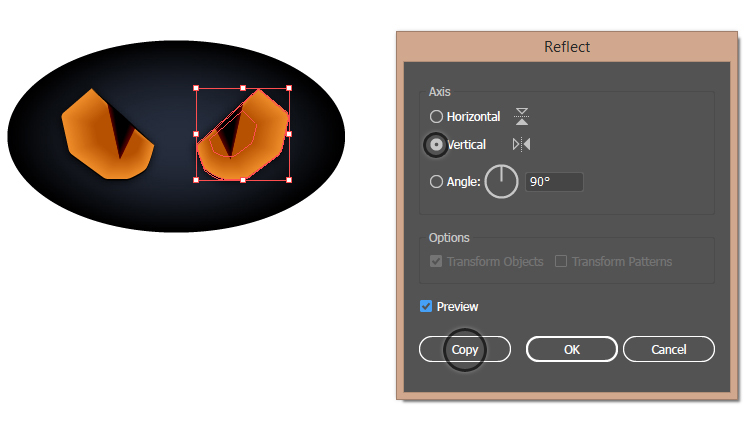
6. Now the right eye is ready and you can Group (Control-G) all the shapes. Go to Object > Transform > Reflect, check Vertical and hit Copy. You will obtain the left eye and you need to move it into place.
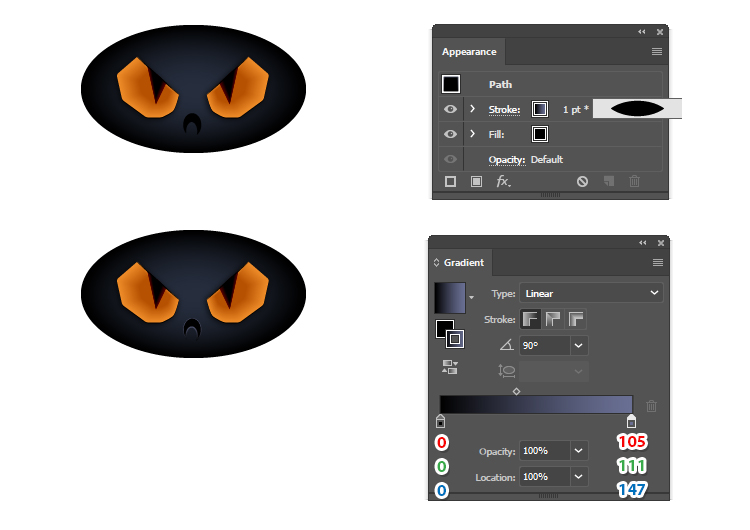
7. At this step we draw the mouth of the black cat. Use the Pen Tool (P) to draw a moon-like shape and color it with black. Also, apply a 1 pt Stroke using the Width Profile 1 in the Stroke panel and the linear gradient shown at a 90 degrees Angle.
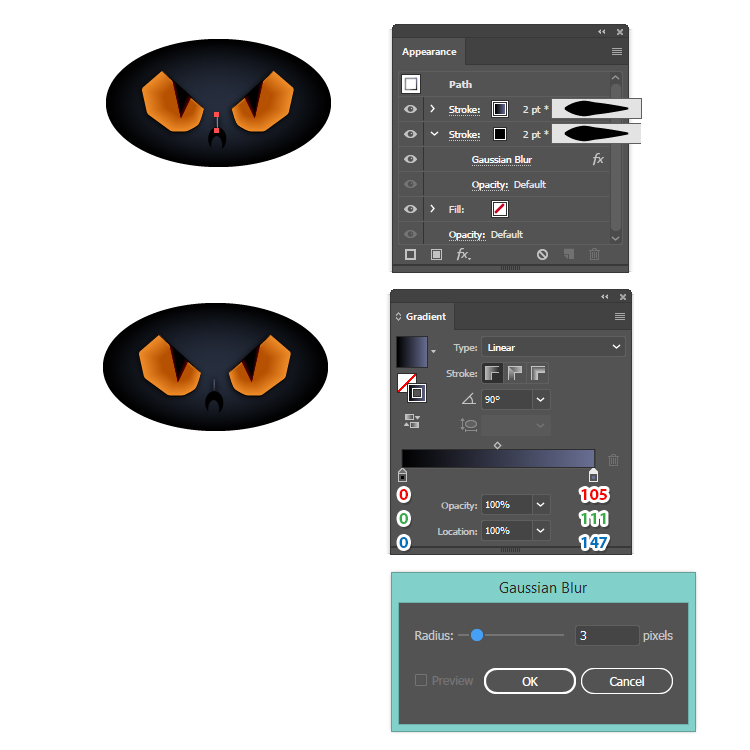
8. Next we draw the nose. Draw a straight path above the mouth and apply a 2 pt Stroke using the Width Profile 5 and the linear gradient shown at a 90 degrees Angle.
Go to the Appearance panel and add a New Stroke under the first one. Use black as the color and the Width Profile 5 again; then go to Effect > Blur > Gaussian Blur and apply a Radius of 3 px. This will create a shadow around the nose.
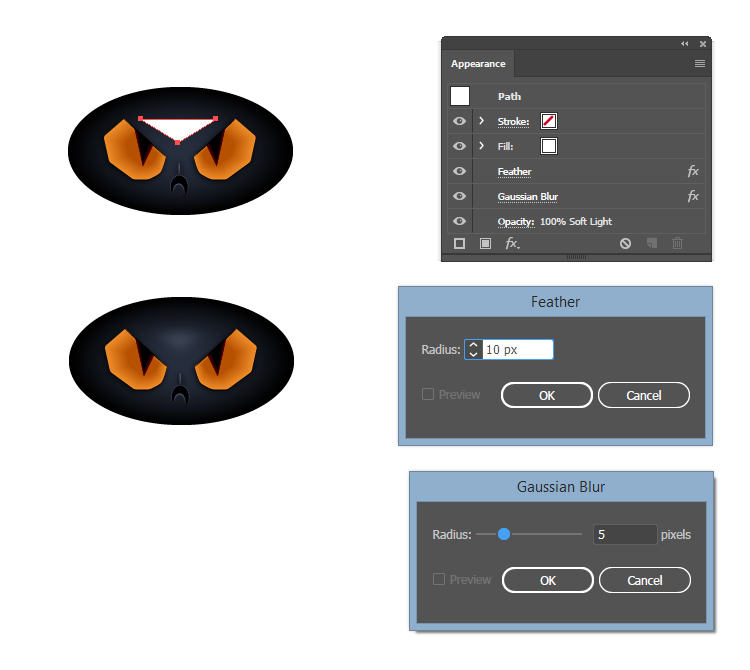
9. To add a highlight on the face, draw a triangle shape with the Pen Tool (P). Color it with white; then apply the Feather and the Gaussian Blur effects using the settings shown. Change the Blending Mode to Soft Light.
Draw the Ears of the Black Cat
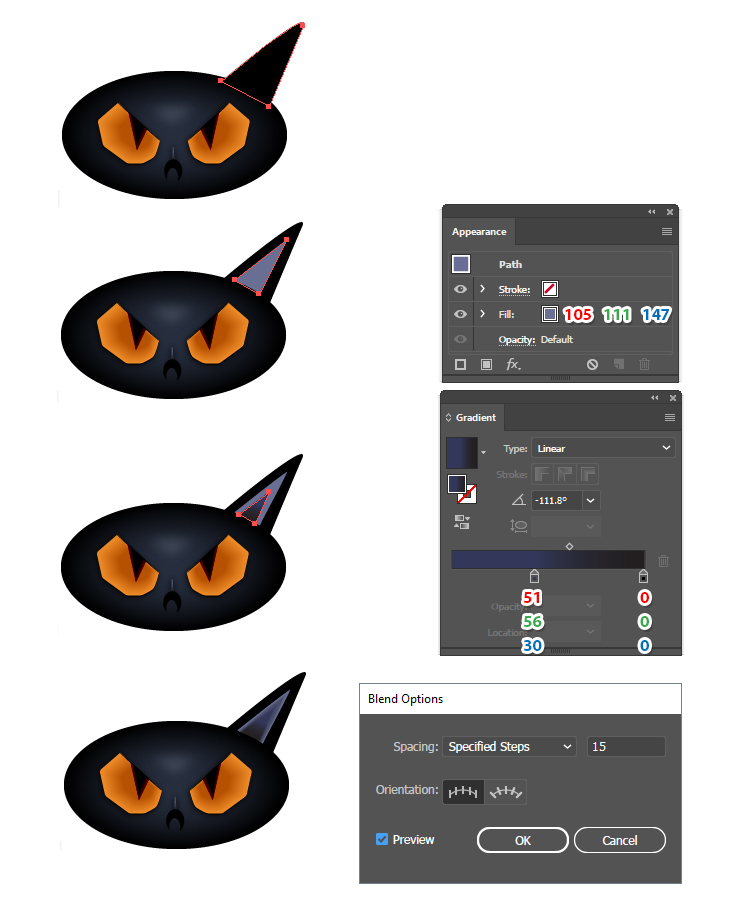
10. Use the Pen Tool (P) to draw a triangle shape as the right ear and color it with black. Draw another smaller triangle in the center filled with blue followed by a third triangle even smaller at the base of the ear filled with the linear gradient shown. Adjust the angle of the gradient so the black is the base of the triangle and the blue is at the tip.
Now, select only the second and the third triangles and go to Object > Blend > Blend Options. Choose 15 Specified Steps and then go back to Object > Blend > Make (Alt-Control-B).
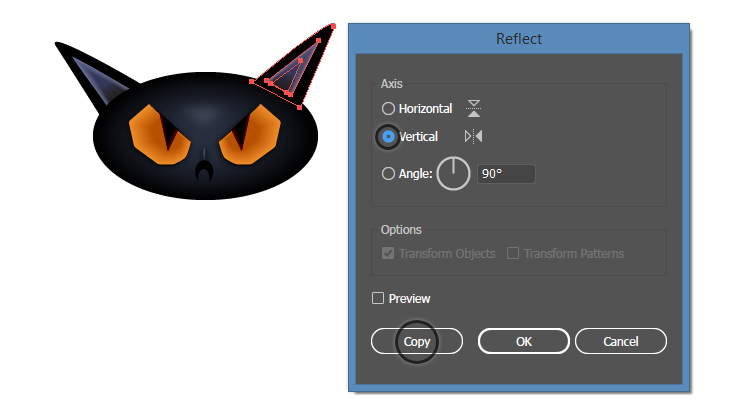
11. Now the right ear is ready and you can Group (Control-G) all the shapes. Go to Object > Transform > Reflect, check Vertical and hit Copy. You will obtain the left ear and you need to move it into place.
Draw the Body and Legs of the Black Cat
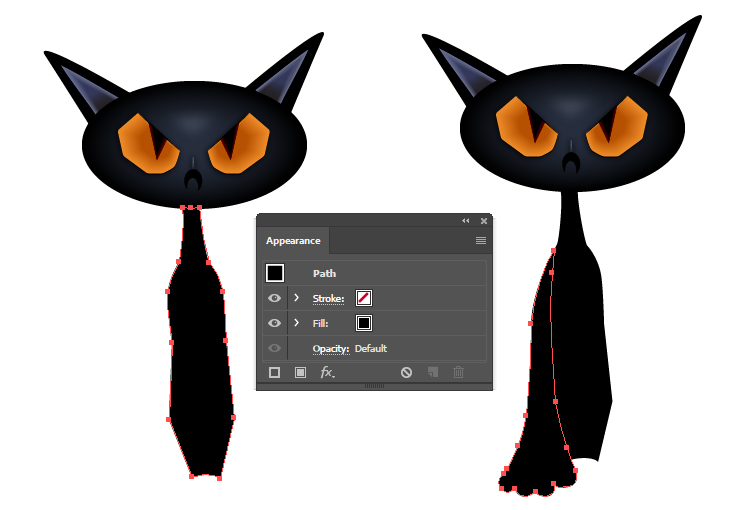
12. Use the Pen Tool (P) to draw the shape of the body like in the next image. Continue with the shape of the left leg and paw together and color them with black.
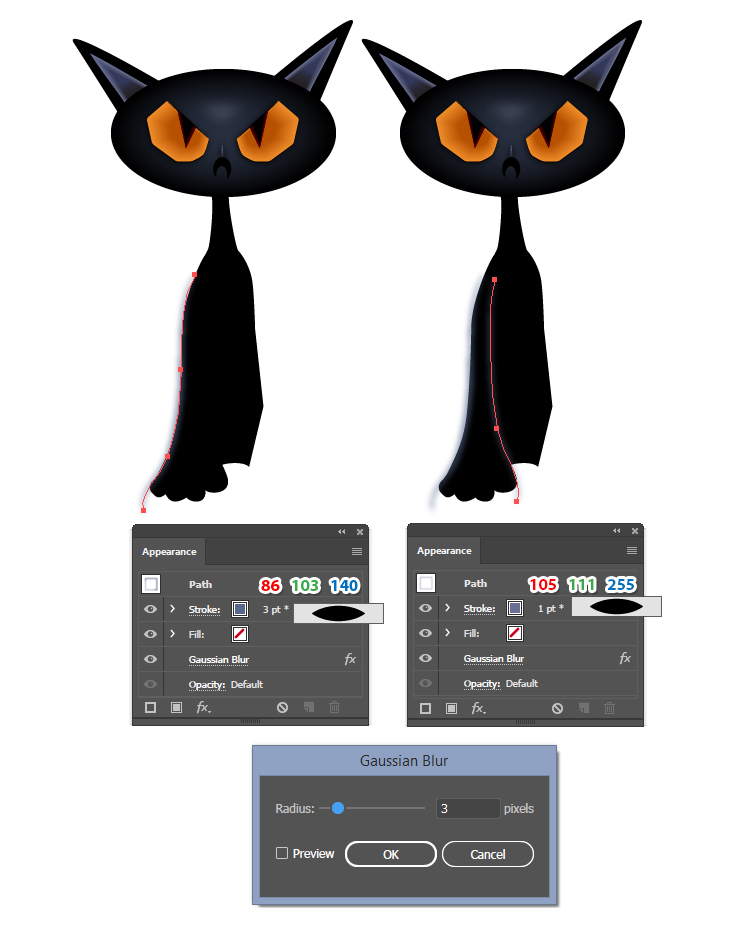
13. At this step we add highlights on the leg to make it stand out. Take the Pen Tool (P) and draw a path following the left edge of the leg. Select a 3 pt Stroke and the Width Profile 1 in the Stroke panel. Next, apply a 3 px Gaussian Blur.
Now, draw a path following the right edge of the leg. Select a 1 pt Stroke and the Width Profile 1 in the Stroke panel. Apply a 3 px Gaussian Blur.
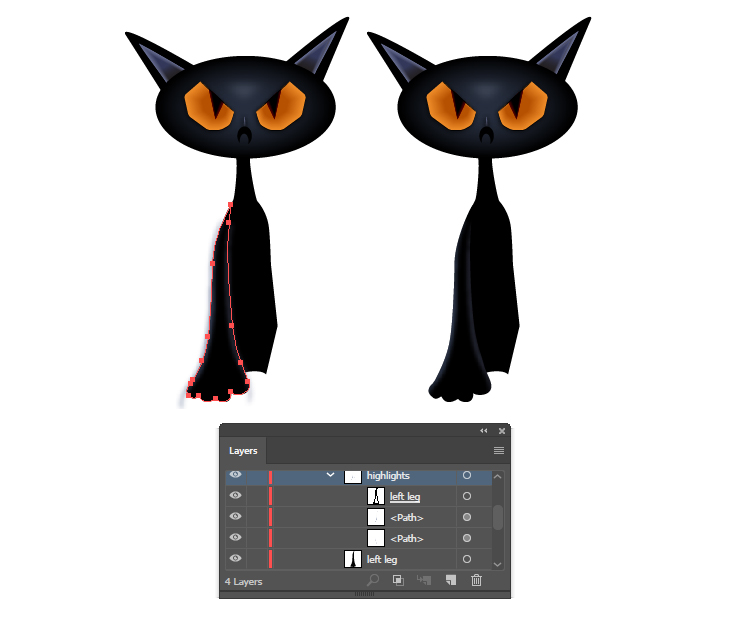
14. Select the shape of the leg and then Copy and Paste in Place (Shift-Control-V). Set the copy to stroke-none and fill-none. Now, select the two highlight paths along with the copy of the leg and go to Object > Clipping Mask > Make (Control-7).
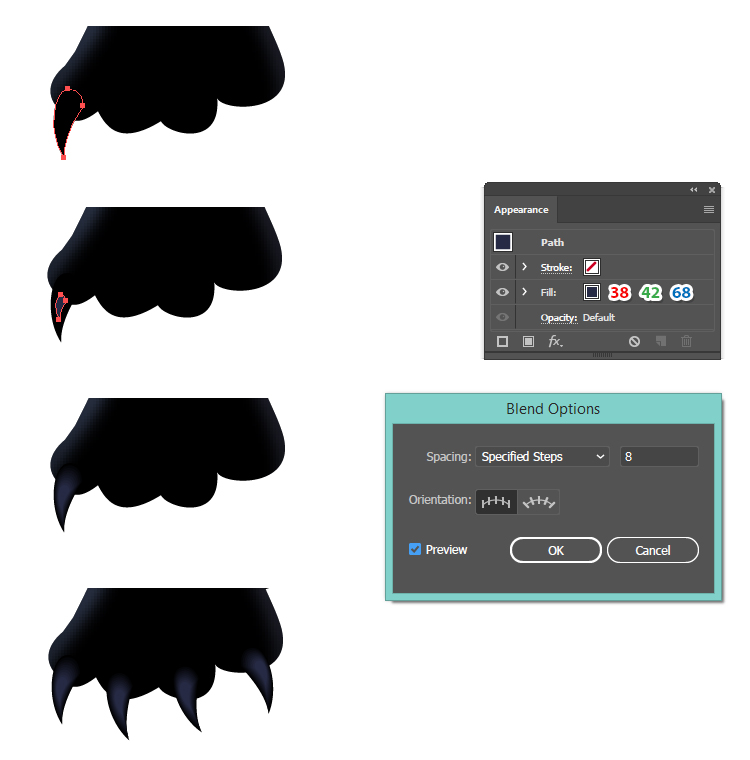
15. At this step we draw the claws of the black cat. Take the Pen Tool (P) and draw the shape of the claw like in the next image. Color it with black. Draw a similar but smaller claw shape in the center and color it with dark blue.
Now, select both shapes and blend them using 8 Specified Steps. The first claw is ready and you can make copies for the other fingers.
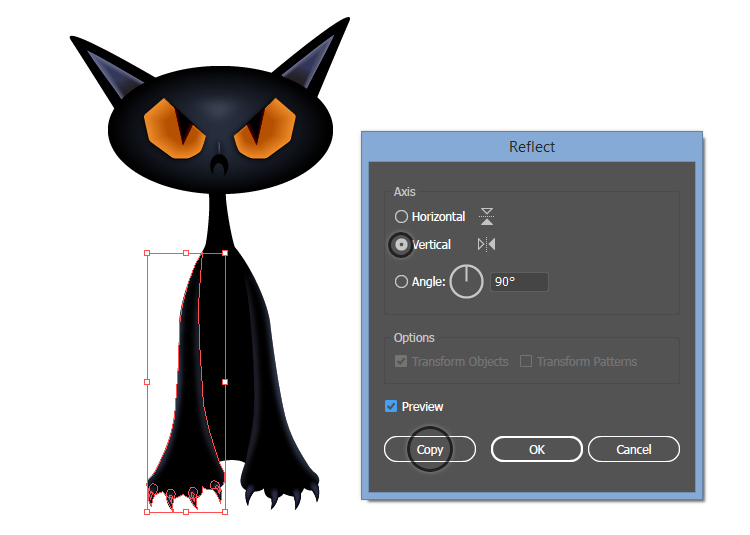
16. The left leg and paw is ready and you can Group (Control-G) all the shapes. Go to Object > Transform > Reflect, check Vertical and hit Copy. You will obtain the right leg and you can move it into place.
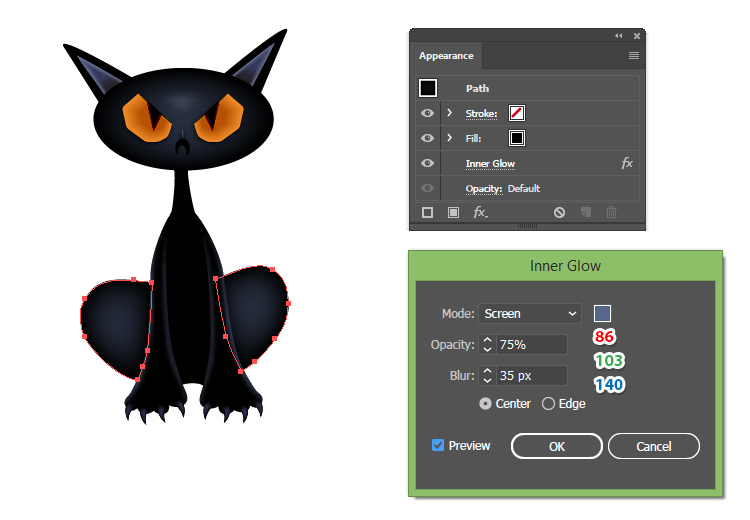
17. Now we draw the shape of the back legs using the Pen Tool (P). Color them with black; then go to Effect > Stylize > Inner Glow and apply the settings shown to add some dimension.
Draw the Tail of the Black Cat
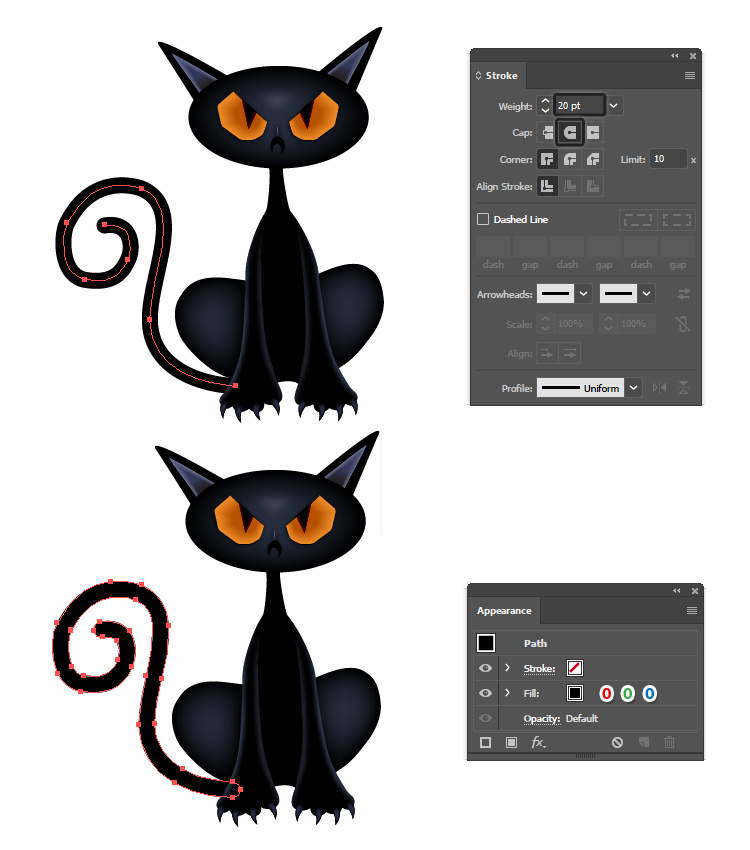
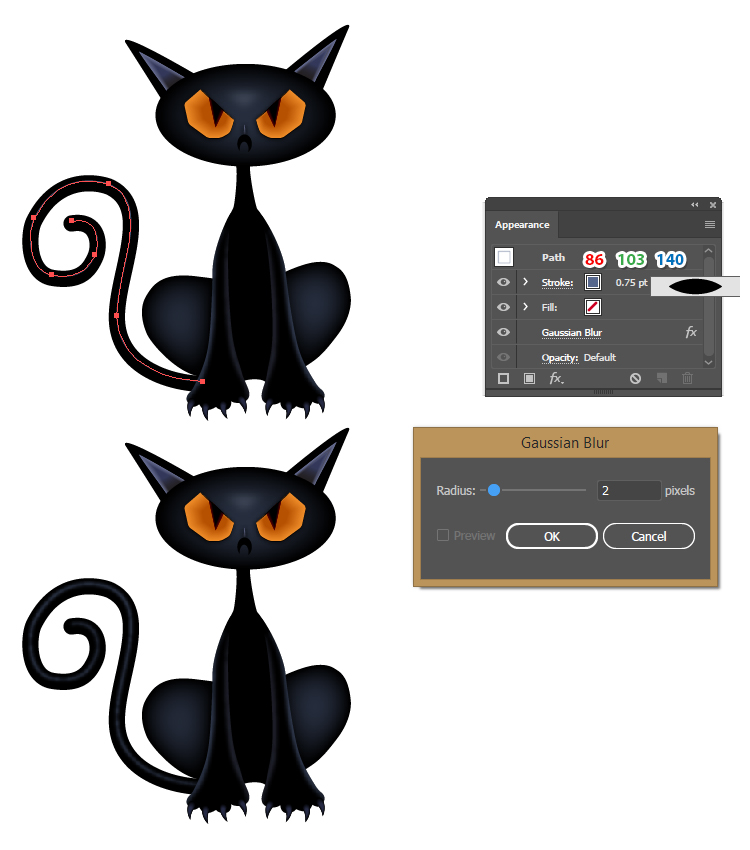
18. At this step we draw the shape of the tail using the Pen Tool (P). Select a 20 pt black Stroke and the Round Cap option in the Stroke panel to obtain the rounded end.
Choose Expand and Ungroup (Shift-Control-G) from the Object menu to turn the stroke into a fill. Color the tail shape with black.
19. Use the Pen Tool (P) to draw a new path through the middle of the tail. Select a 0.75 pt blue Stroke and the Width Profile 1 in the Stroke panel. Apply a 2 px Gaussian Blur and you will get a highlight on the tail.
Draw the Leg Bones of the Black Cat
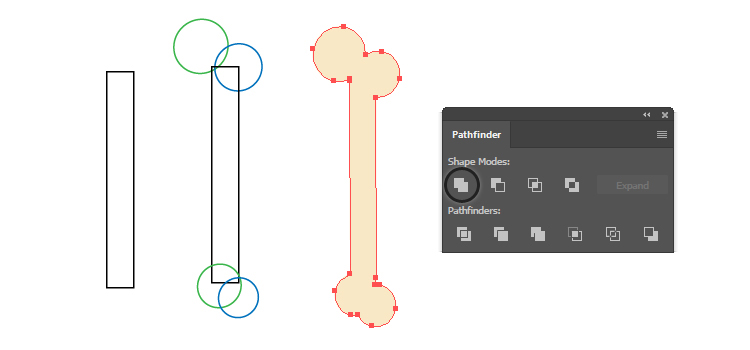
20. Use the Rectangle Tool (M) and the Ellipse Tool (L) to draw a rectangle and two circles at each end. Arrange them like in the image below to create the shape of a bone.
Select all the shapes and press Unite in the Pathfinder panel to merge them into a single shape.
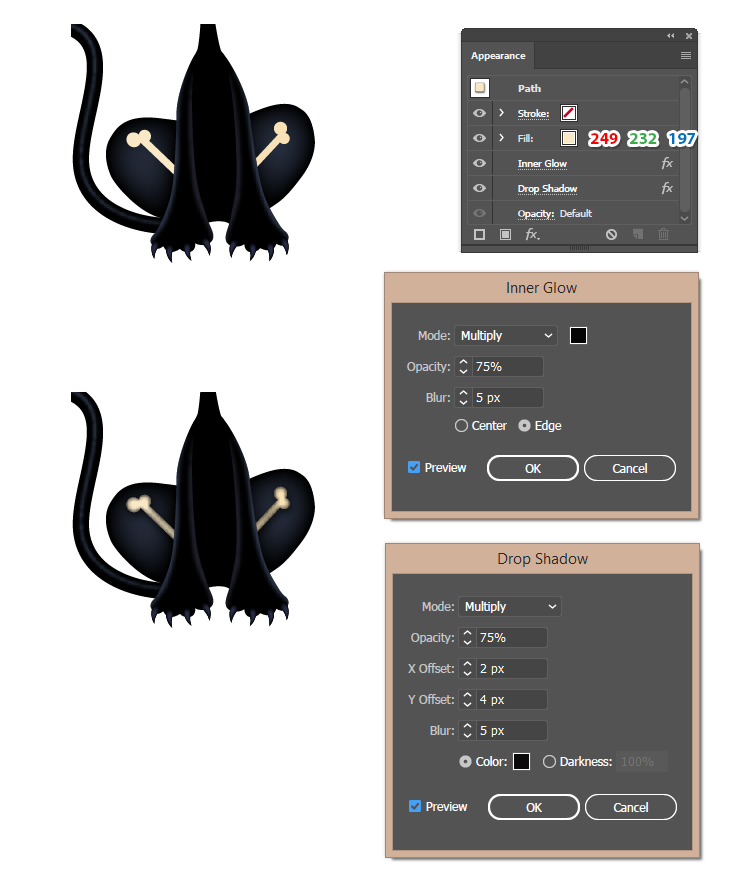
21. Now, arrange two bones like in the image below. In the Layers panel they should be in front of the back legs but under the front legs. Color them with light beige and then apply the Inner Glow and Drop Shadow effects using the settings shown.
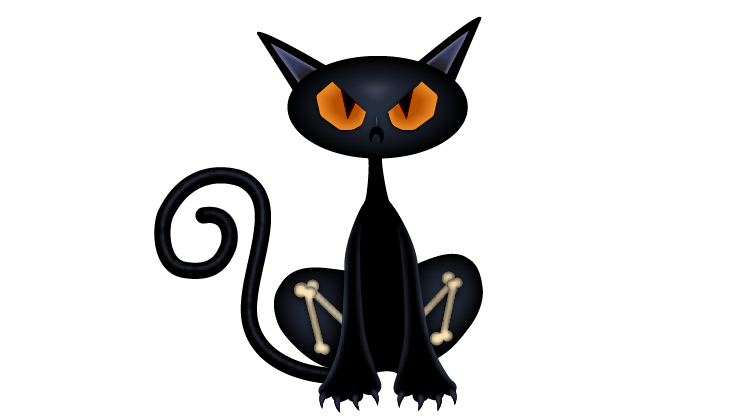
22. Use the same technique to add other two bones on the back legs.
Draw the Tail Bones and Spine of the Black Cat
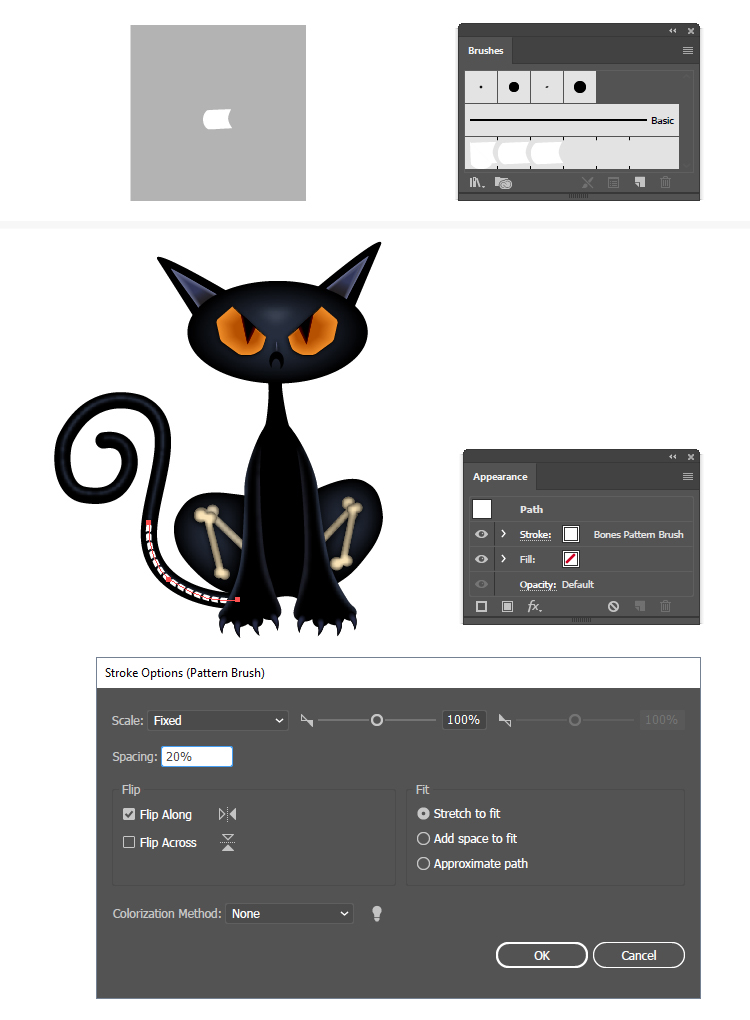
23. Use the Pen Tool (P) to draw a shape like in the next image. This shape is very small and fits into a 10 x 7 px rectangle. Color it with white and then drag it into the Brushes panel to save it as a New Pattern Brush. In the Pattern Brush Options window just type a name like “Bones Pattern Brush” and leave the rest of the settings as they are.
Now, take the Pen Tool (P) and draw a path on the tail. Stroke it with the newly saved Bones Pattern Brush and then open the Stroke Options window from the Appearance panel. Type 20% in the Spacing field and you can also reduce the Scale value if needed. Hit OK.
24. Select the stroked path from the previous step and choose Expand Appearance from the Object menu followed by Ungroup (Shift-Control-G) twice to get the individual pieces.
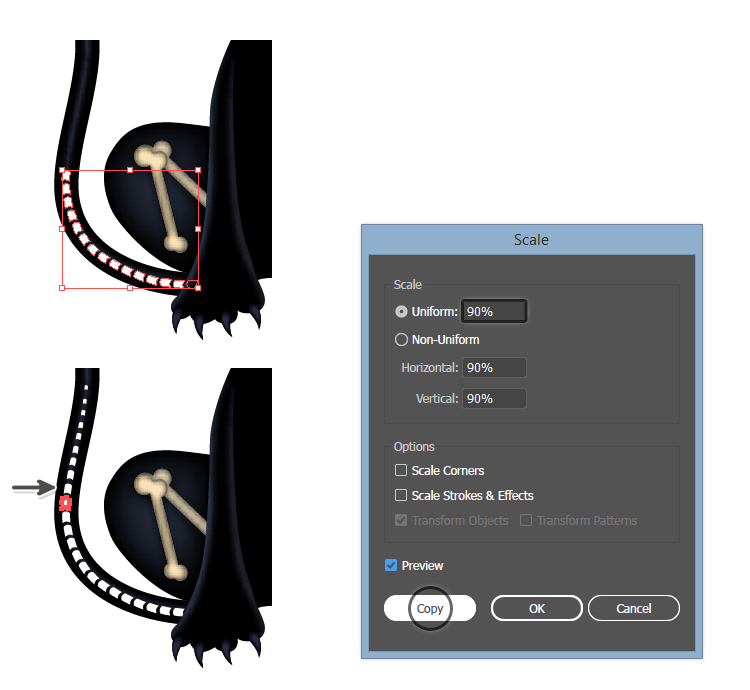
Now, select only the last piece of bone and go to Object > Transform > Scale. Type 90% in the Scale Uniform field and hit Copy. You will get a slightly smaller bone shape at the top end. Now, select this smaller piece of bone and scale it 90% again to get a new piece even smaller. Continue to do this a few more times and align the smaller bones obtained with the tail.
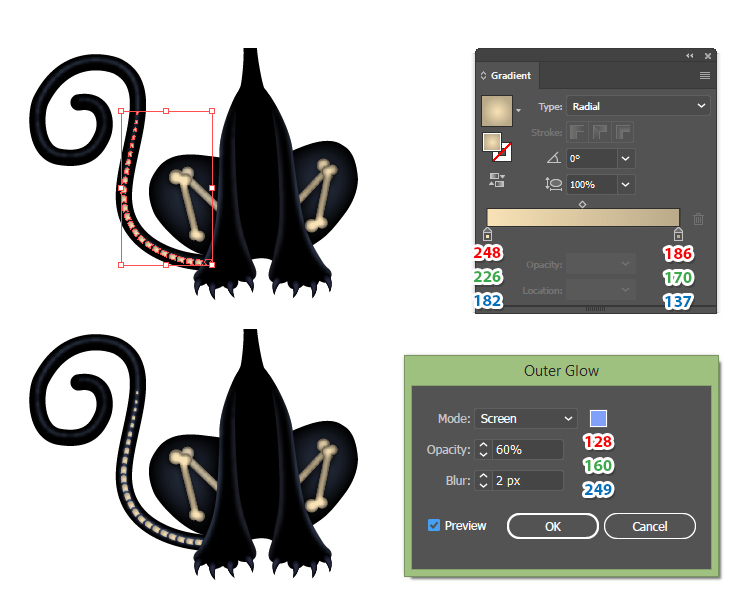
25. Select all the tail bones and fill them with the radial gradient shown. Group (Control-G) them and then go to Effect > Stylize > Outer Glow and apply the settings shown to obtain a blue glow around the bones.
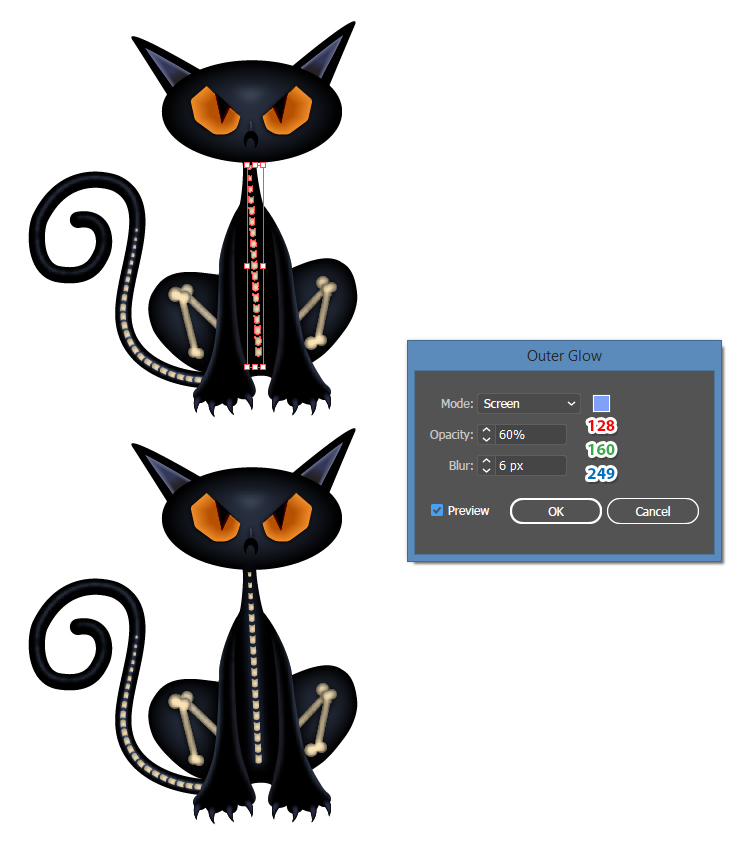
26. Follow the technique explained above to create the spine in the same way. After you are done, apply the Outer Glow effect to the entire group of bones to obtain the blue glow.
Draw the Chest and Ribs of the Black Cat
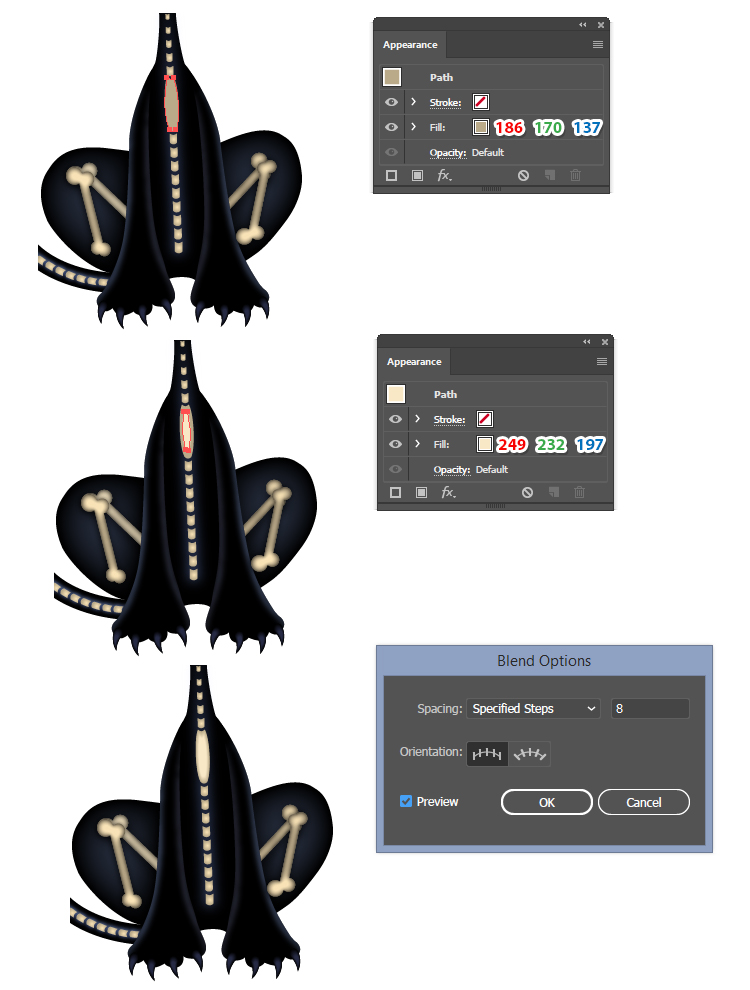
27. For the chest bone, draw a shape over the spine like in the next image followed by a similar but smaller shape in the center. Use the colors indicated and then Blend then using 8 Specified Steps.
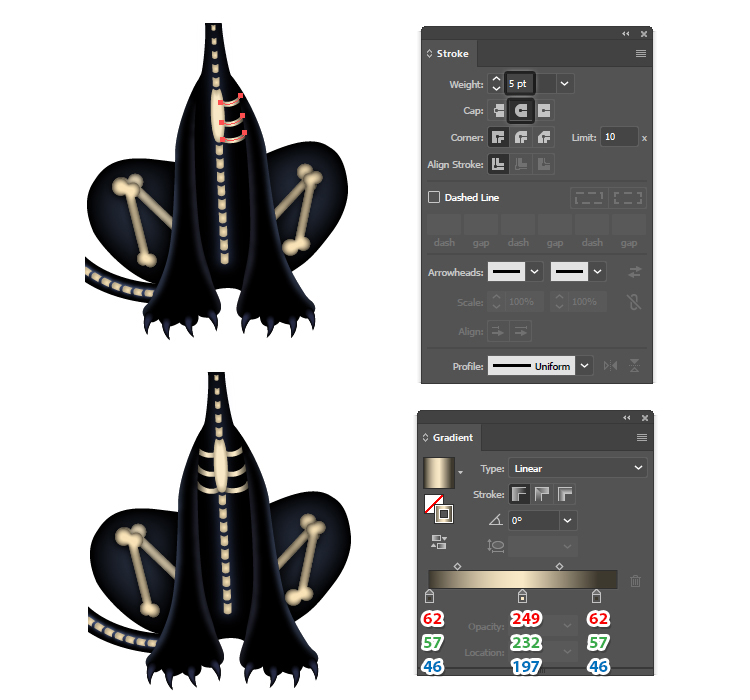
28. Draw three curved paths in the right side of the chest with the Pen Tool (P). Select a 5 pt Stroke and press the Round Cap option in the Stroke panel to obtain the rounded ends. Color them with the linear gradient shown and Group (Control-G) them.
Reflect vertically these three ribs and you will get the ones in the left side. Send the group of ribs under the chest and under the front legs in the Layers panel.
Draw the Hip Bone of the Black Cat
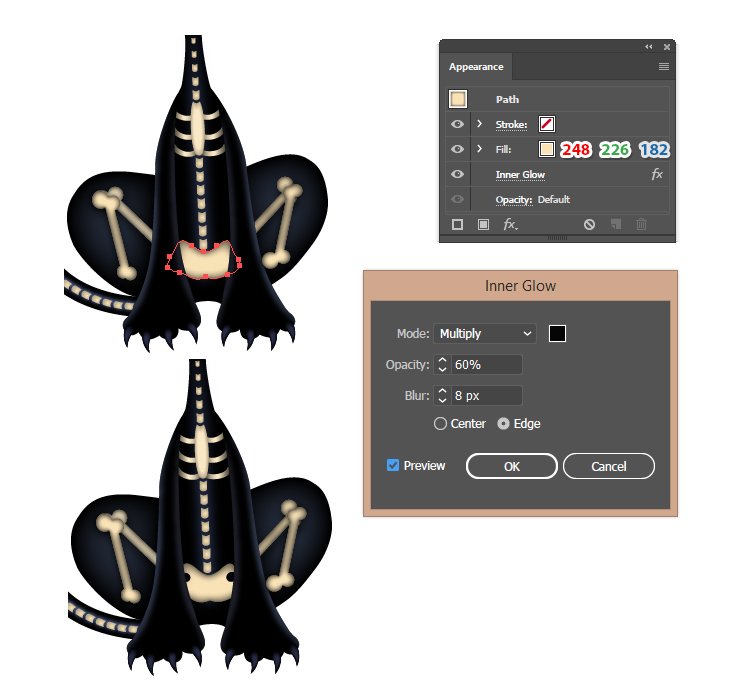
29. Use the Pen Tool (P) to draw the shape of the hipbone like in the image below and send it behind the front legs. Color it with beige and apply the Inner Glow effect. Next, draw two small black circles as the holes.
Draw the Whiskers and Hair of the Black Cat
30. Draw three curved paths as the whiskers and select a 5 pt, 6 pt and 7 pt black Stroke and the Width Profile 4 in the Stroke panel. Do the same thing in the left side.
Draw other three paths at the tip of each ear. Select a 3 pt black Stroke and the Width Profile 4 in the Stroke panel.
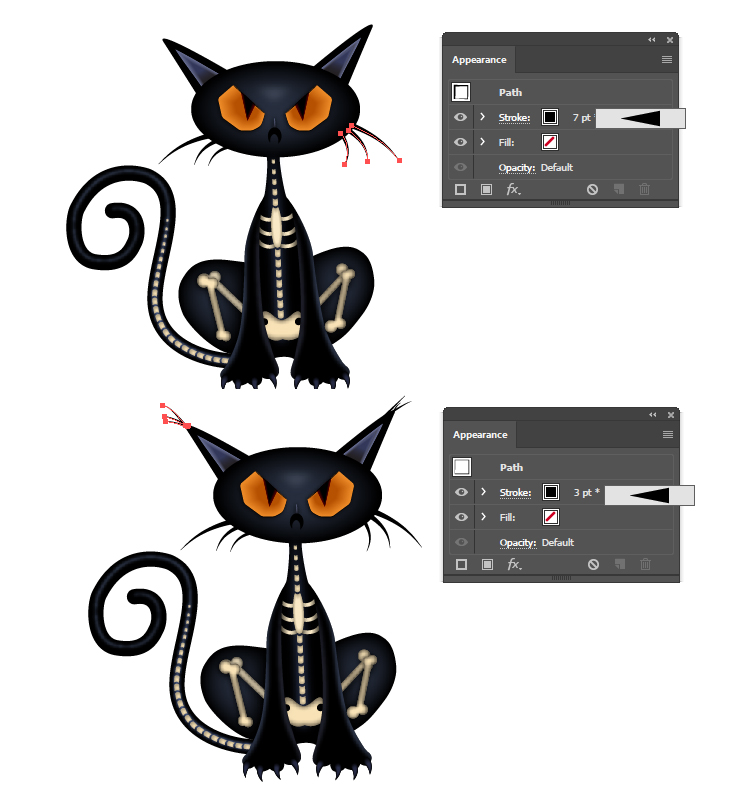
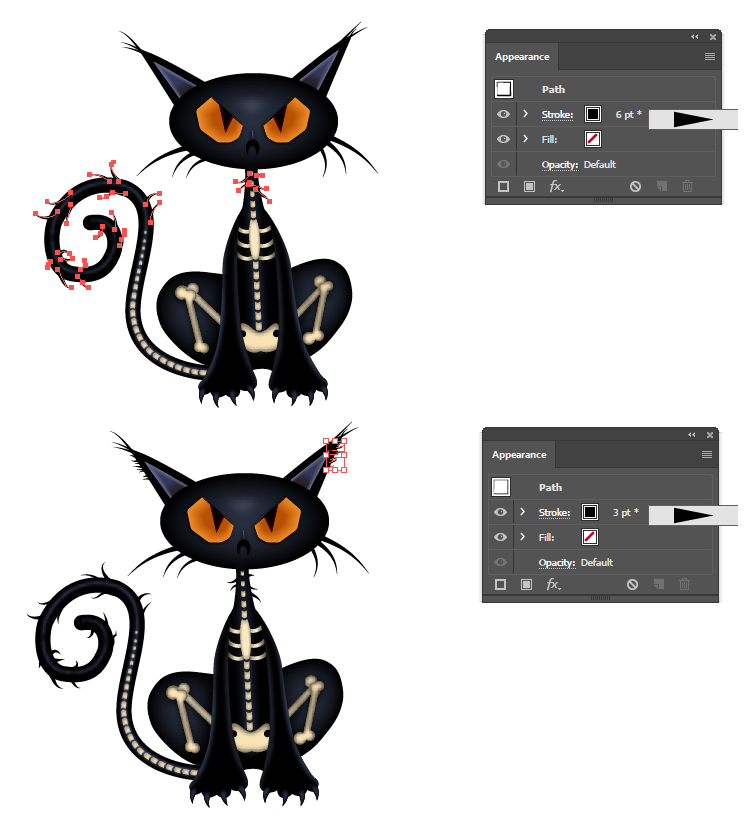
31. Use the Pen Tool (P) or the Pencil Tool (N) to draw a bunch of short paths on the edge of the tail and neck. Select a 4 pt, 6 pt and 8 pt black Stroke and the Width Profile 4 to obtain a few pieces of hair.
The same thing goes for the ears. Use the Pencil Tool (N) to draw a bunch of short paths and then select a 3 pt black Stroke and the Width Profile 4 in the Stroke panel. Send all pieces of hair in back.
You are Done!
Here is the final image of the Spooky Black Cat character. I hope you’ve enjoyed this tutorial and can apply these techniques in your future projects.
