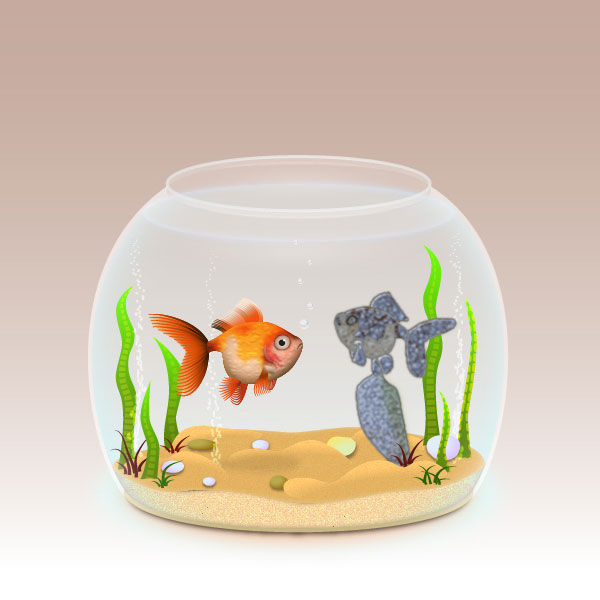
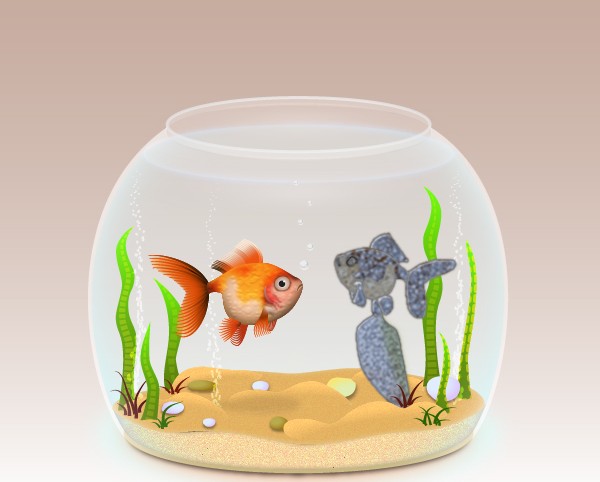
In the following Illustrator tutorial you will learn how to create a realistic fishbowl illustration. For starters you will learn how to create the main shapes using basic tools and vector shape building techniques. Next you will learn how to create fishbowl decorations such as sand, aquatic plants and aquarium rocks. Moving on, you will learn how to create an aquarium fish using some simple shapes and basic effects. Finally you’ll learn how to create a nice background.
Create a New Document
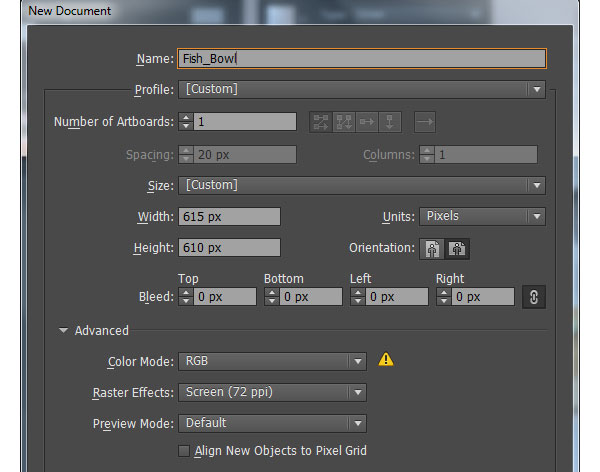
1. Launch Illustrator and then press (Ctrl + N) to create a New document. Select Pixels from the Units drop-down menu, enter 615 in the width box and 610 in the height box then click on the Advanced button. Select RGB, Screen (72ppi) and make sure that the Align New Objects to Pixel Grid box is unchecked before you click OK.
Create the Fishbowl
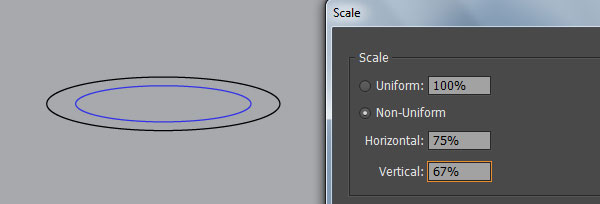
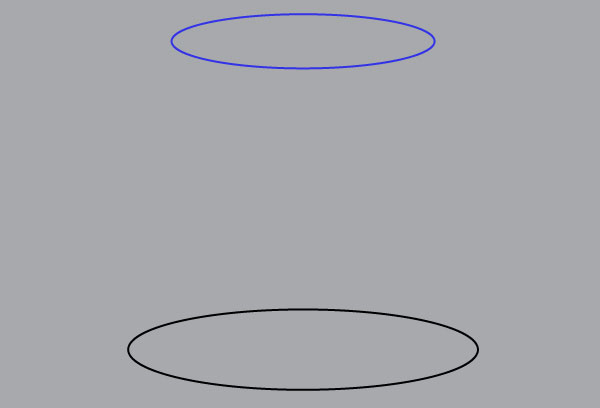
2. Pick the Ellipse Tool (L) and create a 350 by 80px black ellipse. Keep the black ellipse selected and go to the Object > Transform > Scale… In the Scale dialog box, check the Non-Uniform. Enter a 75 in the Horizontal box and 67 in the Vertical box, then click Copy. Replace the existing stroke color of the newly created ellipse with blue and then move it 308px up.

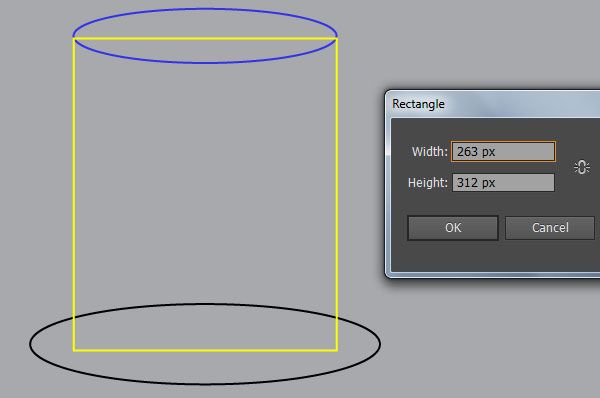
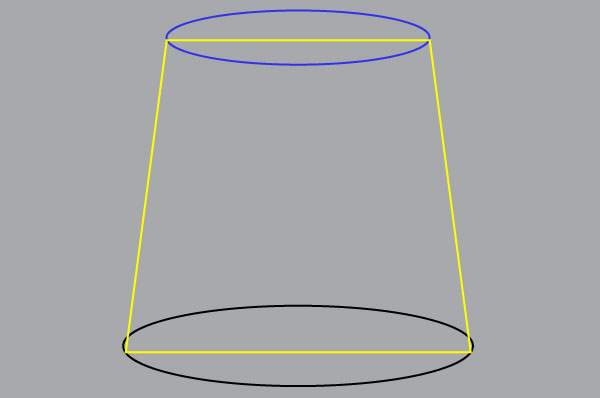
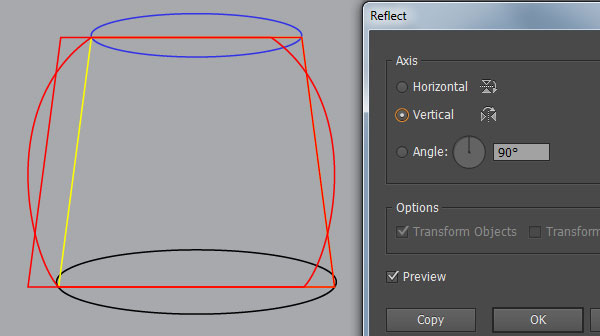
3. Make a yellow rectangle of 263 by 312px size using the Rectangle Tool (M), then place it to the correct position as shown below. With the Direct Selection Tool (A), select the bottom-left anchor point of the yellow rectangle and move it 41px to the left. Next select the bottom-right anchor point and move it 41px to the right. Reselect the yellow object and make a copy (Ctrl +C, Ctrl +F) of it, then replace the existing stroke color of the copy with red. Now pick the Convert Anchor Point Tool (Shift +C), click on the top-left anchor point of the red object, hold mouse and drag it to the left while holding Shift. Next select the left handle of the top-left anchor point and drag it down. Keep working with the Convert Anchor Point Tool, click on the bottom-left anchor point of the red object, hold mouse and drag it to the right while holding Shift. Next select the left handle of the bottom-left anchor point and drag it up. At this point your red object should looks like in the last image.
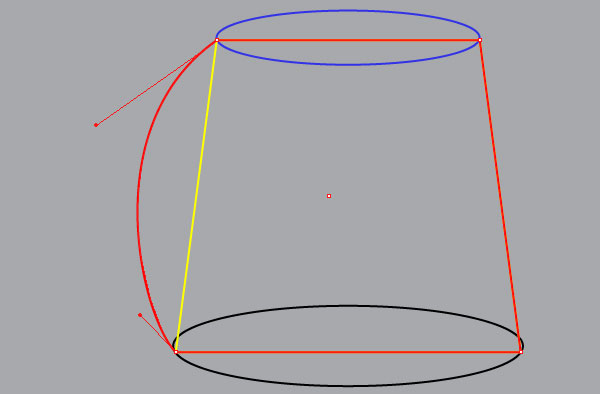
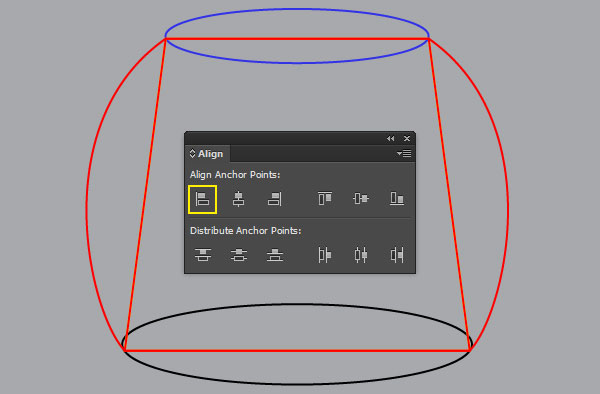
4. After you are done adjusting the shape of the red object, reselect it and double-click on the Reflect Tool icon from the Tool bar. In the Reflect dialog box, check the Vertical and click Copy. Make sure that the copy is still selected, hold down the Shift, click on the yellow object created in the step 3, then release the Shift and click on the yellow object again (to fixed its position). Open the Align palette (Window > Align) and click on the Horizontal Align Left button. Reselect the two red objects, then open the Pathfinder palette (Window > Pathfinder) and click on the Unite button. Finally select and remove the yellow object.
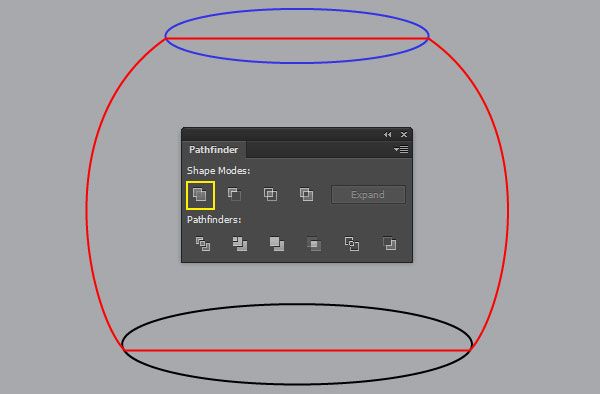
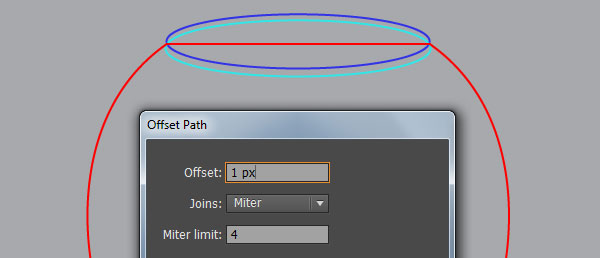
5. Select the blue ellipse created in the step 2 and go to the Object > Path > Offset Path… Enter a 1px Offset and click OK. Replace the existing stroke color of the newly created ellipse with turquoise and move it 7px down. Reselect the turquoise and the black ellipses, then make two copies (Ctrl +C, Ctrl +F, Ctrl +F) of them. Now select the red object created in the step 4 and make a copy of it. Keep the copy selected, hold down the Shift and click on a copy of the turquoise ellipse. Open the Pathfinder palette (Window > Pathfinder) and click on the Unite button. Still having the resulting object selected, hold down the Shift and click on a copy of the black ellipse. Next click on the Minus Back button from the Pathfinder palette and send the resulting object to back (Ctrl +Shift +Left Square Bracket).
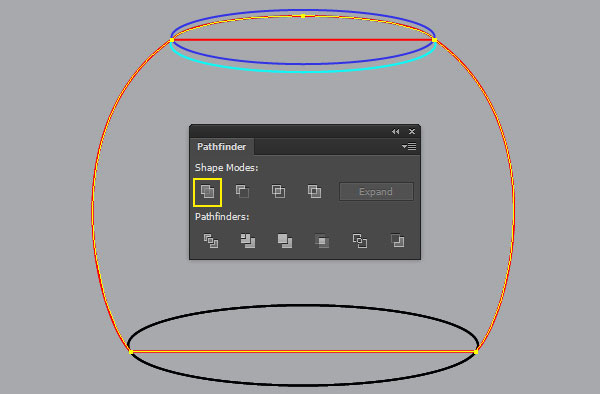
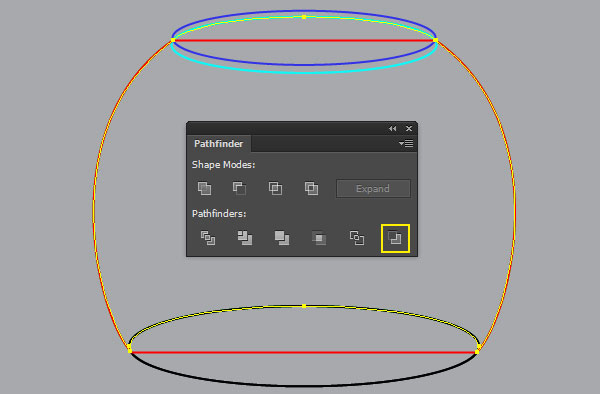
6. Select the red original object and the remaining copy of the turquoise ellipse, then click on the Minus Back button from the Pathfinder palette. Keep the resulting object selected, hold down the Shift and click on the remaining copy of the black ellipse, then click on the Unite button. Having the resulting object selected and bring it to front (Ctrl +Shift +Right Square Bracket).
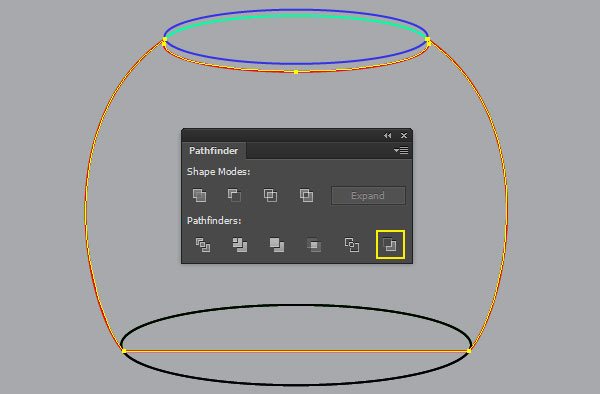
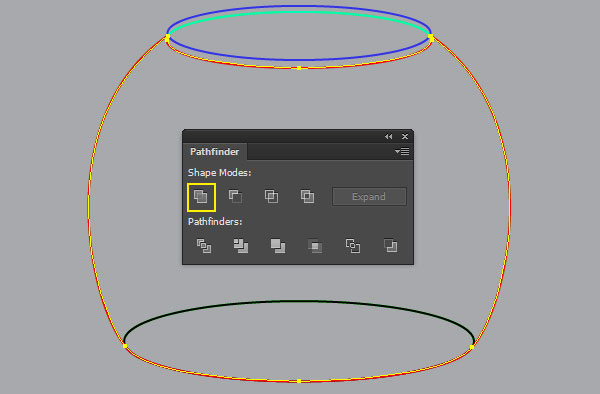
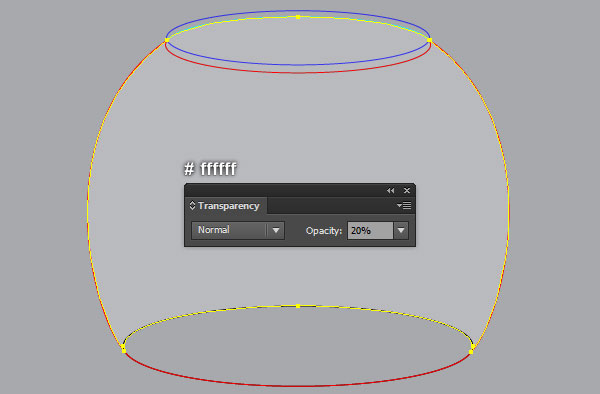
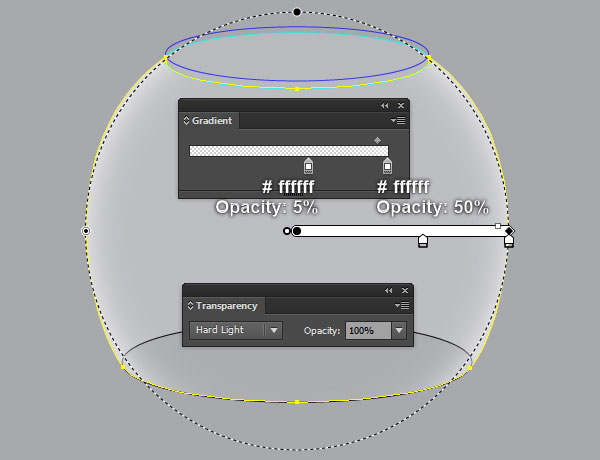
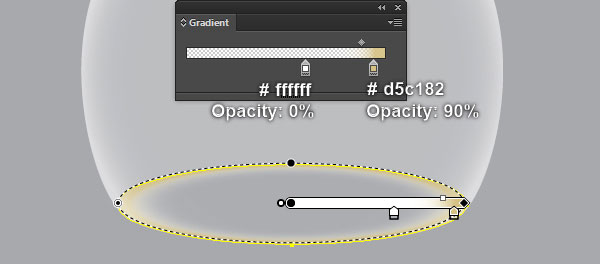
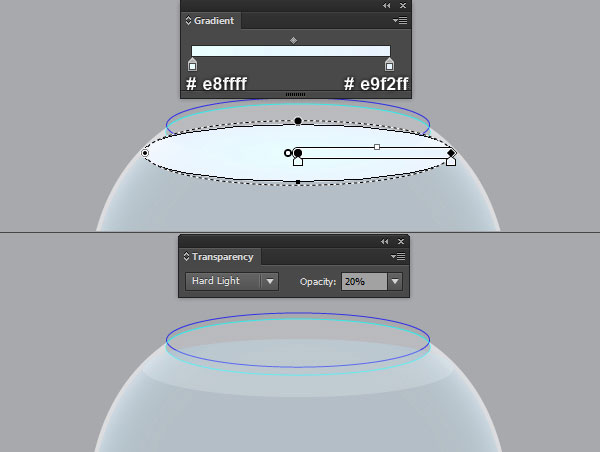
7. Select the red object created in the step 5, remove its stroke and fill this object with white (# ffffff), then reduce the Opacity of the resulting shape to 20%. Next select the red object created in the step 6, remove its stroke and fill this object with the radial gradient as shown in the second image. Keep the resulting shape selected and change the Blending Mode to Hard Light. Now select the black ellipse, remove its stroke and fill this ellipse with the radial gradient like you see in the last image. Finally send the resulting ellipse to back (Ctrl +Shift +Left Square Bracket).
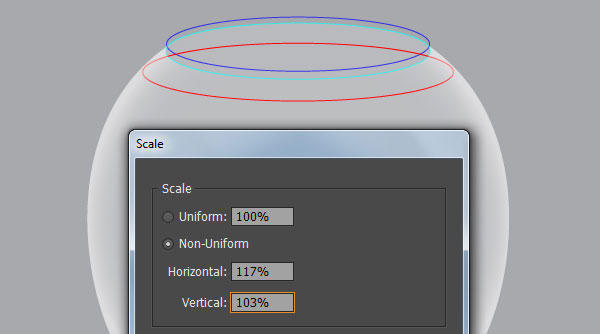
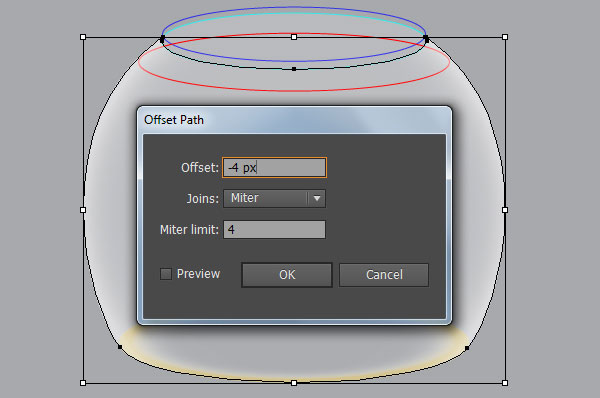
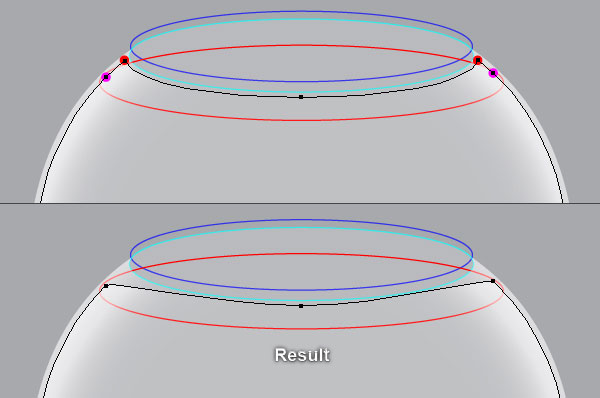
8. Select the turquoise ellipse and go to the Object > Transform > Scale… Check the Non-Uniform, enter a 117 in the Horizontal box and 103 in the Vertical box, then click Copy. Replace the existing stroke color of the newly created ellipse with red and move it 21px down. Now select the front shape created in the step 7 and go to the Object > Path > Offset Path… Enter a -4px Offset and click OK. Focus on the fourth image, pick the Add Anchor Point Tool (+) and click on the two points highlighted with magenta to add two new anchor points. Next with the help of the Direct Selection Tool (A) and the Shift, select and remove the two anchor points highlighted with red. The resulting shape should look like the last image below.
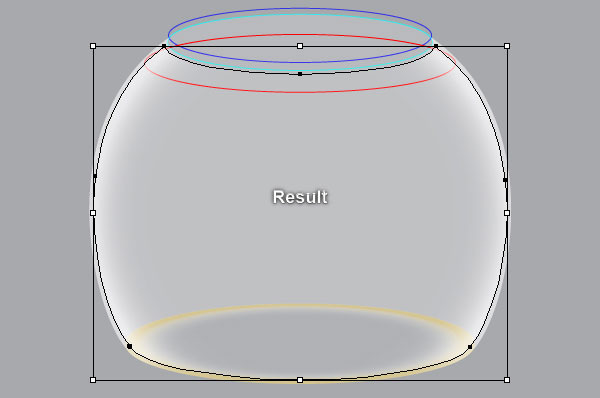
9. Select the red ellipse and make a copy (Ctrl +C, Ctrl +F) of it. Keep the copy selected, hold down the Shift and click on the shape created in the step 8. Open the Pathfinder palette (Window > Pathfinder) and click on the Unite button. Replace the existing color of the newly created shape with new radial gradient like you see in the second image. Still having the resulting shape selected, change the Blending Mode to Normal. Finally hide it behind the front shape created in the step 7.
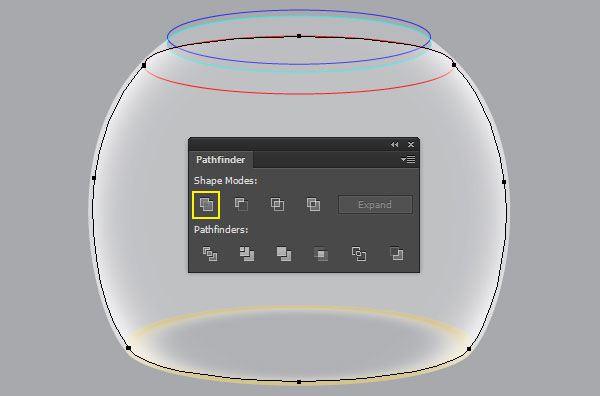
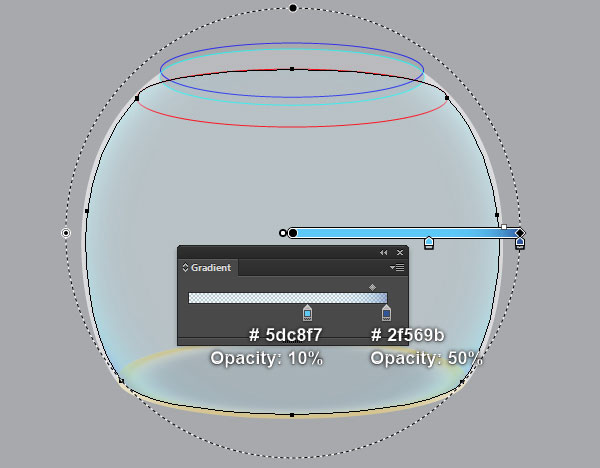
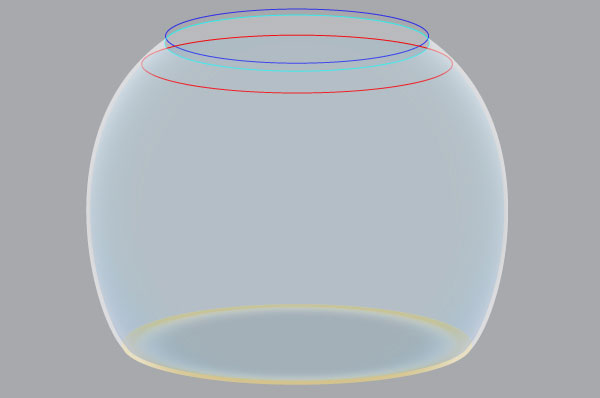
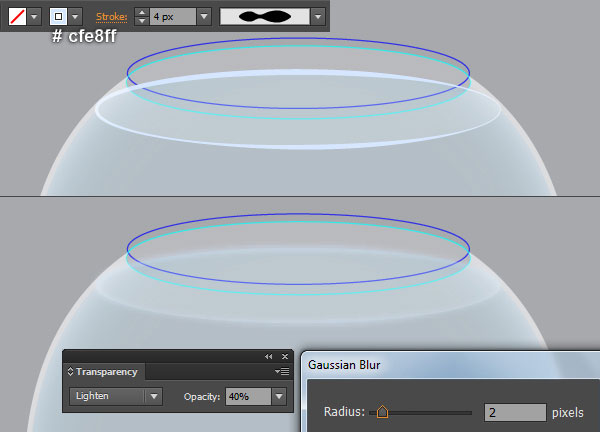
10. Select the remaining red ellipse, remove its stroke and fill this ellipse with the radial gradient as shown below. Make sure that the resulting ellipse is still selected, change the Blending Mode to Hard Light and reduce its Opacity to 20%. Make a copy (Ctrl +C, Ctrl +F) of this ellipse. Remove the fill color of the copy and add a 4px pale blue stroke (# cfe8ff) for it. Keep the newly created ellipse selected, apply the Width Profile 2 and a 2px Gaussian Blur effect for it. Still having the resulting ellipse selected, change the Blending Mode to Lighten and change the Opacity to 40%.
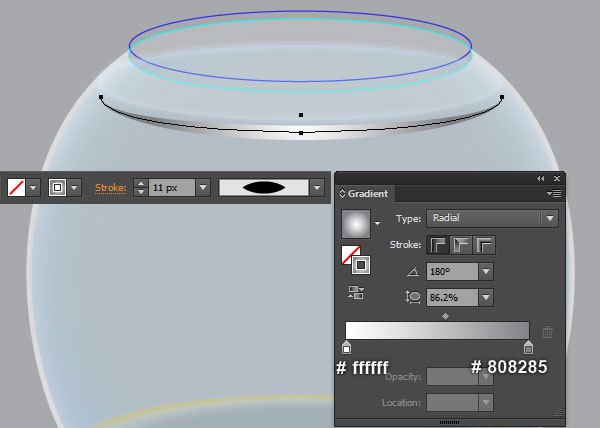
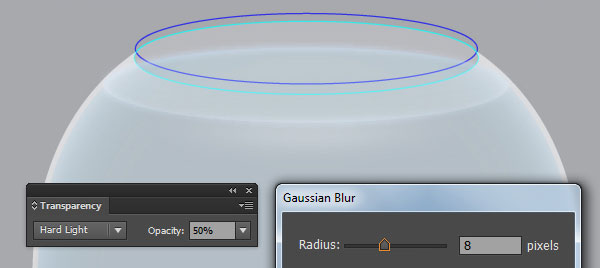
11. Draw a curved path with the Pen Tool (P) and give it a 11px stroke for the moment. Next apply the Width Profile 1 and the radial gradient within stroke for the newly created path. Keep this path selected, apply a 8px Gaussian Blur then set it to Blending Mode Hard Light and reduce the Opacity to 50%.
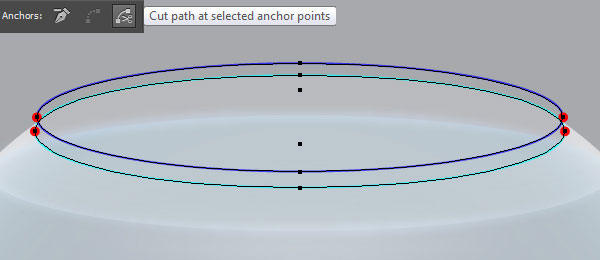
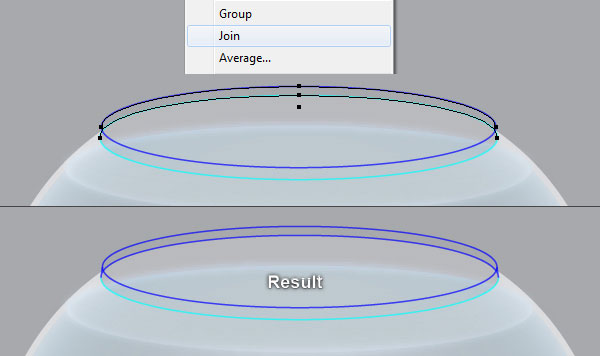
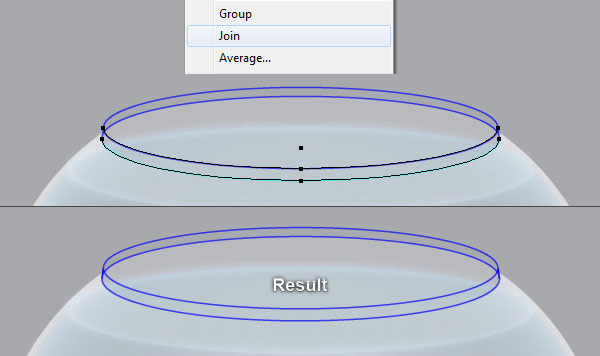
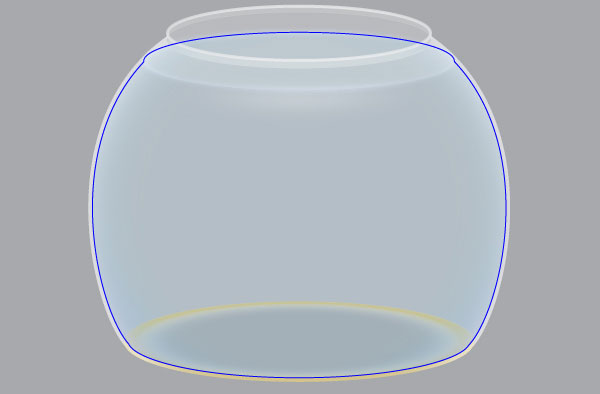
12. Select the blue and turquoise ellipses, then bring them to front (Ctrl +Shift +Right Square Bracket). Before you continue, select the blue ellipse and make a copy (Ctrl +C, Ctrl +F) of it, then press (Ctrl +3) to hide the copy. With the help of the Direct Selection Tool (A) and the Shift, select four anchor points highlighted with red and click on the “Cut path at selected anchor points” icon from the Properties bar. This make the two ellipses become four curved paths. Select the two upper paths, right click on the artboard and then select the Join section from the drop-down menu.
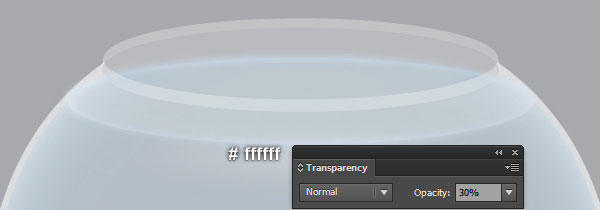
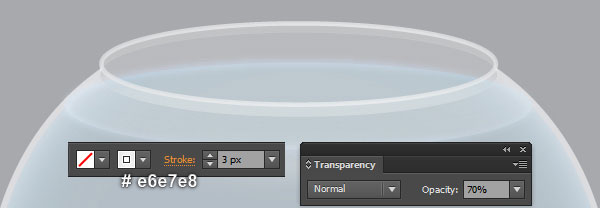
Next right click on the artboard again, then select the Join section. Likewise, repeat the same process for the two remaining curved paths. Reselect the two objects created in this step, remove their strokes and fill these objects with white (# ffffff), then reduce the Opacity of the resulting shapes to 30%. Now press (Ctrl +Alt +3) to show the blue ellipse hidden in this step, then bring it to front (Ctrl +Shift +Right Square Bracket). Next replace the existing stroke color of this ellipse with light gray (# e6e7e8) and change the stroke weight to 3px. Finally reduce the Opacity of the resulting ellipse to 70%.
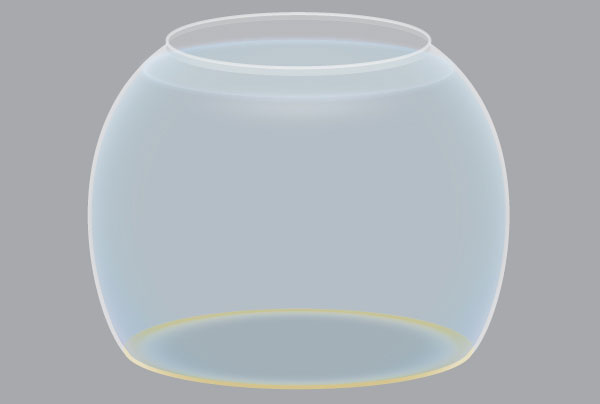
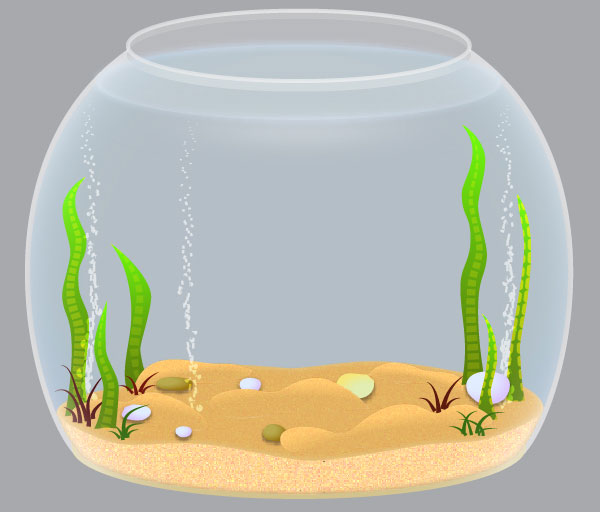
13. The fishbowl is ready and looks like this:
Add Sand to the Fishbowl
14. Select the shape created in the step 9 and make a copy (Ctrl +C, Ctrl +F) of it, then bring the copy to front (Ctrl +Shift +Right Square Bracket). Remove the fill color of the newly created object and add a blue stroke for it. With the Pen Tool (P), create a red object like you see in the second image. Focus on the third image, pick the Add Anchor Point Tool (+) and click on the two points highlighted with yellow of the blue object. Next select all anchor points above the two newly added anchor points, then remove them. At this point your blue object should looks like in the last image.
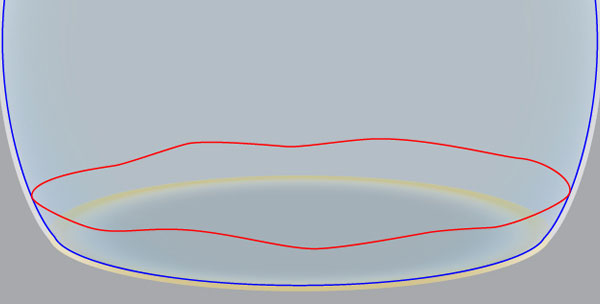
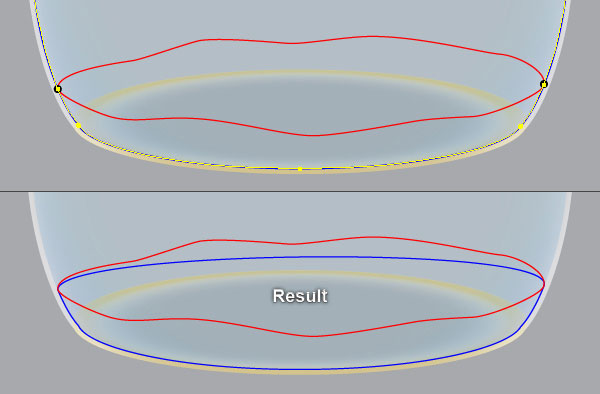
15. Select the blue object created in the step 14, remove its troke and fill this object with light brown (# d1a66e). Keep this shape selected and make a copy (Ctrl +C, Ctrl +F) of it, then replace the existing color of the copy with darker brown (# 967b54). Still having the resulting shape selected and go to the Effect > Texture > Grain… Follow the data as shown in the second image and click OK. Next apply a 5px Feather effect for the resulting shape.
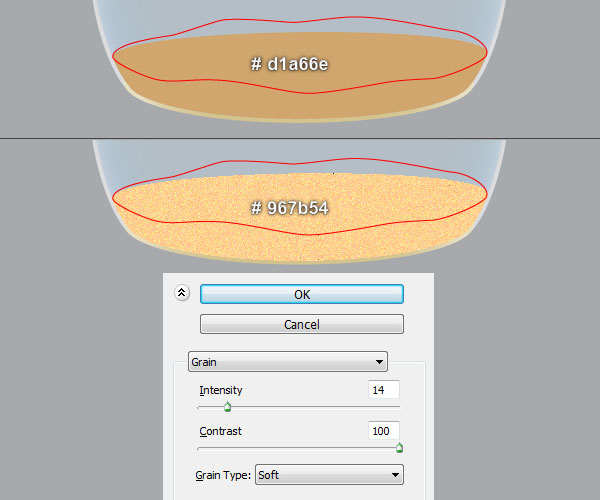
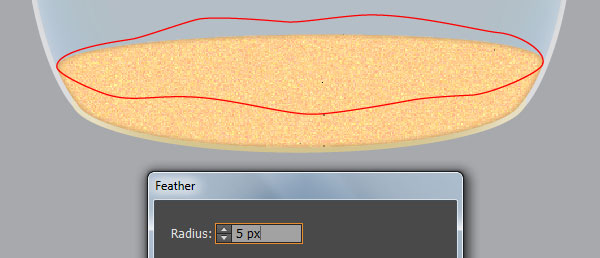
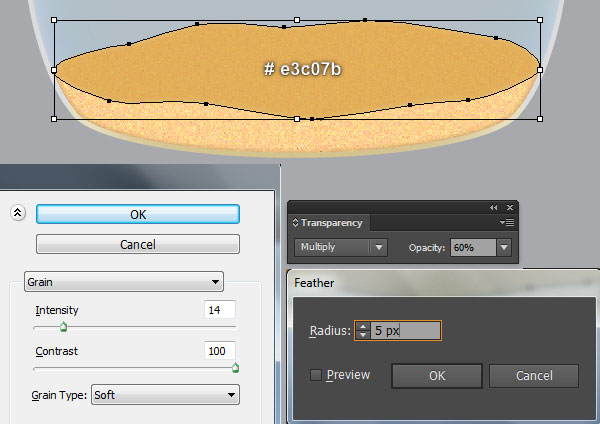
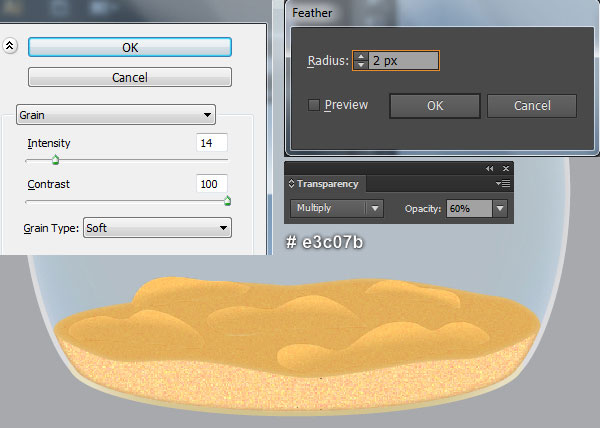
16. Select the red object, remove its troke and fill this object with soft orange (# e3c07b). Keep this shape selected and make a copy (Ctrl +C, Ctrl +F) of it, then go to the Effect > Texture > Grain… Follow the data as shown in the second image and click OK. Keep the resulting shape selected, apply a 5px Feather effect then set it to Blending Mode Multiply and reduce the Opacity to 60%.

17. Pick the Pen Tool (P) and create five objects like you see in the image below. Once your objects are drawn, remove their strokes and then fill these objects with the radial gradient.
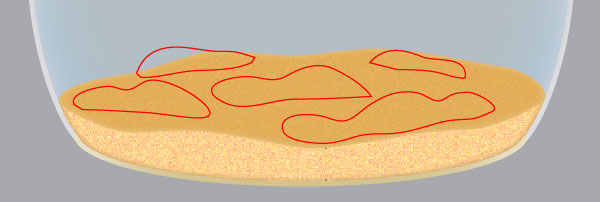
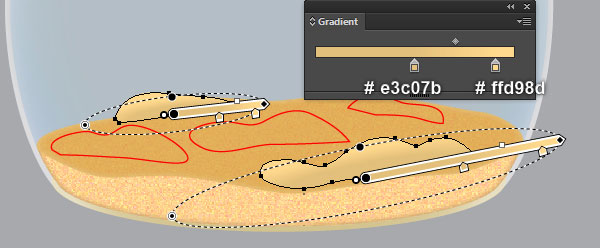

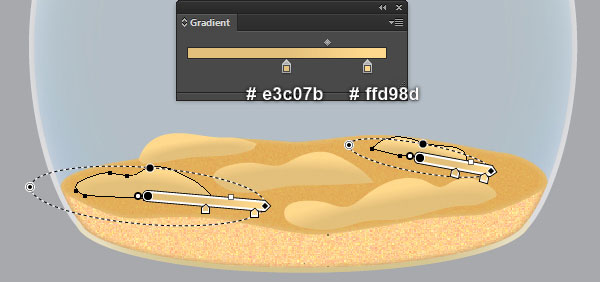
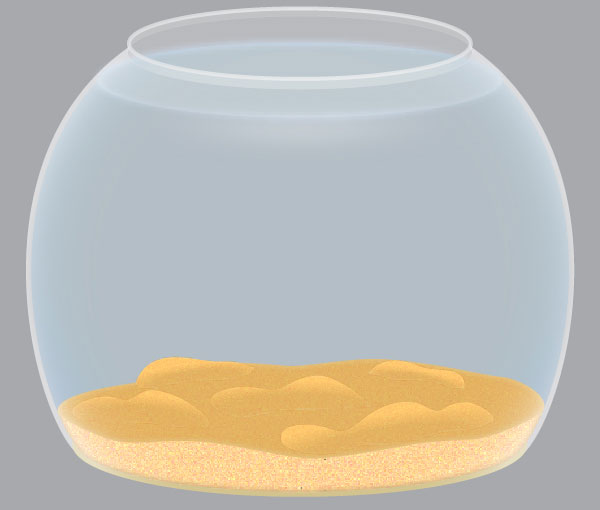
18. Select five shapes created in the step 17 and make a copy (Ctrl +C, Ctrl +F) of them, then replace the existing color of the copies with soft orange (# e3c07b). Keep the resulting shapes selected and go to the Effect > Texture > Grain… Follow the data as shown in the first image and click OK. Keep the resulting shapes selected, apply a 2px Feather effect then set them to Blending Mode Multiply and reduce the Opacity to 60%. Now select all objects created from beginning step 14 to this time and then hide them behind the front shape created in the step 7.
Create some Aquatic Plants
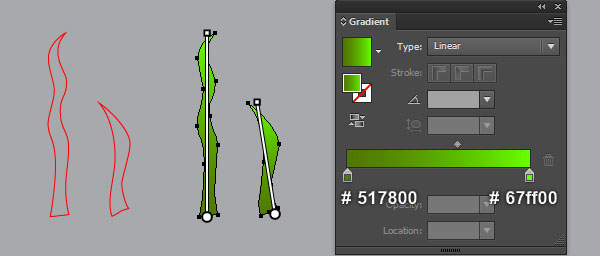
19. It’s time to draw some green plants. With the help of the Pen Tool (P) and the Gradient Tool (G), create two shapes like you see in the images below. Keep working with the Pen Tool (P), create two curved pure orange paths (# ffb700) as shown in the third image. Once your paths are drawn, reselect them, change the stroke weight to 8px and apply the Width Profile 5 for the resulting paths. Keep the two newly created paths selected, open the Stroke palette (Window > Stroke) then check the Dashed Line box. Enter 4px in the dash box and 2px in the gap box.
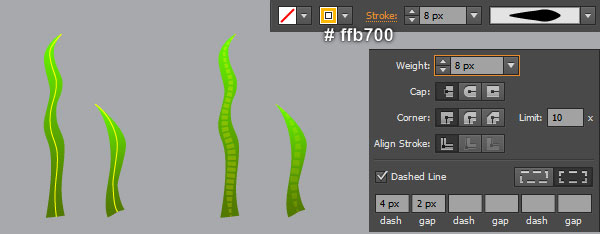
20. Now, follow the sequence of images and repeat the same process as the previous steps to draw more green plants.
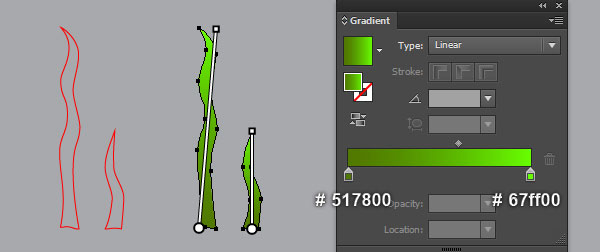
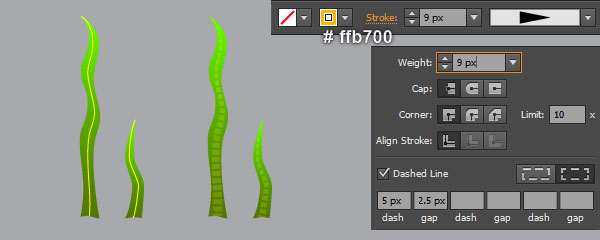
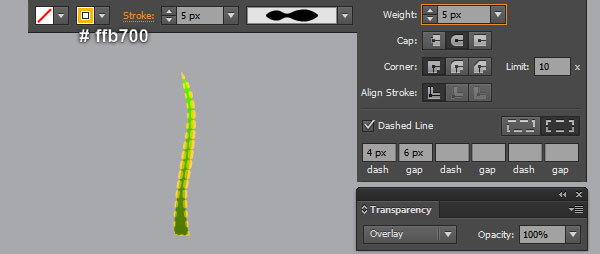
21. With the help of the Pen Tool (P) and the Gradient Tool (G), create a shape like you see in the images below. Reselect the newly created shape and make a copy (Ctrl +C, Ctrl +F) of it. Remove the fill color of the copy and add a 5px pure orange stroke (# ffb700), then apply the Width Profile 2 for the resulting object. Keep the newly created object selected, open the Stroke palette (Window > Stroke) then check the Dashed Line box. Enter 4px in the dash box and 6px in the gap box.
Next change the Blending Mode of the resulting object to Overlay. Now select the first shape created in this step and make a copy (Ctrl +C, Ctrl +F) of it, then bring the copy to front (Ctrl +Shift +Right Square Bracket). Still having the newly created shape selected, hold down the Shift and click on the pure orange object created in this step. Right click on the artboard and then select the Make Clipping Mask section from the drop-down menu. Likewise, repeat the same process as the previous steps to draw another green plant like you see in the last image.
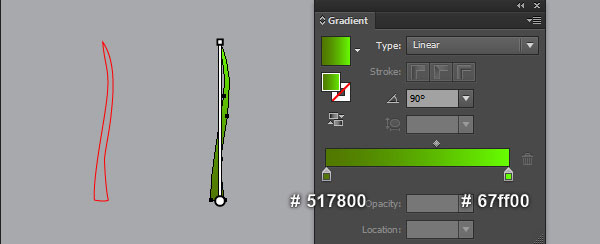
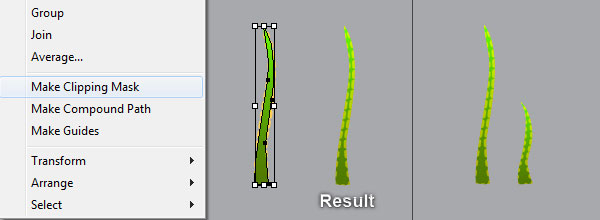
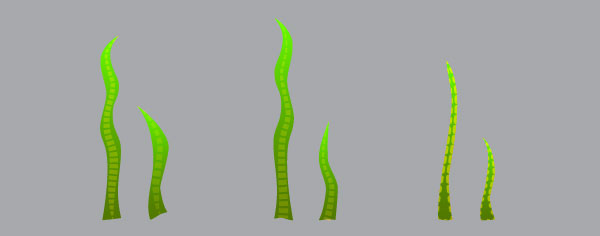
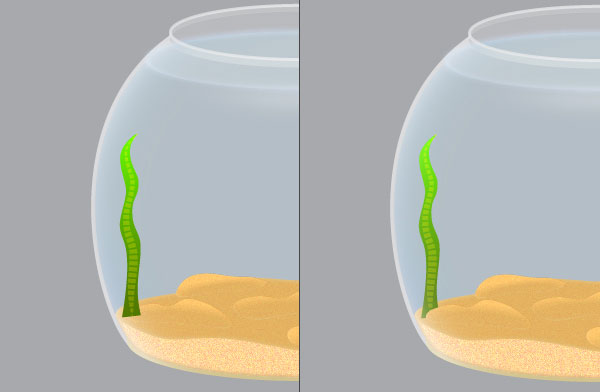
22. At this point your green plants should look like in the first image below. Now select a green plant and place it to the position like you see in the second image, then hide it behind the left shape created in the step 17. Next place the remaining green plants into the fishbowl. You should end up with something like you see in the last image.
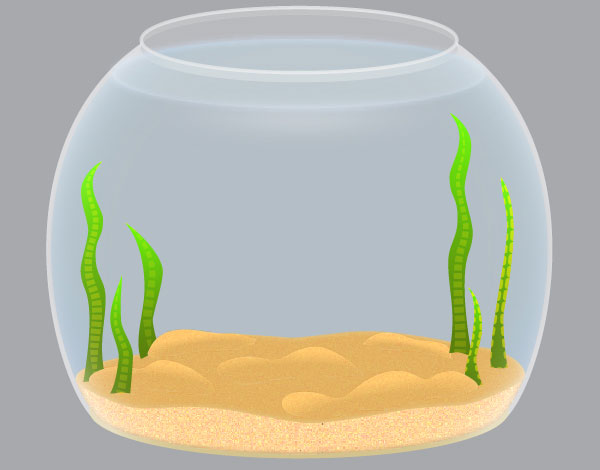
23. Now we are going to create some clumps of grass. Pick the Pen Tool (P) and create some curved paths as shown below. Once your paths are drawn, reselect them, replace the existing stroke color with dark green (# 276201) and change the stroke weight to 3px. Then apply the Width Profile 4 for the resulting paths. Keep the newly created paths selected, press (Ctrl +G) to group them.
With the help of the Pen Tool (P), create four curved dark red paths (# 540d01) like you see in the fourth image. Reselect the newly created paths, change the stroke weight to 3px and apply the Width Profile 4 for the resulting paths. Next reselect and group (Ctrl +G) the four dark red paths. Likewise, repeat the same process as the previous steps to draw more clumps of grass. Also you can see them all in the final image.


24. Select the biggest clump of grass and place it to the position as shown in the first image. Next hide it behind the shortest plant. Continue place the remaining clumps of grass into the fishbowl like you see in the last image.
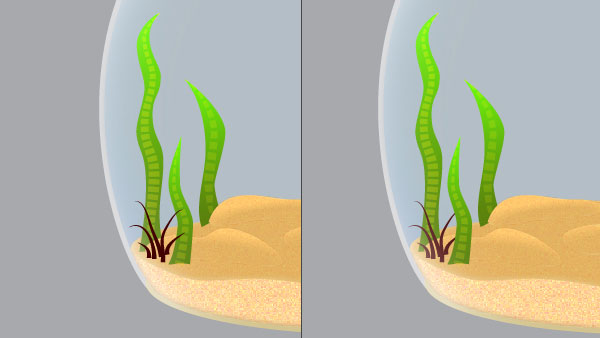
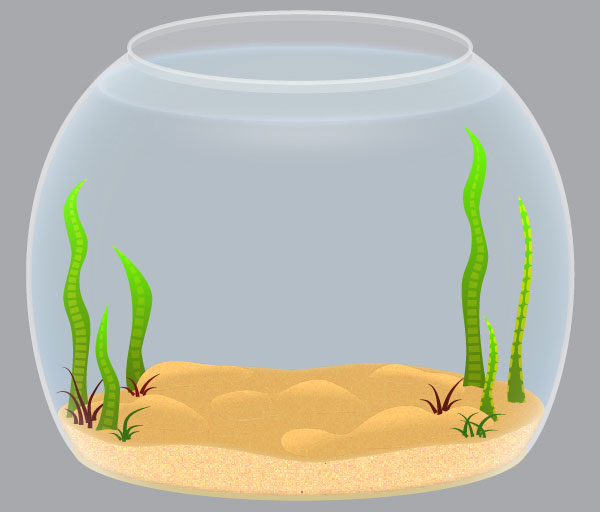
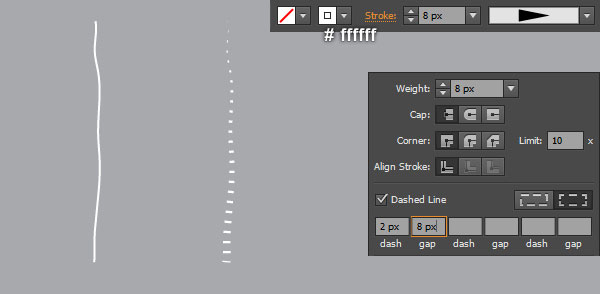
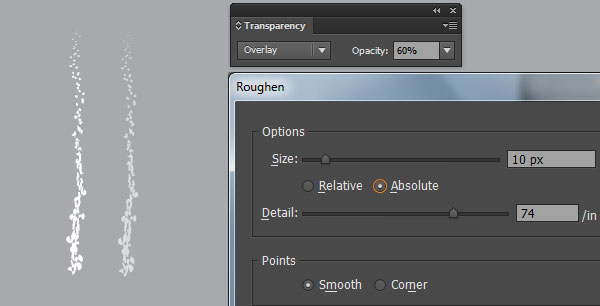
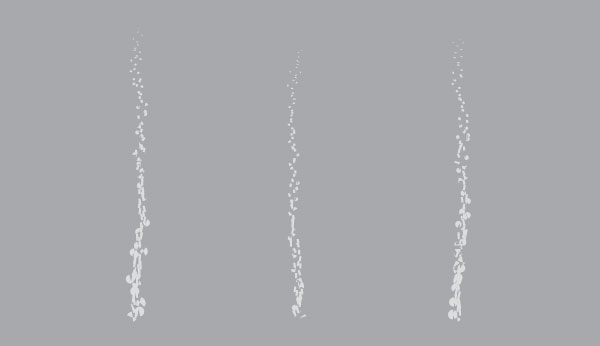
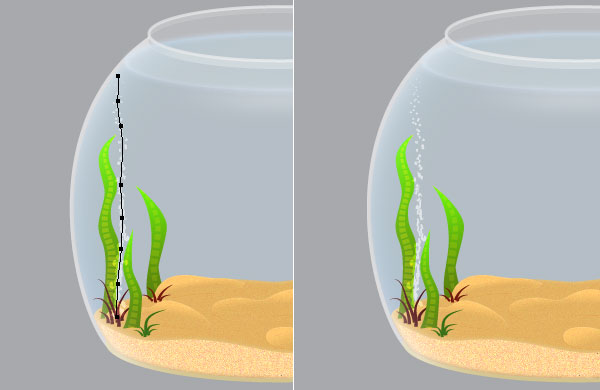
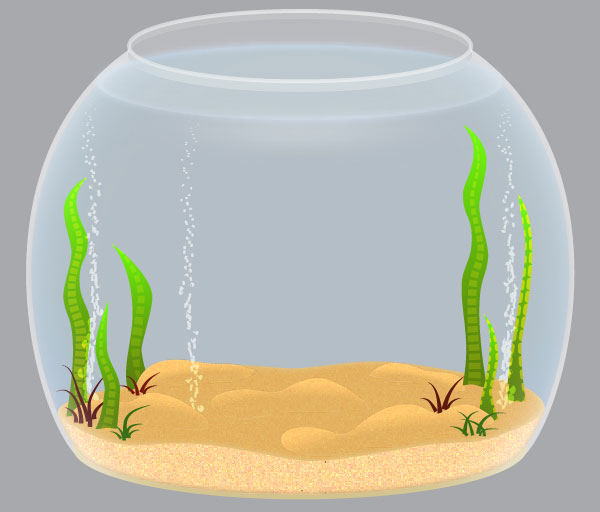
25. With the Pen Tool (P), create a white slightly curved path as shown below. Once your path is drawn, change the stroke weight to 8px and apply the Width Profile 4 for the resulting path. Keep this path selected, open the Stroke palette (Window > Stroke) then check the Dashed Line box. Enter 2px in the dash box and 8px in the gap box. Still having the resulting path selected, go to the Effect > Stylize > Roughen… Follow the data like you see in the third image and click OK. Make sure that the resulting path is still selected, change the Blending Mode to Overlay and reduce its Opacity to 60%. Likewise, repeat the same process as the previous steps to draw two more white plants. Also you can see them all in the fourth image. Now place a white plant to the position like you see in the fifth image, then hide it behind the left clump of grass. Finally place the remaining white plants into the fishbowl.
Create the Small Aquarium Rocks
26. Next come the small aquarium rocks. With the help of the Pen Tool (P) and the Gradient Tool (G), create a shape like you see in the first and the second images. Reselect the newly created shape and go to the Effect > Stylize > Drop Shadow… Follow the data as shown in the third image and click OK. Now, follow the sequence of images and repeat the same process as the previous steps to draw more rocks.
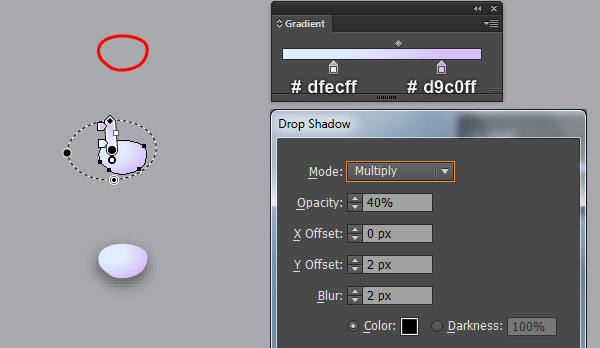
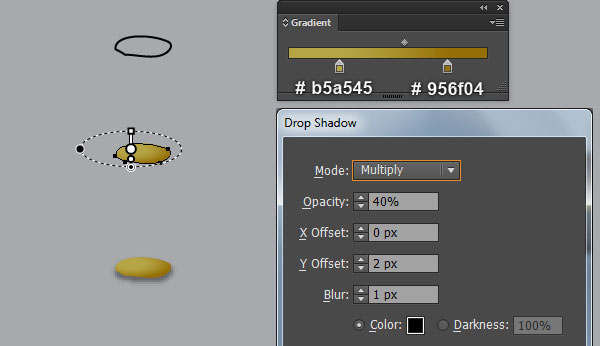
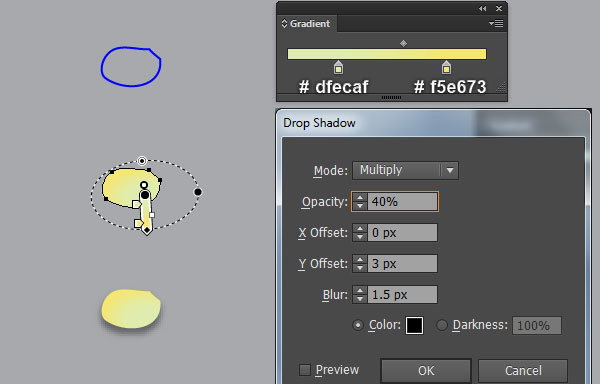
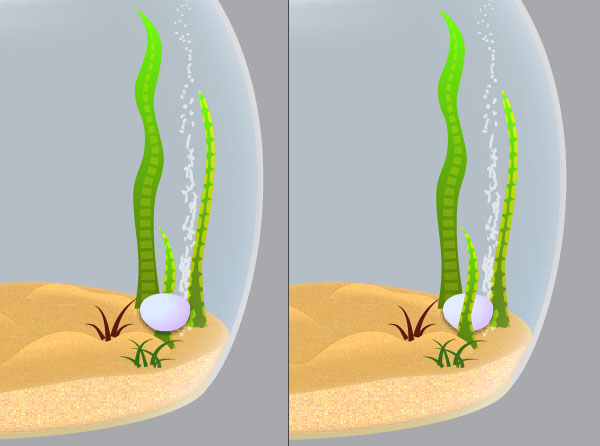
27. At this point your small aquarium rocks should look like in the first image below. Now select the biggest rock and place it to the position like you see in the second image, then hide it behind the shortest plant. Next place the remaining rocks into the fishbowl. You should end up with something like you see in the last image.

Create the Aquarium Fish
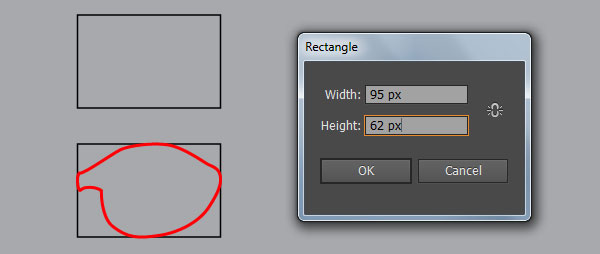
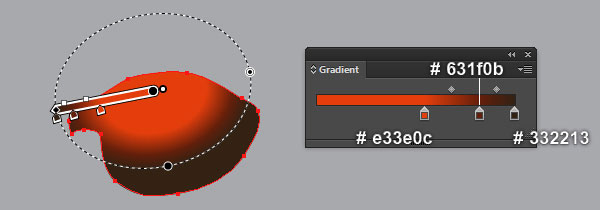
28. It’s time to draw the aquarium fish. Pick the Rectangle Tool (M) and create a 95 by 62px rectangle. Next with the Pen Tool (P), create a red object like you see in the second image. Once your red object is drawn, select and remove the rectangle created in this step. Now reselect the red object, remove its stroke and then fill this object with the radial gradient as shown in the last image.
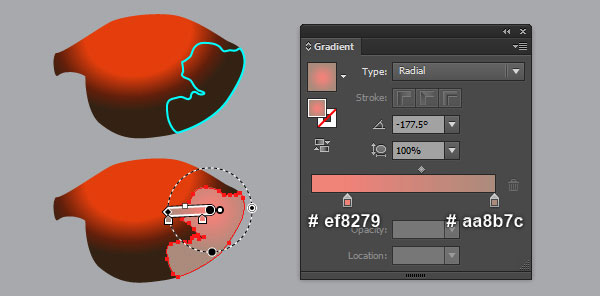
29. With the help of the Pencil Tool (N) and the Gradient Tool (G), create three shapes like you see in the images below.
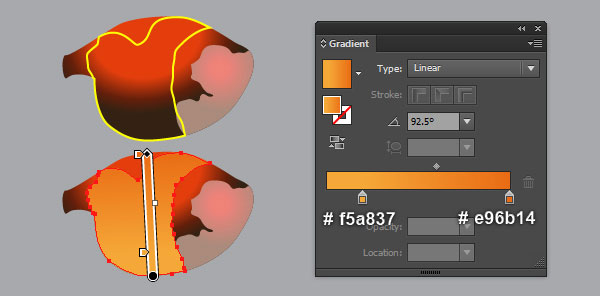
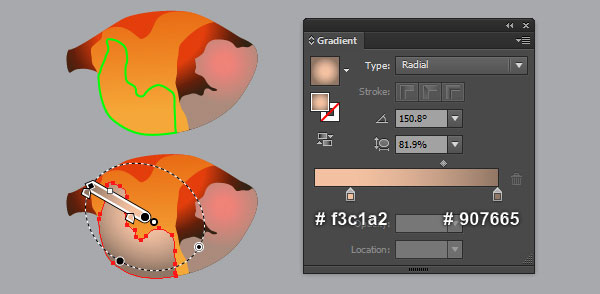
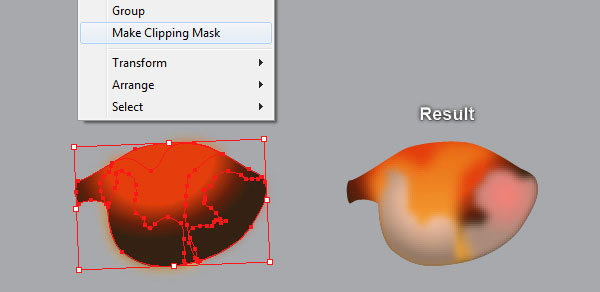
30. Select the biggest shape created in the step 29 and apply a 3px Gaussian Blur effect for it. Next select the two remaining shapes created in the step 29 and apply a 2px Gaussian Blur effect for them. Before you continue, select and group (Ctrl +G) three shapes created from beginning step 29 to this time. Now select the shape created in the step 28 and make a copy (Ctrl +C, Ctrl +F) of it, then bring the copy to front (Ctrl +Shift +Right Square Bracket). Keep this copy selected, hold down the Shift and click on the group created in this step. Right click on the artboard and then select the Make Clipping Mask section from the drop-down menu.


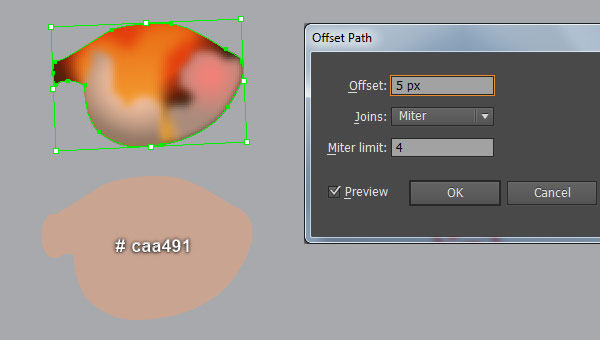
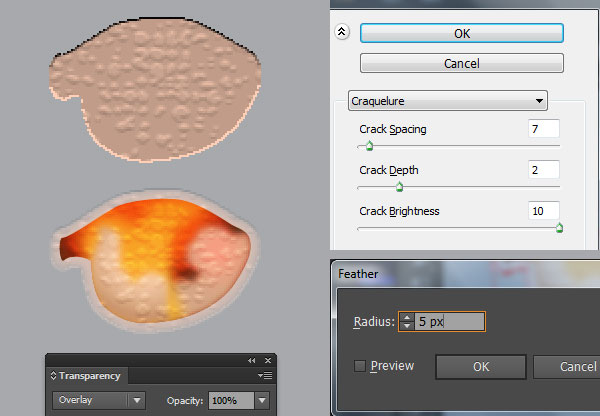
31. Select the shape created in the step 28 and go to the Object > Path > Offset Path… Enter a 5px Offset and click OK. Bring the newly created shape to front (Ctrl +Shift +Right Square Bracket) and replace the existing color of it with slightly orange (# caa491). Keep this shape selected and go to the Effect > Texture > Craquelure… Follow the data as shown in the third image and click OK. Then apply a 5px Feather effect for the resulting shape and change the Blending Mode to Overlay. Still having the resulting shape selected, press (Ctrl +X) to cut it. Then pick the Selection Tool (V), double-click on the clipping set created in the step 30 and press (Ctrl +F) to paste the shape was cut in this step. Finally, double-click on the anywhere outside of the clipping set.

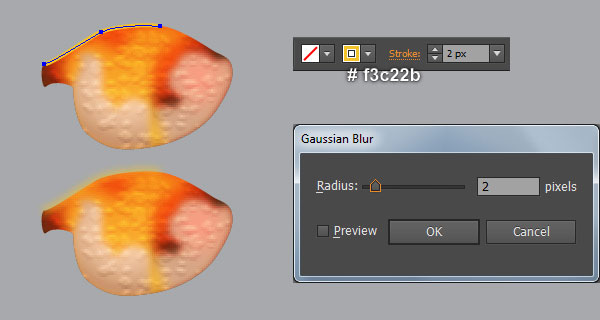
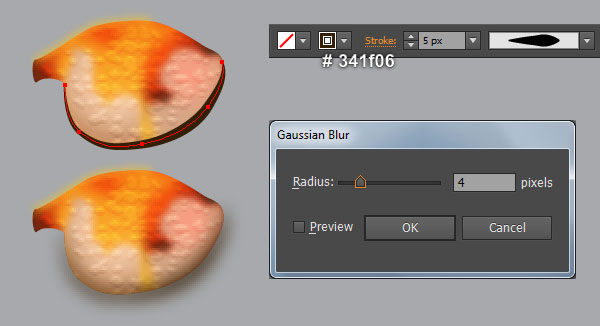
32. We are going to start making highlight and shadow on the fish to give it more of a 3D look. Pick the Pen Tool (P), create a curved path and give it a 2px bright yellow stroke (# f3c22b) for the moment. Reselect the newly created path and apply a 2px Gaussian Blur effect for it. Keep working with the Pen Tool (P), create a black curved path (# 341f06), with a 5px stroke and no fill. Once your path is drawn, apply the Width Profile 5 and a 4px Gaussian Blur effect for it. Now reselect the two paths creaetd in this step and press (Ctrl +X) to cut them. Then pick the Selection Tool (V), double-click on the clipping set created in the step 30 and press (Ctrl +F) to paste the paths were cut in this step. Finally, double-click on the anywhere outside of the clipping set.

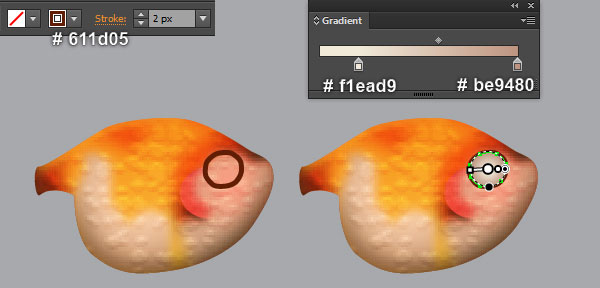
33. Pick the Ellipse Tool (L) and create a bright red ellipse (# da3833), then place it to the position as shown below. Still having the newly created ellipse, press (Ctrl +Left Square Bracket) to hide it behind the clipping set created in the step 30. With the Pen Tool (P), create an object as shown in the third image, with 2px dark orange stroke (# 611d05) and no fill. Keep the newly created object selected and make a copy (Ctrl +C, Ctrl +F) of it. Then remove the stroke of the copy and fill this object with the radial gradient as shown in the fourth image. Next reselect the dark orange object and apply a 1px Gaussian Blur effect for it.
Now create a black ellipse using the Ellipse Tool (L) like you see in the sixth image. Make a copy (Ctrl +C, Ctrl +F) of the newly created ellipse. Remove the fill color of the copy and add a 1px white stroke, then apply the Width Profile 5 for the resulting ellipse. Finally create a small white ellipse like you see in the last image.


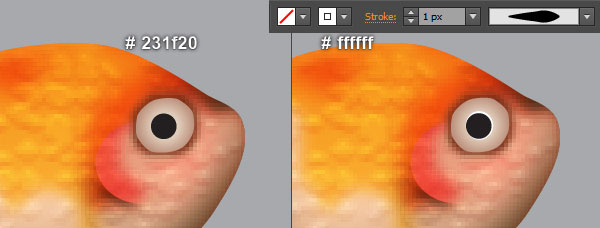
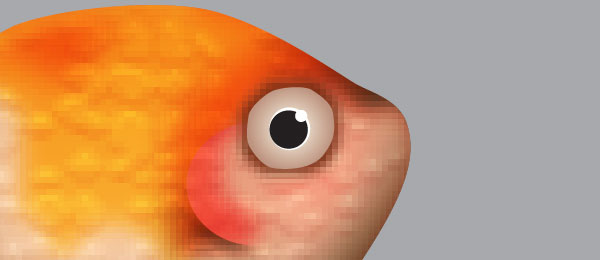
34. Next come the fish mouth. With the help of the Pen Tool (P), create two shapes like you see in the images below.
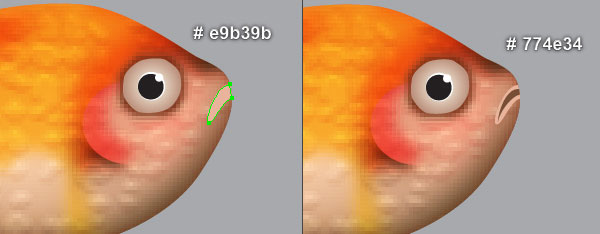
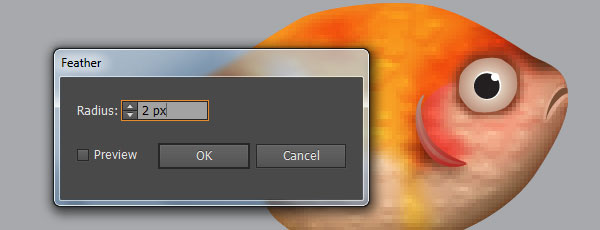
35. To add some details, first draw a curved path using the Pen Tool (P), with a 3px stroke (apply the linear gradient within stroke) and no fill. Then apply the Width Profile 5 for the newly created path. Keep this path selected and make a copy (Ctrl +C, Ctrl +F) of it. Replace the existing stroke color of the copy with new linear gradient, then change the stroke weight to 1px. Finally apply a 2px Feather effect for the resulting path.
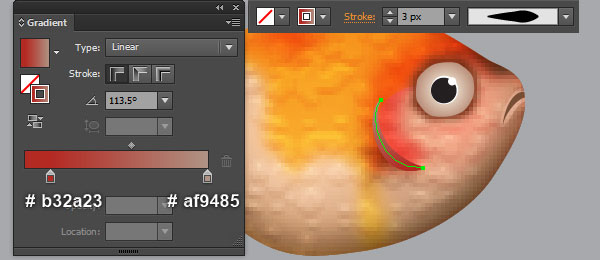
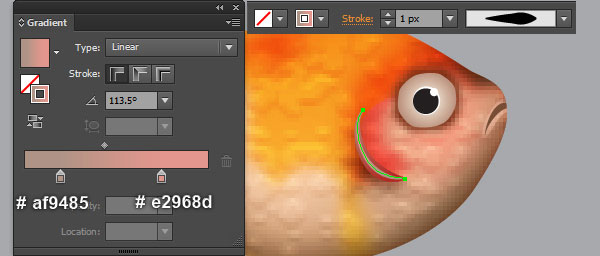
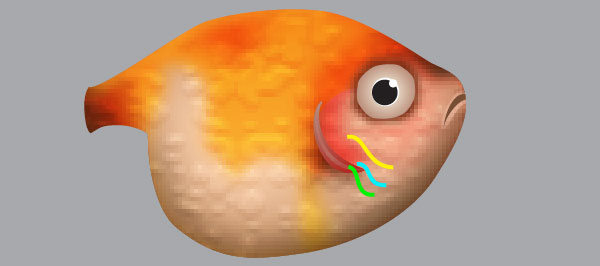
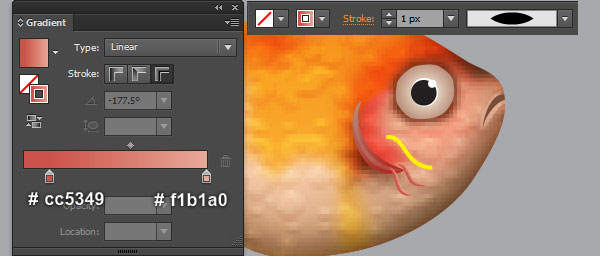
36. Continue with the Pen Tool (P), create three curved paths like you see in the first image. Once your paths are drawn, reselect the two lower paths, replace the existing stroke color with the linear gradient across stroke, then apply the Width Profile 1 for the resulting paths. Now select the yellow curved path, replace the existing stroke color with the linear gradient across stroke. Then change the stroke weight of this path to 2px and apply the Width Profile 1 for it. Finally select the three paths created in this step and apply a 0.5px Gaussian Blur effect for them.
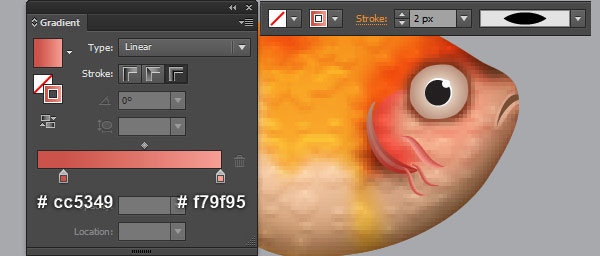
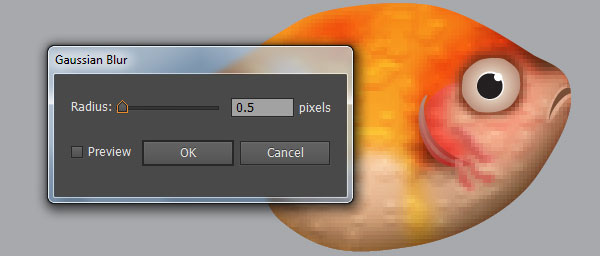
37. Continue with the fish fins. With the help of the Pen Tool (P) and the Gradient Tool (G), create a shape like you see in the first and the second images. Next apply a 5px Feather effect for the newly created shape.
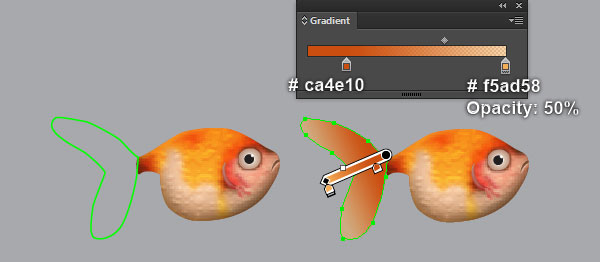
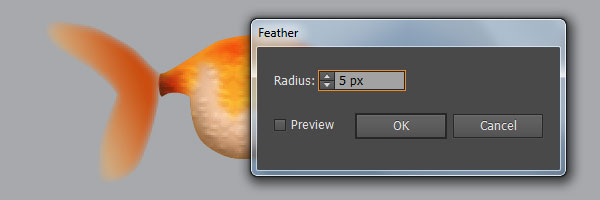
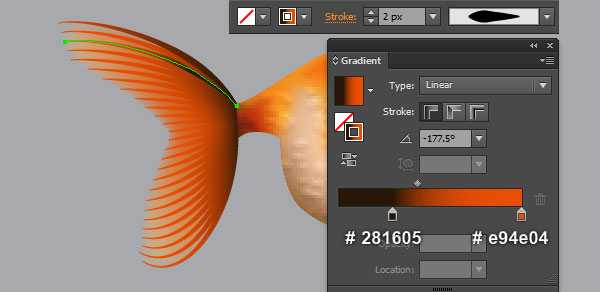
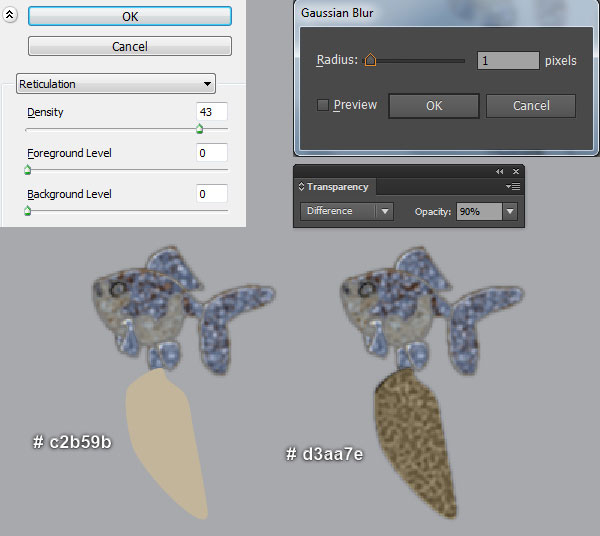
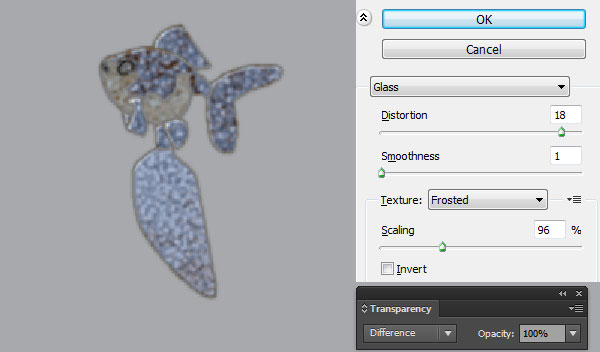
38. With the Pen Tool (P), create curved paths as shown in the images below. You should end up with something like you see in the fourth image. Once your paths are drawn, reselect them, change the stroke weight to 2px and replace the existing stroke color with linear gradient within stroke. Next apply the Width Profile 5 for the resulting paths.
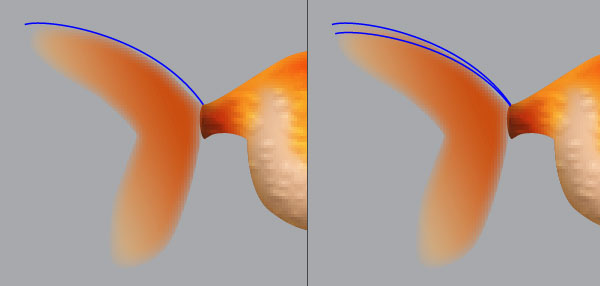
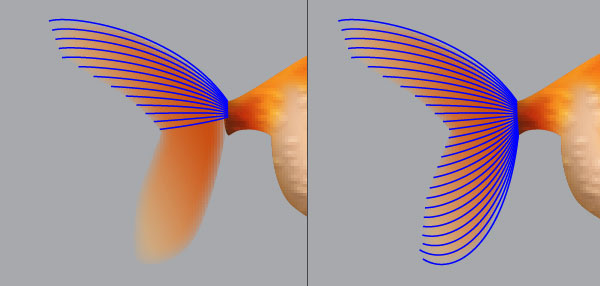
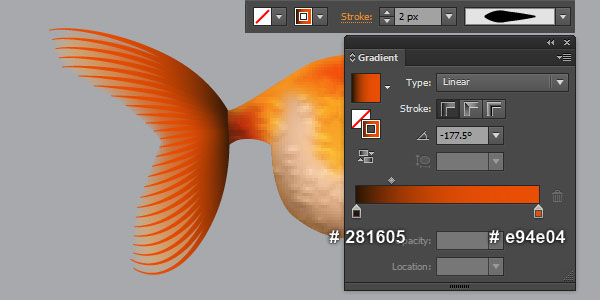
39. To give the fin a more irregular look, replace the existing stroke color of some curved paths like you see in the images below. Finally select all objects created from beginning step 37 to this time and then send them to back (Ctrl +Shift +Left Square Bracket).
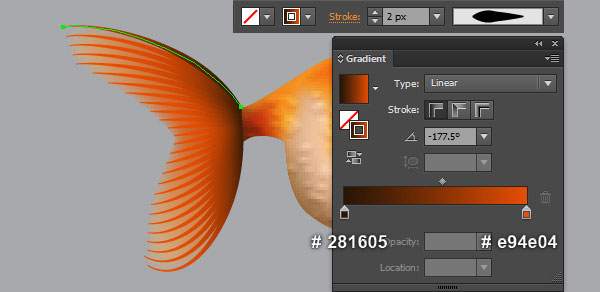
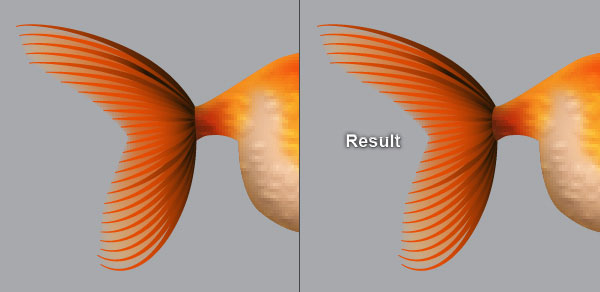
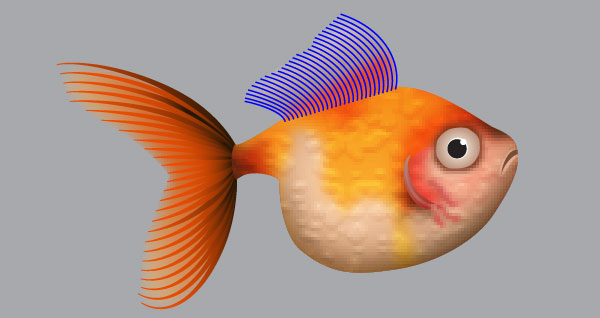
40. With the help of the Pen Tool (P) and the Gradient Tool (G), create a shape like you see in the first and the second images. Next apply a 5px Feather effect for the newly created shape.
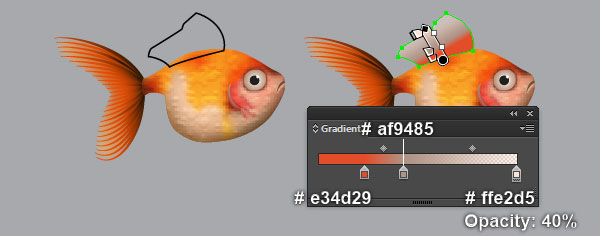
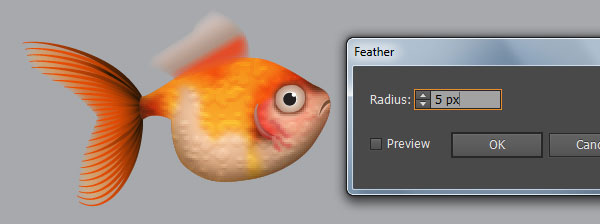
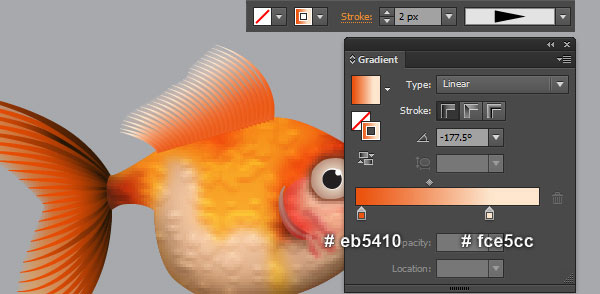
41. Continue with the Pen Tool (P), create curved paths as shown in the first image below. Once your paths are drawn, reselect them, change the stroke weight to 2px and replace the existing stroke color with linear gradient within stroke. Next apply the Width Profile 4 for the resulting paths. To give this fin a more irregular look, replace the existing stroke color of some curved paths like you see in the third image below. Finally select all objects created from beginning step 40 to this time and then send them to back (Ctrl +Shift +Left Square Bracket).
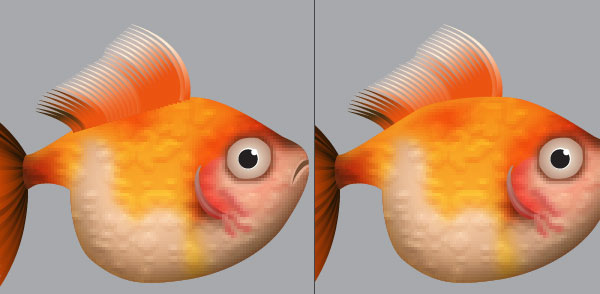
42. With the help of the Pen Tool (P) and the Gradient Tool (G), create two shapes like you see in the images below. Once your shapes are drawn, reselect the bigger shape and apply a 3px Feather effect for it. Next select the remaining shape and apply a 2px Feather effect for it.
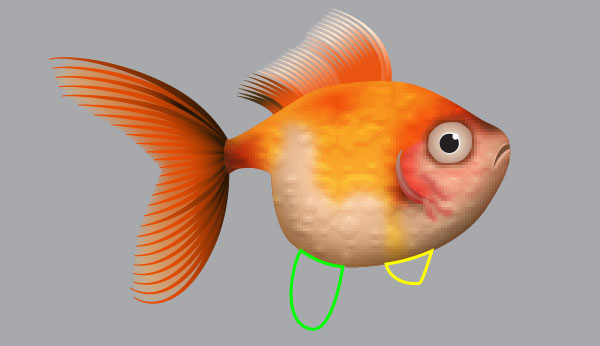
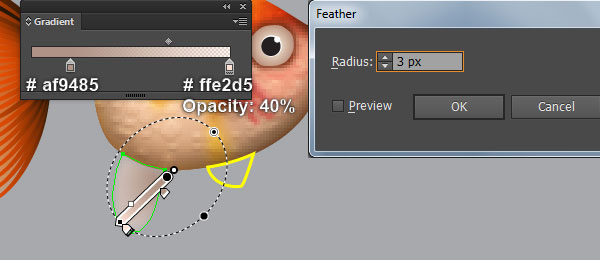
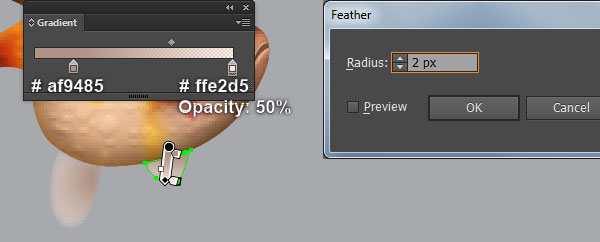
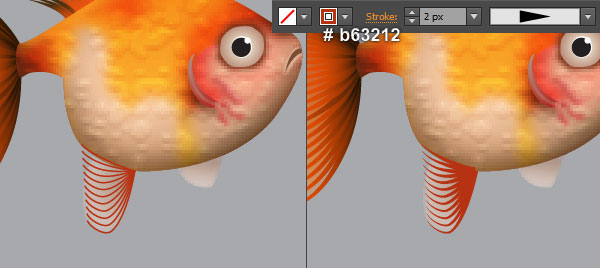
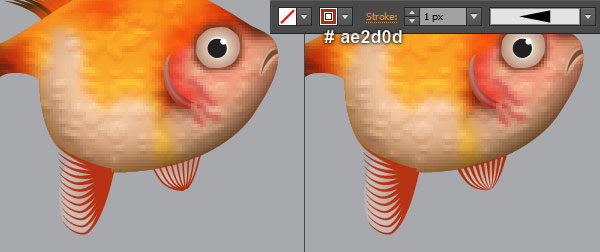
43. Continue with the Pen Tool (P), create some strong red curved paths (# b63212) as shown in the first image. Once your paths are drawn, reselect them, then change the stroke weight to 2px and apply the Width Profile 4 for the resulting paths. Likewise, repeat the same process to create some curved paths like you see in the third and the fourth images. Finally select all objects created from beginning step 42 to this time and then send them to back (Ctrl +Shift +Left Square Bracket).
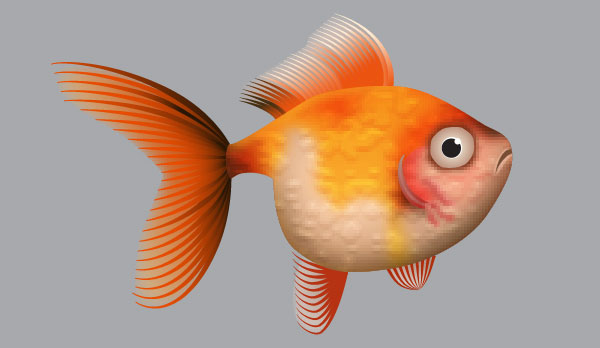
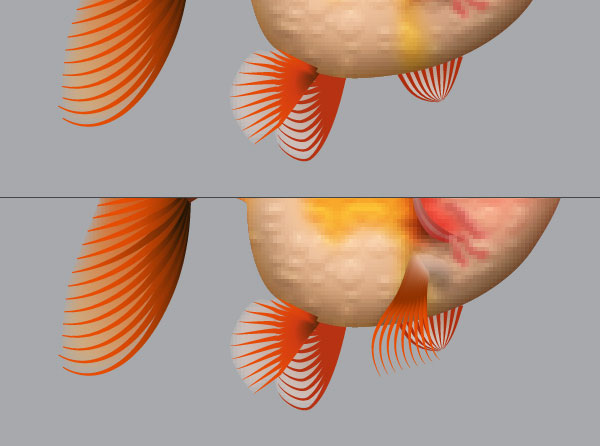
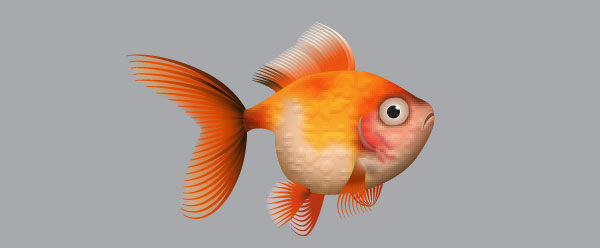
44. Likewise, repeat the same process as the previous steps to draw more fins. Select and group (Ctrl + G) all objects created from beginning step 28 to this time. The aquarium fish is done!
Create the Bubbles
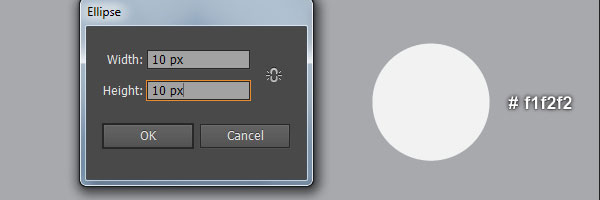
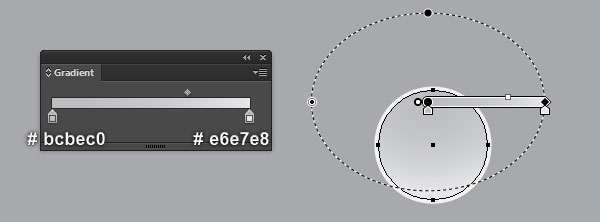
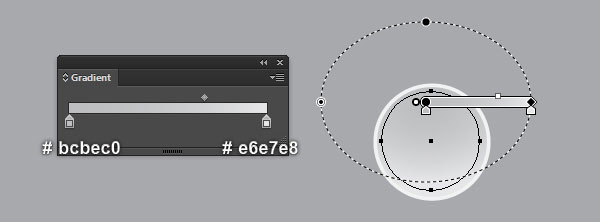
45. We are going to create the bubbles. Pick the Ellipse Tool (L) and create a 10 by 10px white ellipse (# f1f2f2). Make a copy (Ctrl +C, Ctrl +F) of the newly created ellipse. Reduce the size of the copy and then replace the existing color of it with the radial gradient. Still having the resulting ellipse selected, make a copy of it. Next reduce the size of the copy and then replace the existing color of it with new radial gradient.
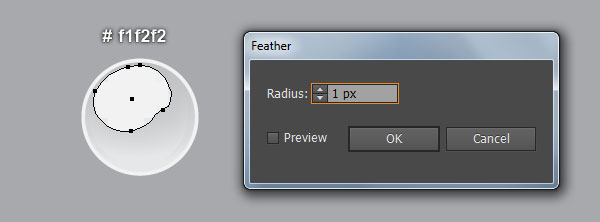
46. To add some details, first draw a white shape as shown below. Then apply a 1px Feather effect for the newly created shape. With the Pen Tool (P), create two curved paths like you see in the second image, with 0.5px white stroke and no fill. Next apply the Width Profile 4 for the newly created paths. Finally create three white ellipses as shown in the last image. Now select and group (Ctrl + G) all objects created from beginning step 45 to this time. We are done with the bubble for the moment.

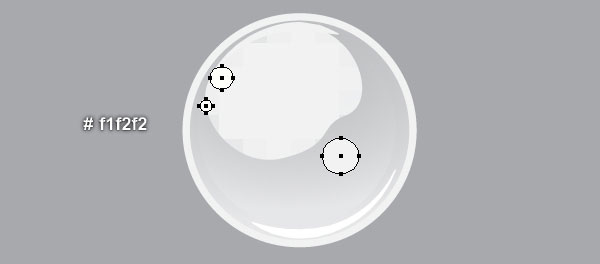
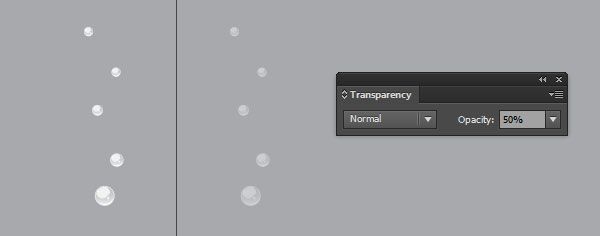
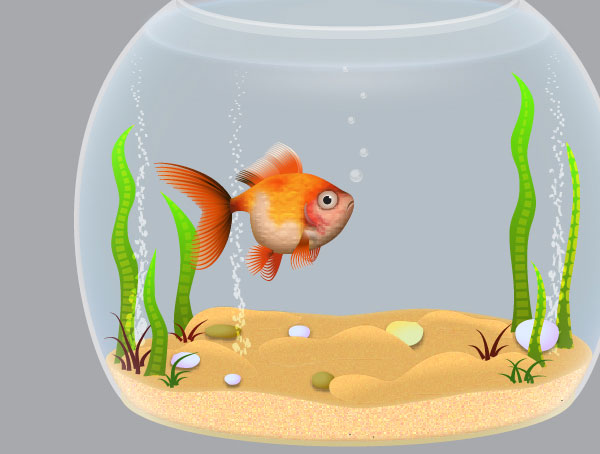
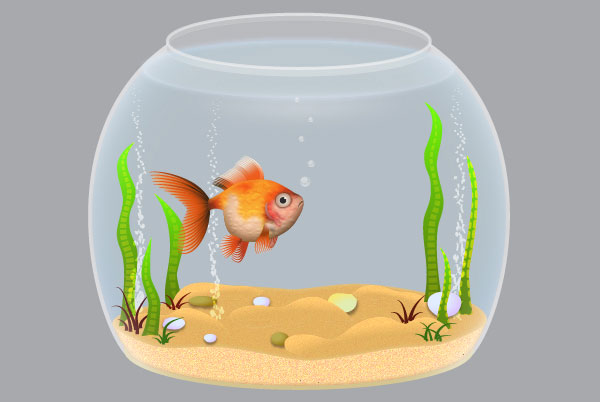
47. Select the bubble group created in the step 46 and make four copies of it. Then scale these copies as needed. Reselect all bubbles and reduce their Opacity to 50%. Finally place the newly created bubbles to the positions like you see in the third image, then hide them behind the front part of the fishbowl.
Create the Fish-shaped Rock
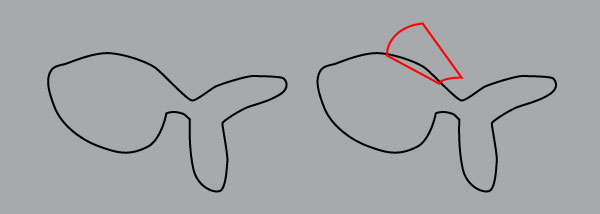
48. With the Pen Tool (P), create two objects like you see in the first and the second images. Once your objects are drawn, reselect the red object and hide it behind the black object. Now select the two objects created in this step, remove their strokes, then fill these objects with grayish orange (# c2b59b). Keep the resulting shapes selected and go to the Effect > Sketch > Reticulation… Follow the data as shown in the fourth image and click OK. Still having the resulting shapes selected, apply a 1px Gaussian Blur then set them to Blending Mode Difference and reduce the Opacity to 90%. Make sure that the resulting shapes are still selected, make a copy (Ctrl +C, Ctrl +F) of them. Keep the copies selected, open the Appearance palette (Window > Appearance) and remove the Reticulation section. Having the resulting shapes selected and go to the Effect > Distort > Glass… Follow the data as shown in the last image and click OK, then change the Opacity of the resulting shapes to 100%.
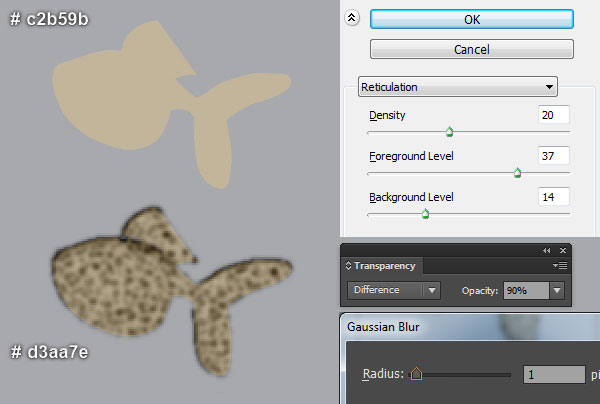
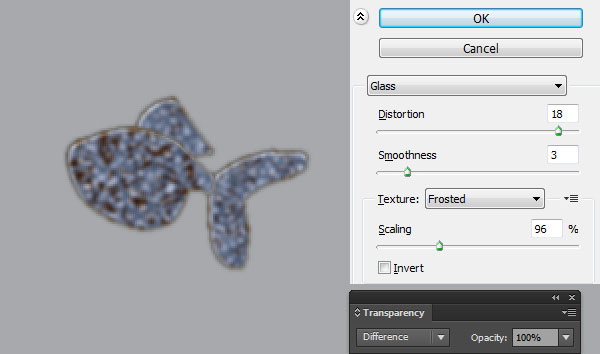
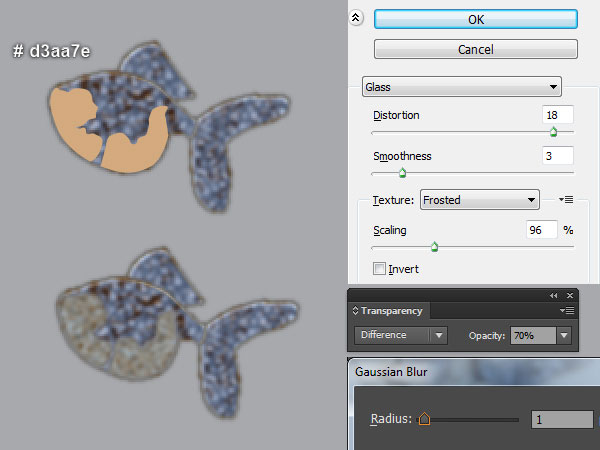
49. Pick the Pen Tool (P) and create two slightly orange shapes (# d3aa7e) like you see in the first image. Reselect the two newly created shapes and go to the Effect > Distort > Glass… Follow the data as shown in the image below and click OK. Apply a 1px Gaussian Blur effect for the resulting shapes then set them to Blending Mode Difference and reduce their Opacity to 70%.
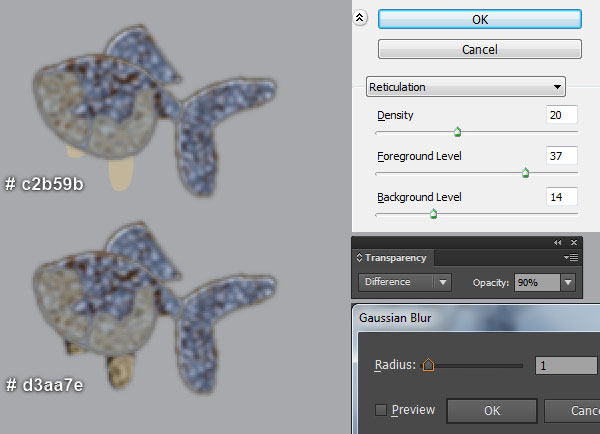
50. With the Pen Tool (P), create two grayish orange shapes (# c2b59b) like you see in the first image. Make a copy (Ctrl +C, Ctrl +F) of the two newly created shapes, then replace the existing color of the copies with slightly orange (# d3aa7e). Keep the newly created shapes selected and go to the Effect > Sketch > Reticulation… Follow the data as shown in the second image and click OK. Still having the resulting shapes selected, apply a 1px Gaussian Blur then set them to Blending Mode Difference and reduce the Opacity to 90%. Make sure that the resulting shapes are still selected and make a copy (Ctrl +C, Ctrl +F) of them. Keep the copies selected, open the Appearance palette (Window > Appearance) and remove the Reticulation section. Having the resulting shapes selected and go to the Effect > Distort > Glass… Follow the data as shown in the last image and click OK, then change the Opacity of the resulting shapes to 100%.
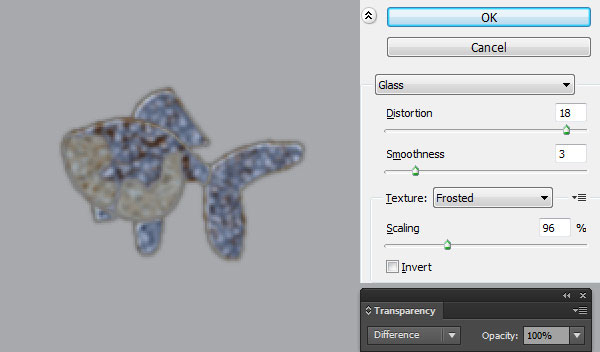
51. Now, follow the sequence of images and repeat the same process as the previous steps to draw more details similar to the ones from below.
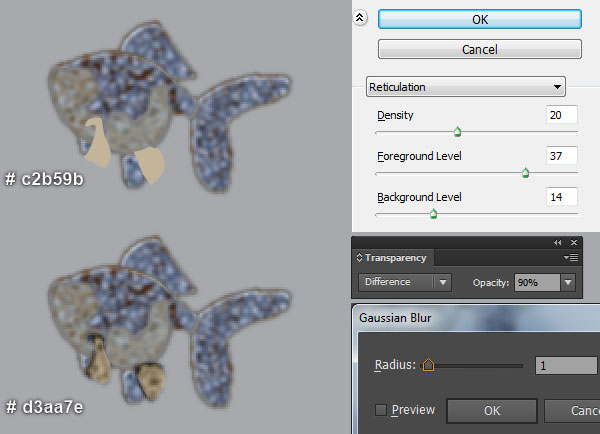
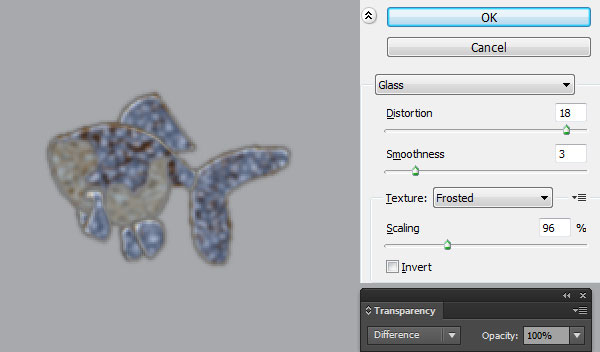
52. Pick the Pen Tool (P) and create three slightly orange shapes (# d3aa7e) like you see in the first image. Keep the newly created shapes selected and go to the Effect > Sketch > Reticulation… Follow the data as shown in the second image and click OK. Still having the resulting shapes selected, apply a 1px Gaussian Blur then set them to Blending Mode Difference and reduce the Opacity to 90%.
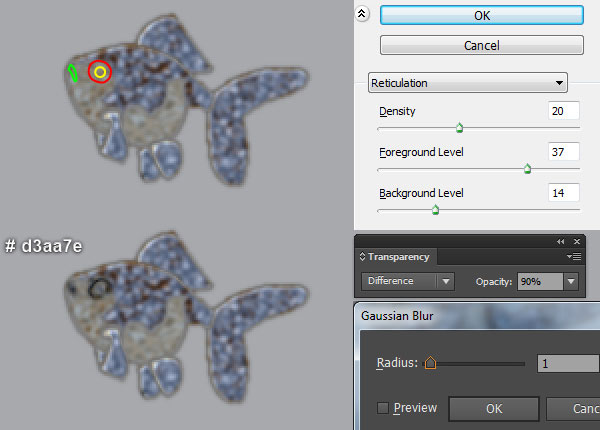
53. Continue with the Pen Tool (P), create a grayish orange shape (# c2b59b) like you see in the first image. Make a copy (Ctrl +C, Ctrl +F) of the newly created shape, then replace the existing color of the copy with slightly orange (# d3aa7e). Keep the newly created shape selected and go to the Effect > Sketch > Reticulation… Follow the data as shown in the second image and click OK. Still having the resulting shape selected, apply a 1px Gaussian Blur then set it to Blending Mode Difference and reduce the Opacity to 90%. Make sure that the resulting shape is still selected and make a copy (Ctrl +C, Ctrl +F) of them.
Keep the copy selected, open the Appearance palette (Window > Appearance) and remove the Reticulation section. Having the resulting shape selected and go to the Effect > Distort > Glass… Follow the data as shown in the last image and click OK, then change the Opacity of the resulting shape to 100%.
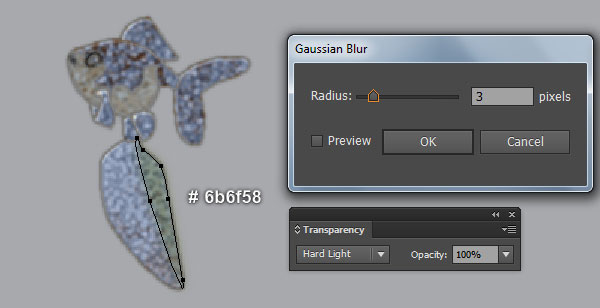
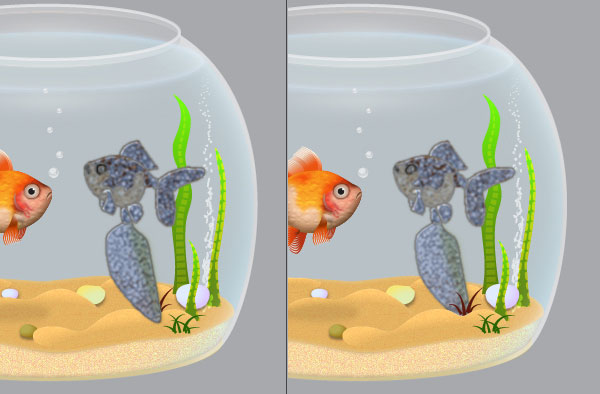
54. With the Pen Tool (P) create a dark gray shape (# 6b6f58) like you see in the first image. Apply a 3px Gaussian Blur effect for the newly created shape and change the Blending Mode to Hard Light. Now select and group (Ctrl + G) all objects created from beginning step 48 to this time. The fish-shaped rock is ready. Now place this rock to the position like you see in the second image. Next hide it behind the dark red clump of grass.
Create the Background
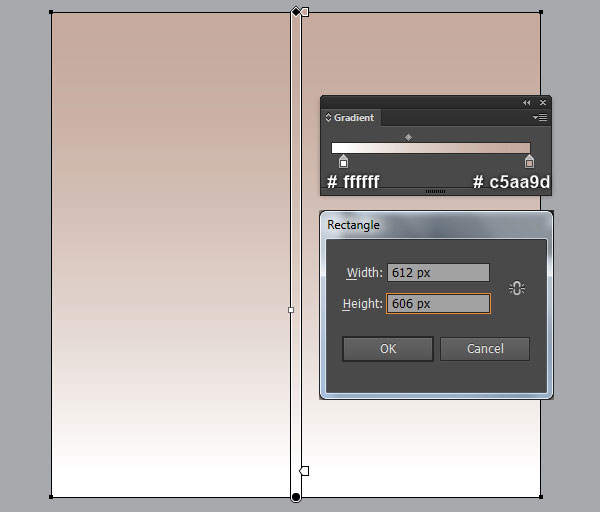
55. Before you continue, select and group (Ctrl +G) all objects created from beginning step 2 to this time. We are done with the fishbowl for the moment. It’s time for the background now. With the Rectangle Tool (M) and the Gradient Tool (G), create a 612 by 606px rectangle as shown below. Then place the fishbowl into the newly created background.
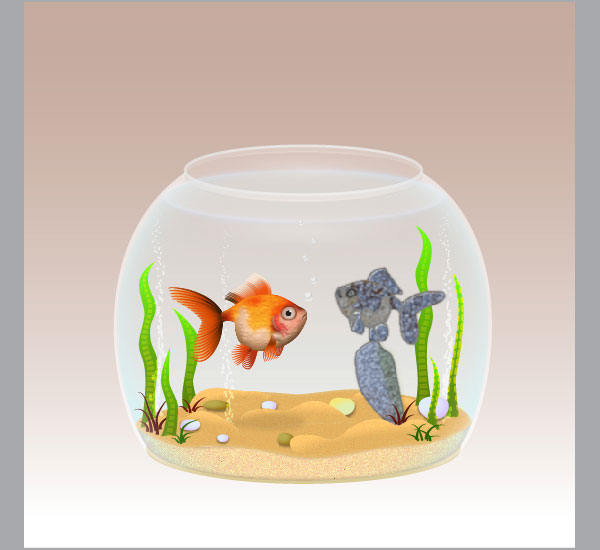
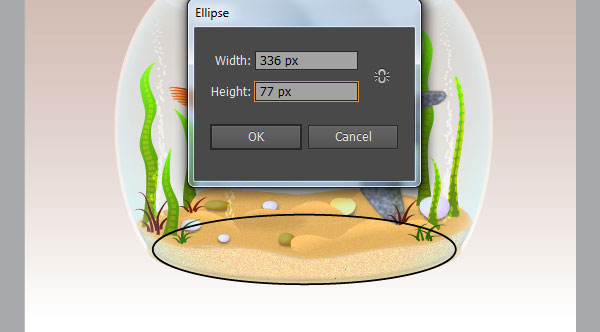
56. To give a more realistic look I’m going to be adding some shadows on some key places. Pick the Ellipse Tool (L) and create a 336 by 77px ellipse, then place this object to the position as shown below. Reselect the newly created ellipse, remove its stroke and fill this object with black (# 000000). Apply a 3px Gaussian Blur effect for the resulting ellipse then reduce its Opacity to 90%. Finally hide the resulting ellipse behind the fishbowl.
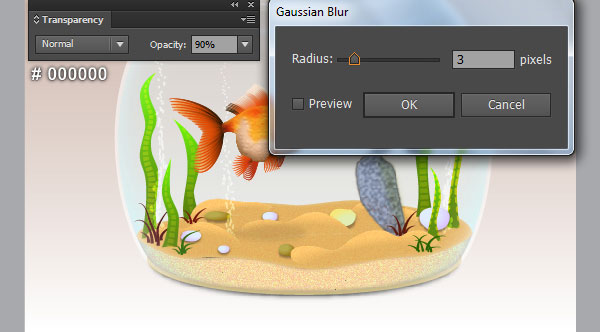
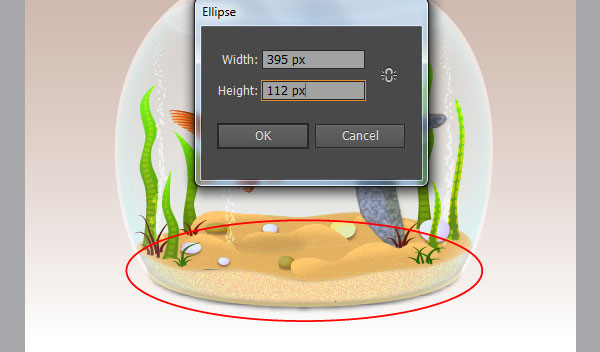
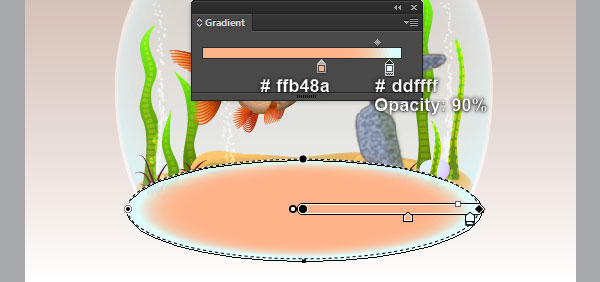
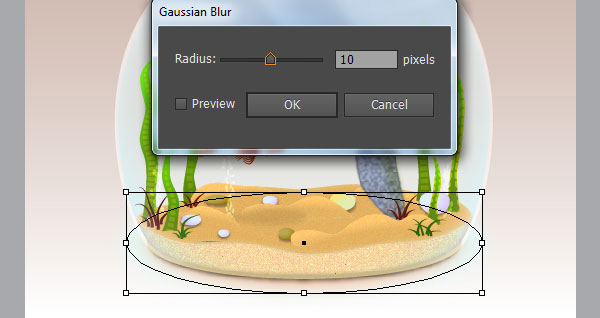
57. Continue create a 395 by 112px ellipse using the Ellipse Tool (L), then place it to the position as shown below. Make sure that the newly created ellipse is still selected, remove its stroke and then fill this object with the radial gradient. Apply a 10px Gaussian Blur efffect for the resulting ellipse, then hide it behind the ellipse created in the step 56.
And We’re Done!
