Christmas is coming!
I have decided to make a CorelDRAW tutorial on how to create a seamless Christmas pattern. In this tutorial you will be learn how to create Christmas elements like the sock, Santa’s hat, bell using the Ellipse Tool, Roughen Effect and Vector Pattern in CorelDRAW.
So, let’s get started!
- Create The Sock
Step 1
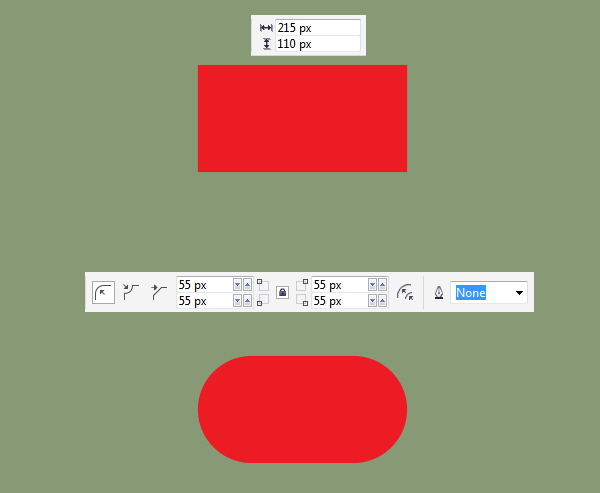
Let’s start with the sock. In the Toolbox, take the Regtangle Tool (F6) and create a red regtangle shape. Focus on your Property Bar, set the Object Size boxes to 215 x 110 px and you will find Corner option. Select Round Corner and enter 55 px to all corners of the regtangle shape in the Corner Radius boxes.
Step 2
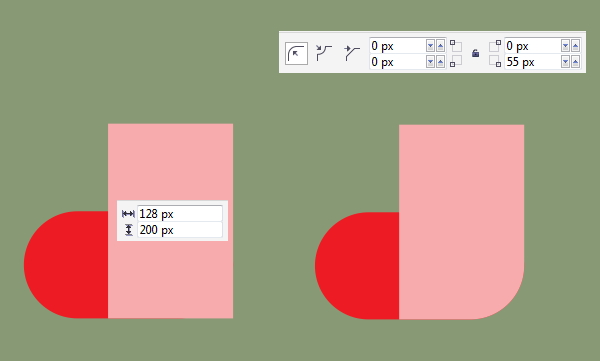
Move on your Property Bar and make a 128 x 200 px red regtangle. Set the Corner Radius of the right bottom corner to 50 px. Then select the two objects, go to Object > Align and Distribute > Align Right (R) and Align Bottom (B). Keeping the two objects selected. In the Property Bar, hit the Weld button.
Step 3
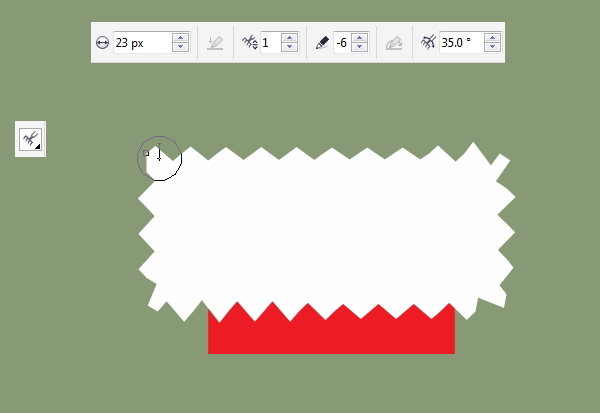
Add a white regtangle shape. Set the Object Sizes to 188 x 82 px. Place it as shown below.

Step 4
Now we will apply the Roughen effect to the previous shape. In the Toolbox, select the Roughen Tool from the Shape Flyout (F10). Enter the values in the Property Bar like image below. As you see its become to the zig-zag shapes.
Step 5
Let’s give the Smooth effect to the zig-zag shape. Choose the Smooth Tool in the Toolbox. Move to your Property Bar and enter the values as shown below.
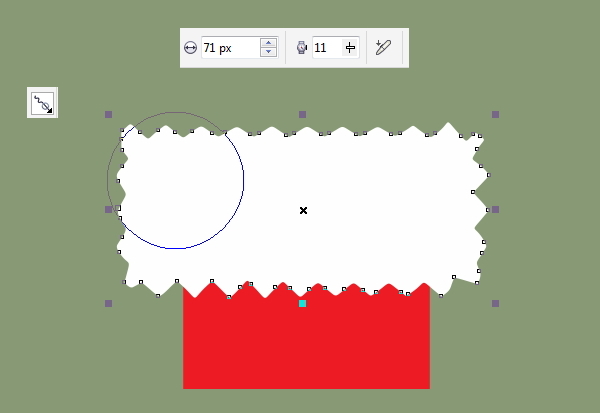
My resulting shape should be like this.

- Create The Tree
Step 1
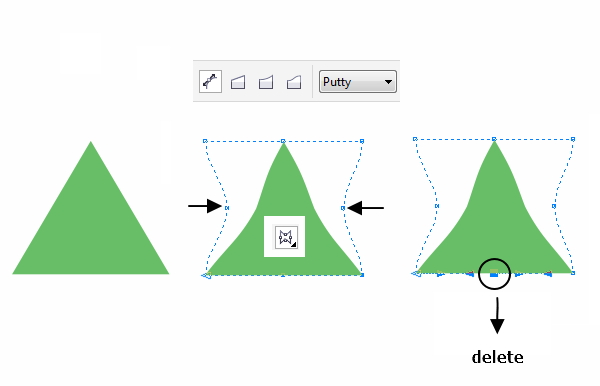
Using the Polygon Tool (Y) to draw a triangle shape. Set the number of Sides in the Property Bar to 3. Open the Envelope Tool from the Dropshadow Flyout. Use the Pick tool, select the two nodes and move them inward. After that Delete the center of the bottom nodes.
Step 2
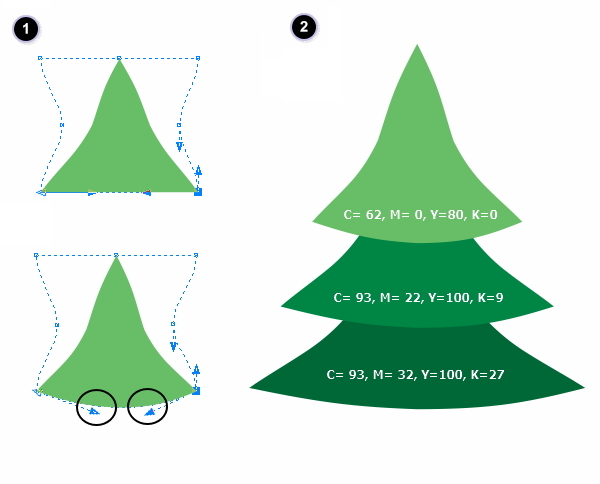
Next, drag the control handles of the bottom nodes. You should have resulting shape like below.
Make two copies the previous shape. Using the Pick Tool, you can Scale your two copied shapes to be wider. Recolor and place them exactly as picture below.
Step 3
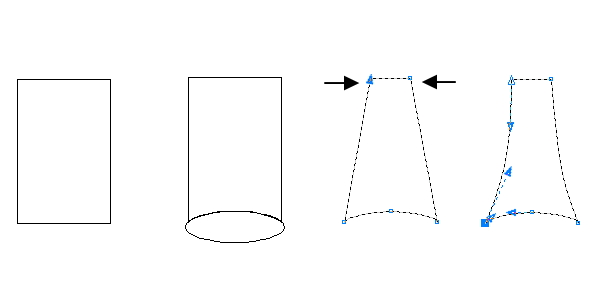
Now create the stem with the Regtangle Tool (F6). Draw a regtangle shape. Then make an oval to cut the bottom of the regtangle shape with the Trim tool in the Property Bar. After that select the top nodes of the stem and bring them inward. Then change the control handles like this.
Step 4
Arrange the stem above of the tree. Select the bottom of the tree and then the stem then click the Trim button.
Add a star with the Star Tool in the Toolbox. No Outline. Fill it with yellow. With the Pick Tool, select all objects and Group them together (Ctrl + G).

- Create The Santa’s Hat
Step 1
Draw a triangle shape with the Pen Tool to make the hat.
Using the Shape Tool (F10), click both nodes to change the straight segments into the curves by clicking the Convert to Curve icon in the Property Bar.
Now click the top node and press Symmetrical Node icon on the Property Bar. Then drag the control handles like this.
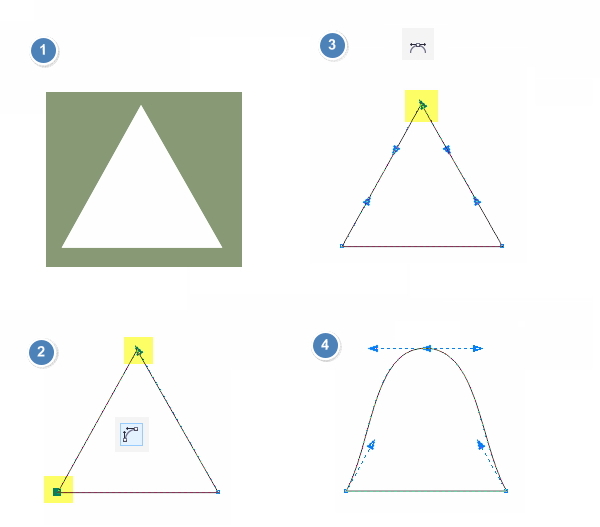
My resulting shape should be like this.

Step 2
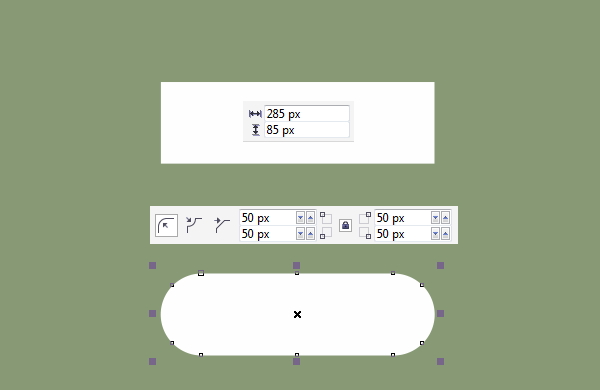
Create a 285 x 85 px regtangle. Focus on your Property Bar, select Round Corner and set 50 px in the Corner Radius boxes.
Step 3
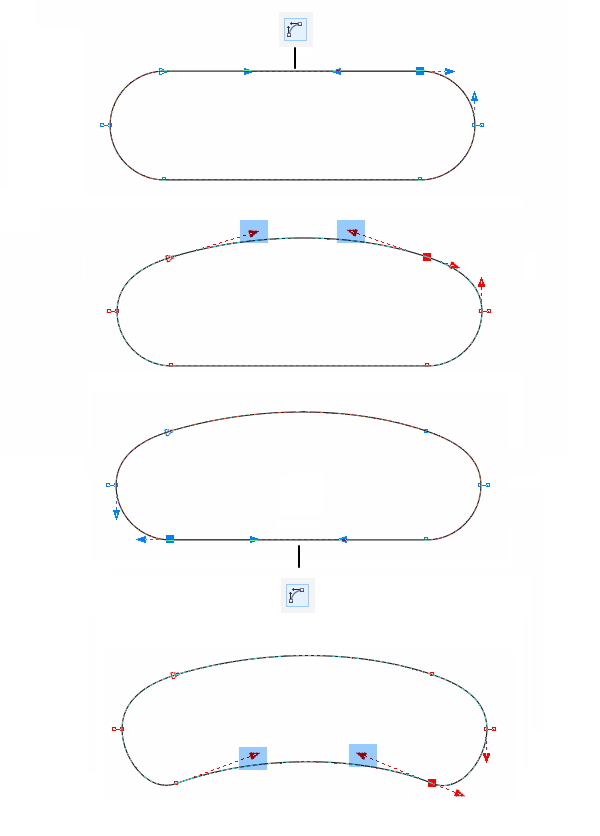
Keeping the rounded regtangle selected and go to Go to the Object > Convert to Curves (Ctrl + Q). Next, reshape the rounded regtangle. To do this, grab the Shape Tool (F10) and select one node of the top nodes then click the Convert to Curve icon in the Property Bar.
Move the control handles with the Pick Tool like image below.
Use this step for the bottom of the rounded regtangle. Set the fill color to white.
Step 4
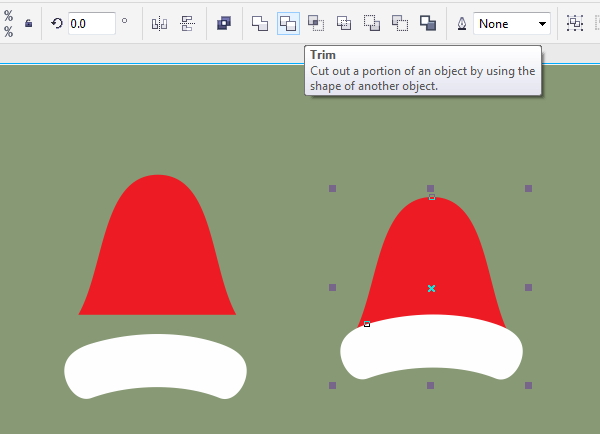
Place the white rounded regtangle on the bottom of the red shape and select both shapes. Hit the Trim tool.
Step 5
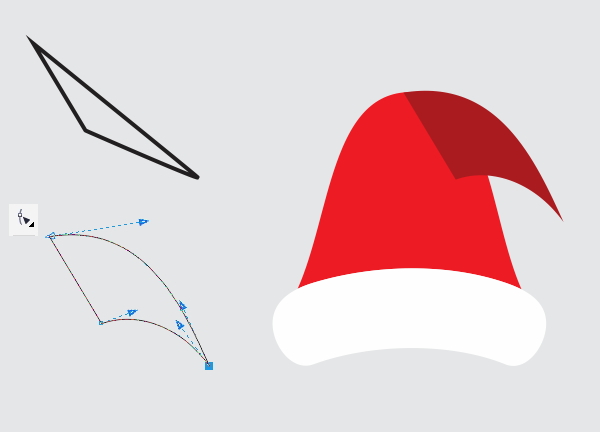
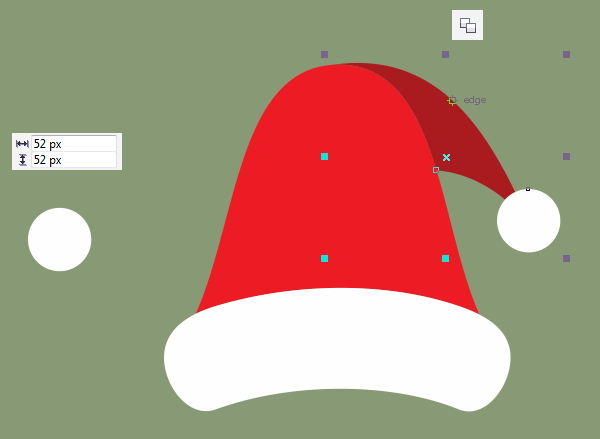
Using the Pen Tool to draw a triangle shape. Take the Shape Tool (F10). Adjust the control handles with the Pick Tool like picture below. Set its color to dark red (C= 19, M=100, Y=100, K=18).
Step 6
Put it on the top pf the red shape. Select the red shape then dark red shape. Hit the Trim tool.

Step 7
To create the ball, pick the Ellipse Tool (F7). Make a 52 x 52px white circle. Place it like image below. Select the white circle shape and then the dark red shape. Select all objects and group together by pressing Ctrl + G.
- Create The Bell
Step 1
Use the Ellipse Tool (F7) to draw the bell. Create a yellow oval shape. Add the regtangle which we will use it to cut the bottom half f the shape oval using the trimming. Make an another oval. Place it like image below. Then select both shapes and hit the Weld icon.

Step 2
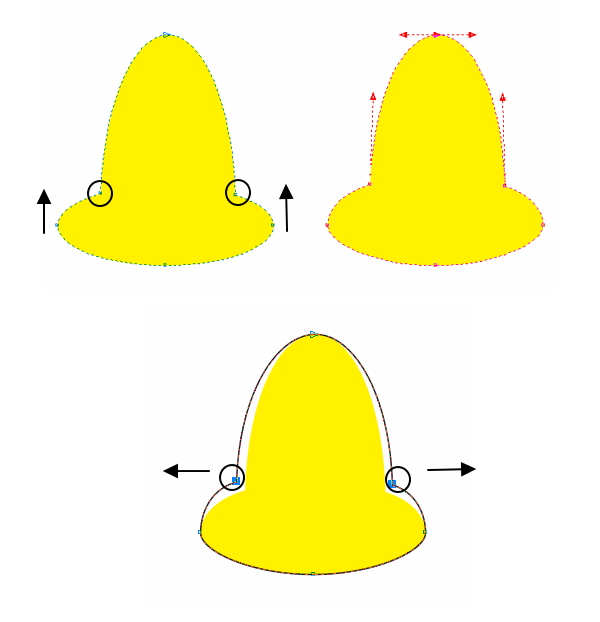
Grab the Shape Tool (F10). Select both nodes with the Pick Tool and drag them up. After that select the left and right nodes and move them outward (see picture).
Step 3
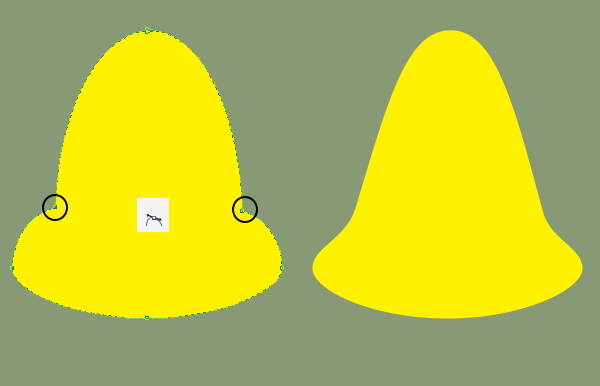
Choose the Smooth Node in the Property Bar.
Step 4
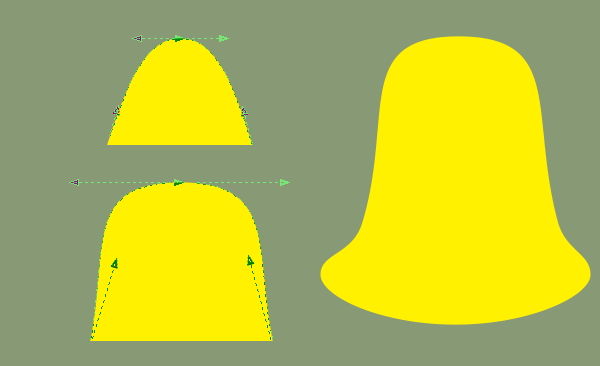
Let’s make the top node of the bell and drag the control handles out to be a wider. The resulting shape should looks like the image below.
Step 5
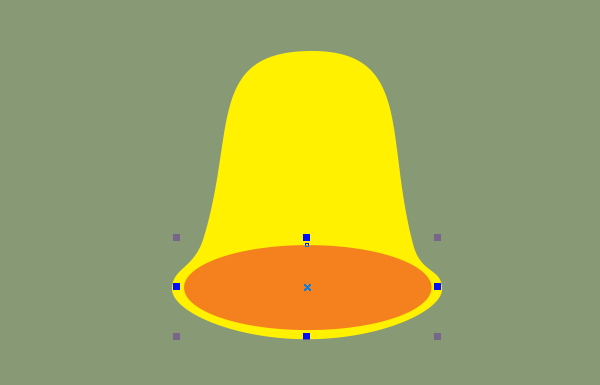
Let’s add the inner surface of the bell. To do this, draw a orange oval. Place it like image below.
Step 6
Let’s add the bell’s clapper. Draw a small oval. Set the color to (C= 19, M=80, Y=100, K=11). Place it like image below. Select the inner surface and then the bell’s clapper. Click the Intersect button in the Property Bar. Remove the unneeded object.

- Create The Candy
Step 1
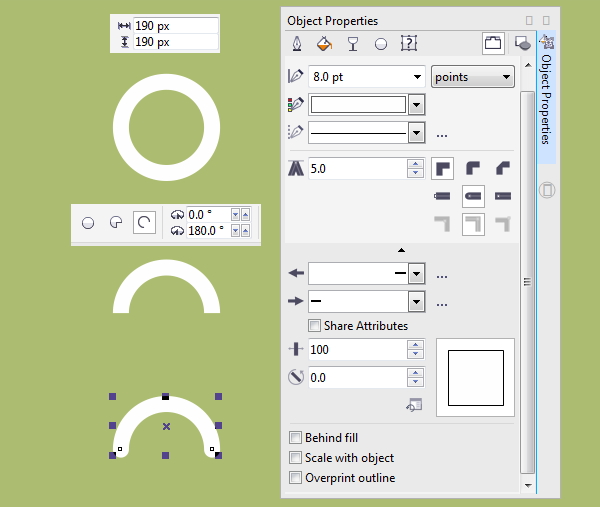
To draw the cane we need a 190 x 190 px circle using the Ellipse Tool (F7). No fill. Set the Outline Width to 8 pt and the Outline Color to white.
In the Property Bar, change the drawn shape from Ellipse to Arc shape. Set the value in the Starting and Ending Angles box to 180°.
From the Outline option in the Object Properties docker, choose Round Cap.
Step 2
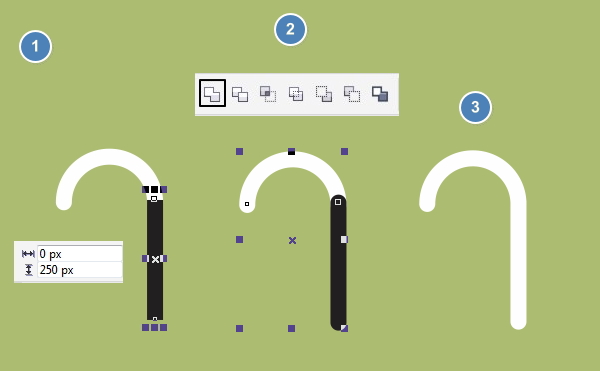
Take the 2-Point Line Tool to draw a straight line. Set the Outline Width to 8 pt and choose Round Cap. Select both and hit the Weld icon.
Convert its to object by pressing Ctrl + Shift + Q on your keyboard.
Step 3
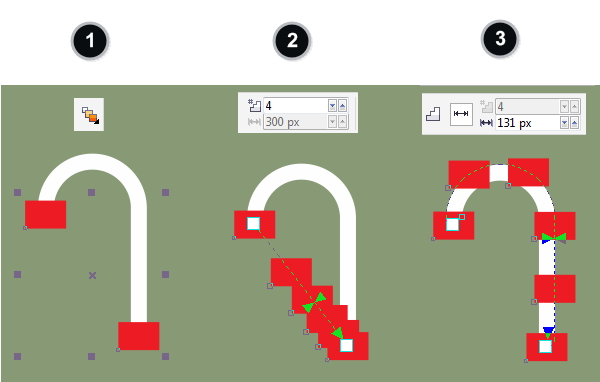
Draw two red regtangle shape. Place them above of the cane as shown picture below. Select the two regtangles and take the Blend Tool. Move on your Property Bar, enter 4 for the Blend Steps options. In the Path Properties, choose the New Path option and click on our cane. Then click the Blend Spacing button.
Step 4
Select the blend and press Ctrl + K and then Ungroup them (Ctrl + U). Rotate the two regtangles (see picture) with the Pick Tool.
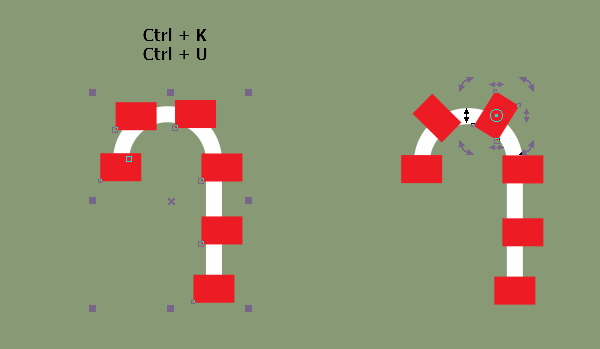
Step 5
Select all regtangles. Right-click and choose PowerClip Inside. Then click inside the cane.
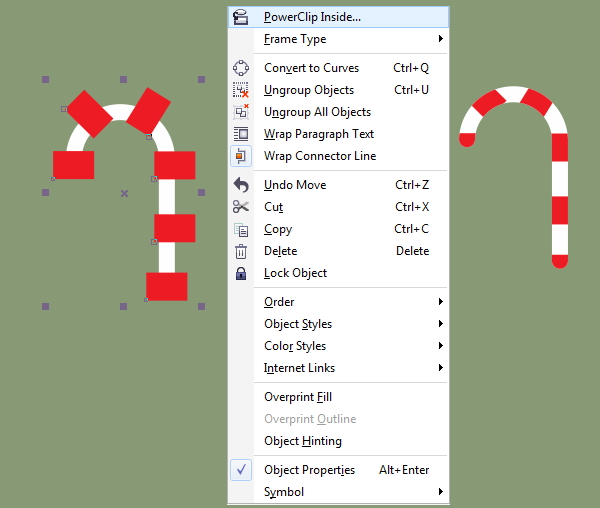
- Create The Snowflake
Step 1
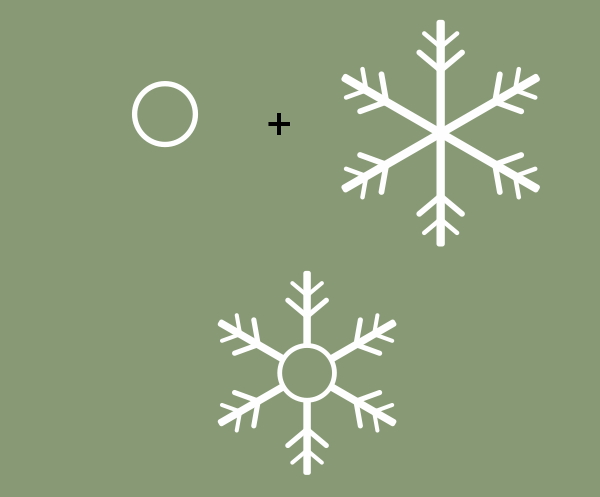
Grab the Regtangle Tool (F6) and draw a 13 x 117 px regtangle. On the Property Bar, select Round Corner. Enter 4 px in the Corner Radius boxes. Sets it color to white (picture 1).
Duplicate and resize the previous shape by 9 x 49 px. Type 50° in the Angle of Rotation box (picture 2).
Copy (Ctrl + C) and Paste (Ctrl + V) then click the Mirror Horizontally button in the Property Bar. Holding Ctrl, move the copied regtangle to the right.
Make another regtangle smaller than the original shape using the previous shape and place them like image below (picture 3).
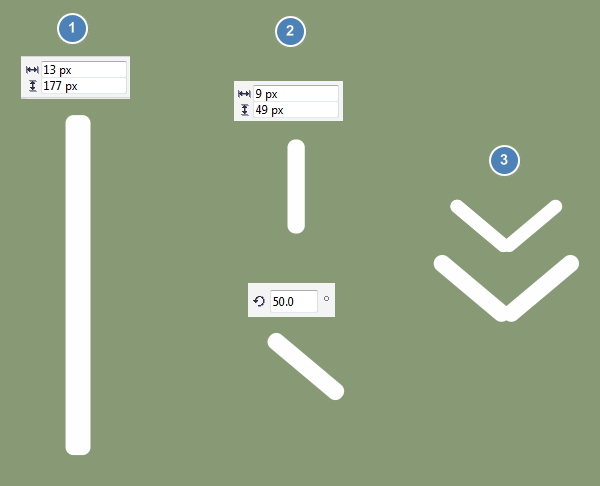
Step 2
Place the four regtangles on the top of the long regtangle shape. Select all objects. Hit the Weld tool. You should get a result similar below.

Step 3
Open the Transformation Rotation docker (Alt + F8). Moving the center of the rotation to the bottom of the long regtangle shape. Type values following image below. Click Apply.
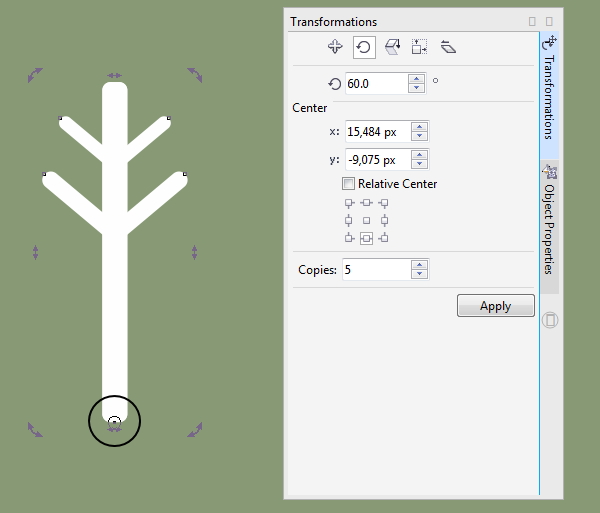
With the Pick Tool, select all objects and Group them by pressing Ctrl + G.

Step 4
Create a 95 x 95 px. Set the Outline Width to 2 pt and the Outline Color to white.
Select this circle and the grouped objects. Go to Object > Align and Distribute > Align Centers Horizontally (E) and Align Centers Vertically (C) and then hit the Trim icon. Please select the circle shape and Convert its to objects (Ctrl + Shift + Q). Now select all objects and hit the Weld icon.
- Creating The Pattern
Step 1
Make a 600 x 600 px square shape for the background. Fill it with light blue (C= 58, M=0, Y=4, K=0).

Step 2
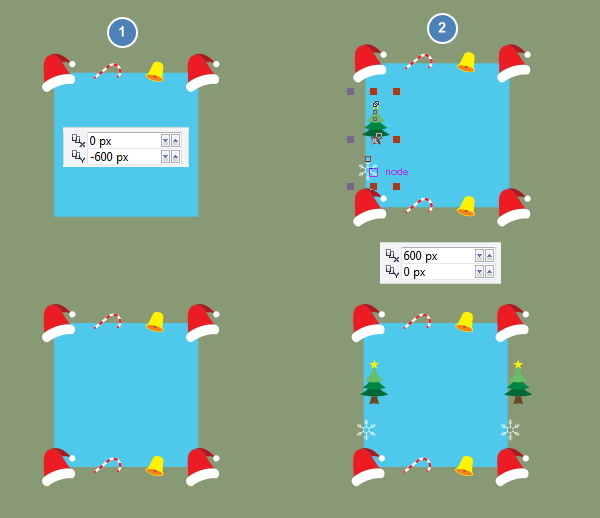
As shown the picture 1, place the Santa’s hat, candy, and bell on the top of background and keeping all of them selected. Focus on your Property Bar, you’ll find the Duplicate Distance option. Input -600 px for the Vertical Object Position box. Press Cttl + D.
Next, in picture 2, place the tree and snowflake, on the left of background and keeping all of them selected. Input 600 px for the Horizontal Object Position box. Press Cttl + D.
Step 3
Make several copies of every element and feel free to changing their size, rotation anything you want (picture 1).
Spread the snowflakes in the blank spaces of course you resize them before (picture 2).

Step 4
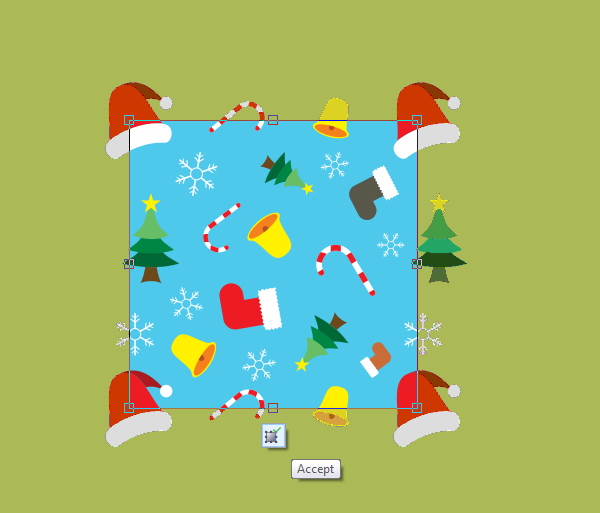
Once you are satisfied with result, go to Tools > Create > Pattern Fill. On dialog box pop up, select Type: Vector. Click OK.
With the Pick Tool, drag a marquee to select pattern area. Click Accept button.
Enter Name: Christmas Pattern on dialog Save Pattern. Press OK.
Step 5
Let’s apply our Christmas pattern into a 600 x 600 px regtangle. In the Fill Properties, select the Vector Pattern Fill and click the Fill Picker drop-down list. You will find the new pattern that we just created it.
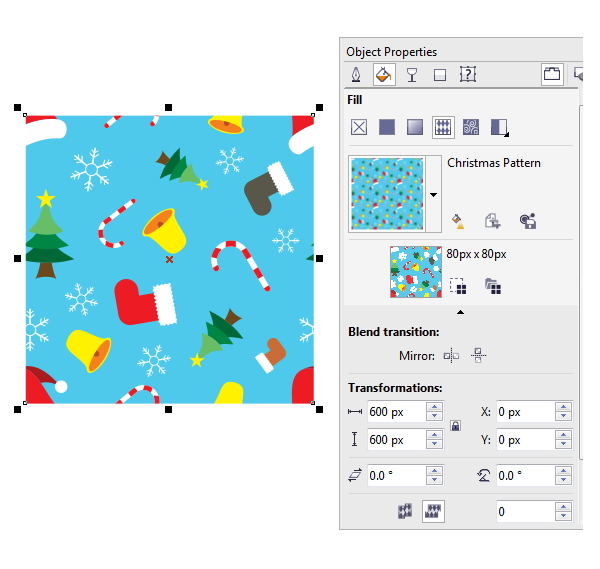
Here is the final image.

Conclusion
I hope this tutorial very usefull and you can applying this pattern on your design or something like wrapping paper.
Happy enjoy!


