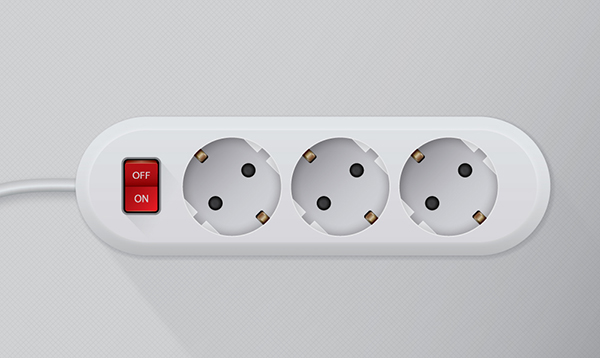
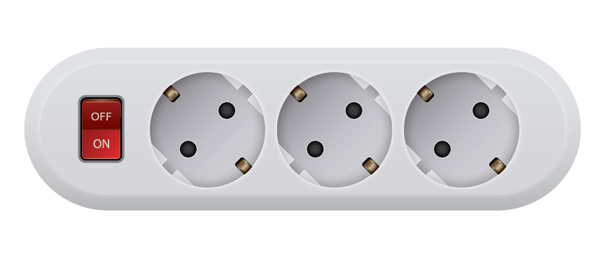
In the following Adobe Illustrator tutorial you will learn to Create a semi-realistic Electric Extension Cord using some basic shapes like rectangles and ellipses. We will also learn how to use add multiple fills and strokes and also we’ll apply a 3D effect to create an On/Off button.
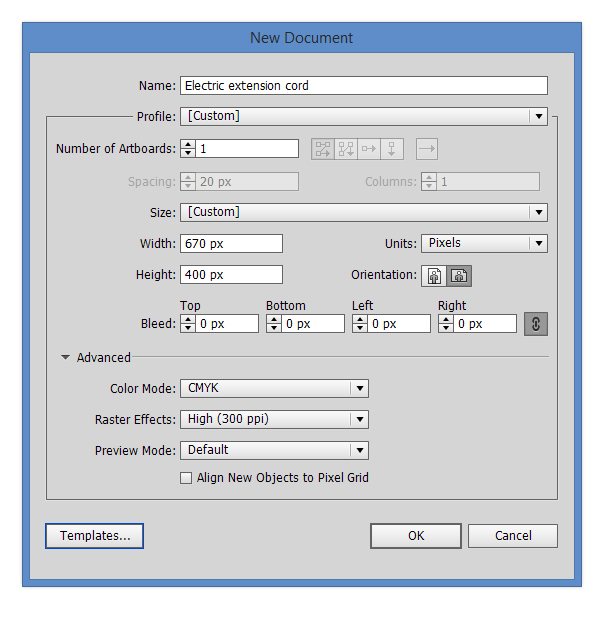
1. Open Adobe Illustrator and create a new 670 x 400px document (Ctrl + N). Select CMYK Color Mode, 300 PPI Raster Effects and make sure that Align New Objects to Pixel Grid is unchecked.
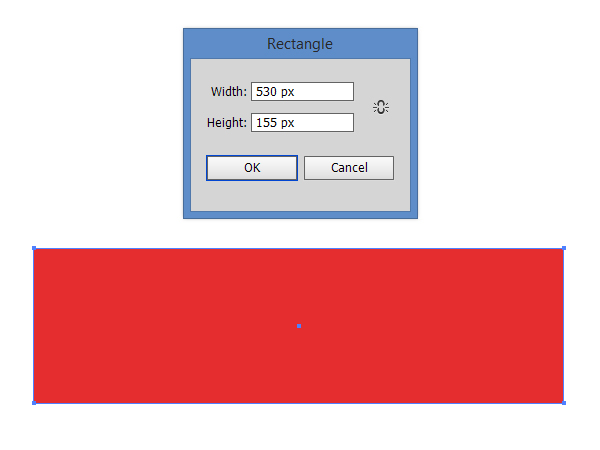
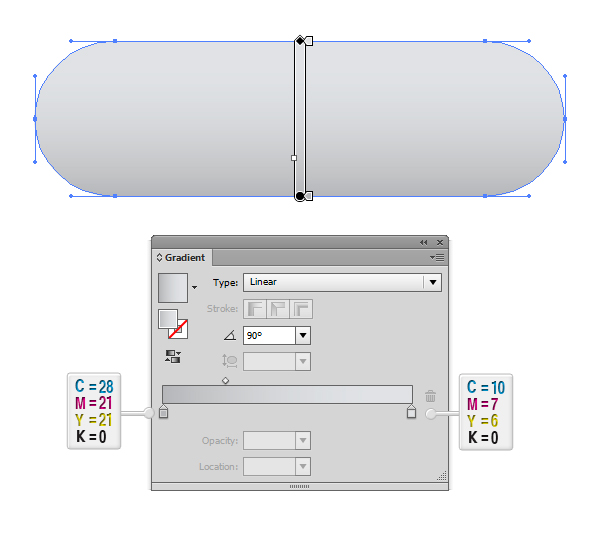
2. Pick the Rectangle Tool (M) and draw a 530 x 155px rectangle.
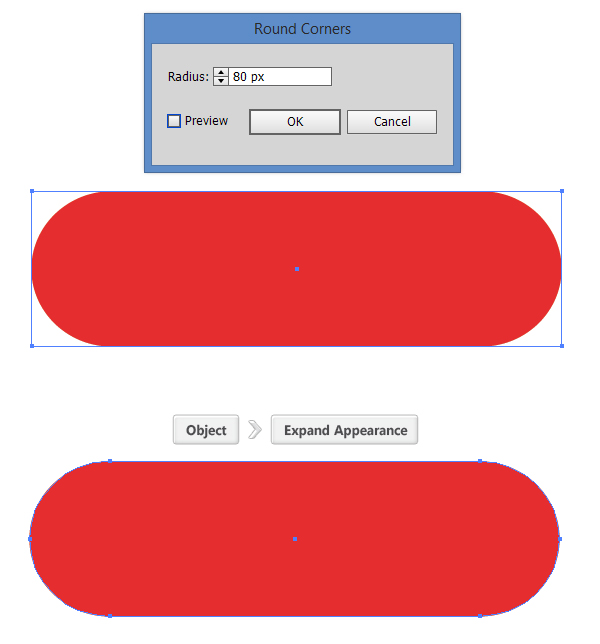
3. With the rectangle selected go to Effect > Stylize > Round Corners and enter a value of 80px, then expand the dynamic effect (Object > Expand Appearance).
4. Using the Gradient Panel, fill the shape with a linear gradient fill. Set the angle to 90 degrees then enter the same CMYK values like in the image below.
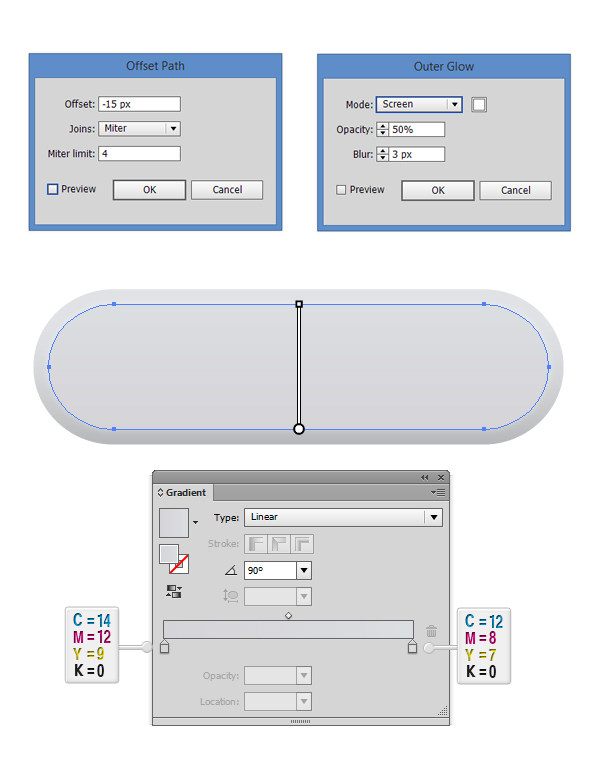
5. With the big shape selected go to Object > Path > Offset Path then enter a value of -15px in the dialog box. A new smaller shape will appear. Using the Gradient Panel, fill the shape with a linear gradient fill. Set the angle to 90 degrees, then enter the same CMYK values like in the image below. With the smaller shape still selected go to Effect > Stylize > Outer Glow, then in the dialog box set the Mode to Screen, the color to white, lower the opacity to 50%, then enter a value of 3px for Blur.
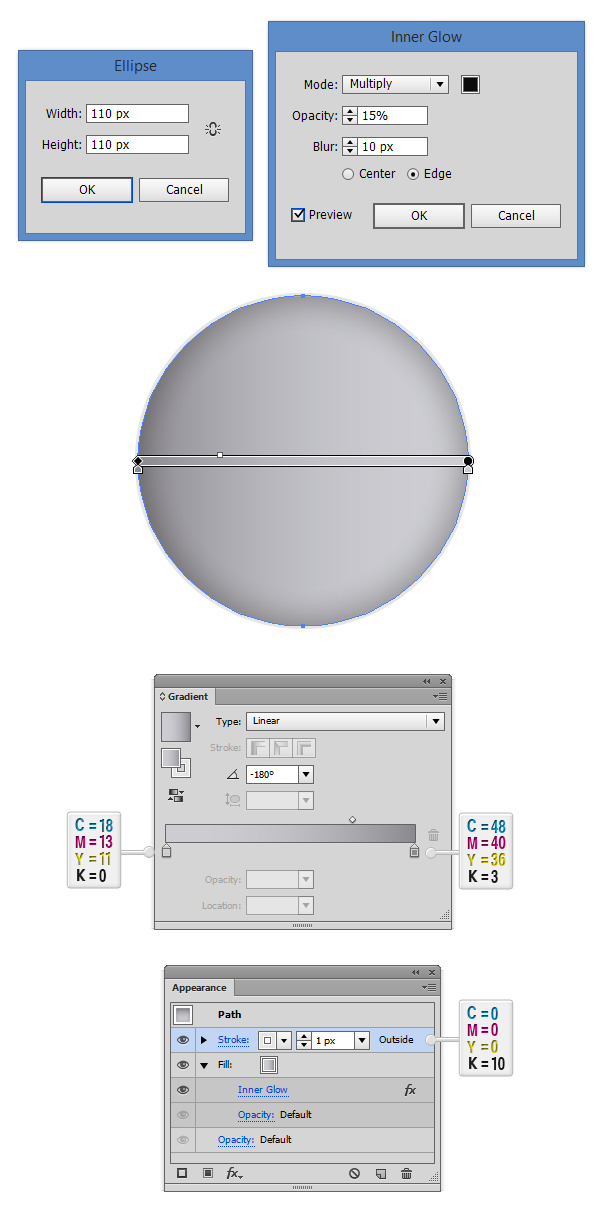
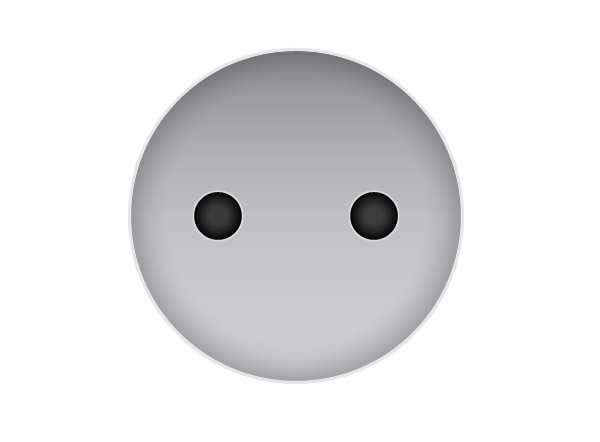
6. Now let’s create the second part of our Electric Extension Cord. Pick the Ellipse Tool (L) and draw a 110 x 110px ellipse. Using the Gradient Panel, fill the shape with a linear gradient fill. Set the angle to –180 degrees then enter the same CMYK values like in the image below. Now it’s time to focus on the Appearance Panel. Select the Fill and apply an Inner Glow (Effect > Stylize > Inner Glow). In the dialog box, set the mode to Multiply, lower the Opacity to 15%, set the color to Black, then the blur to 10px. Now add a 1px Stroke (C=0 M=0 Y=0 K=10), then set the mode to Outside Stroke.
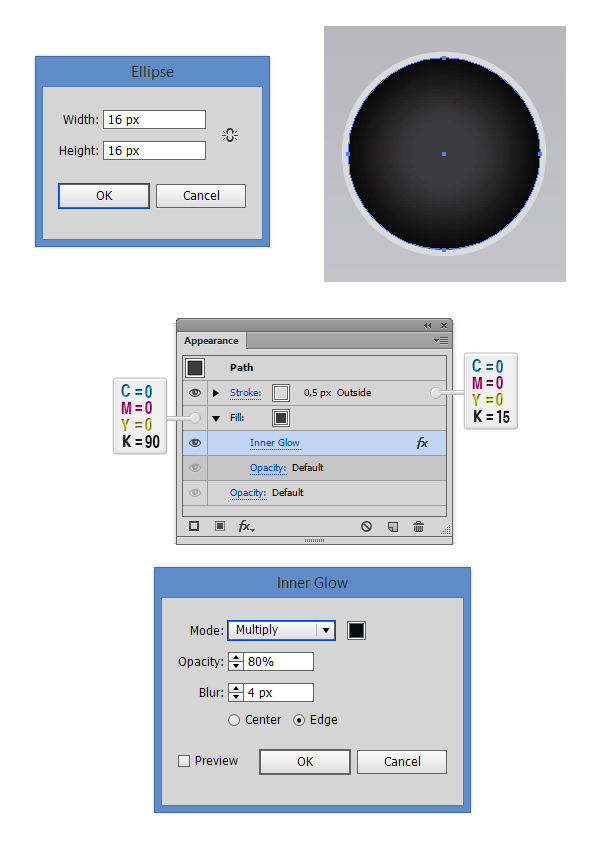
7. Now let’s create the second part of our Electric Extension Cord. Pick the Ellipse Tool (L) and draw a 16 x 16px ellipse. Fill the ellipse with C=0 M=0 Y=0 K=90. Now it’s time to focus on the Appearance Panel. Select the Fill and apply an Inner Glow (Effect > Stylize > Inner Glow). In the dialog box, set the mode to Multiply, lower the Opacity to 80%, set the color to Black, then the blur to 4px. Now add a 0,5px Stroke (C=0 M=0 Y=0 K=15), then set the mode to Outside Stroke.
After this, copy and paste the last shape created at Step 7 like in the image below.
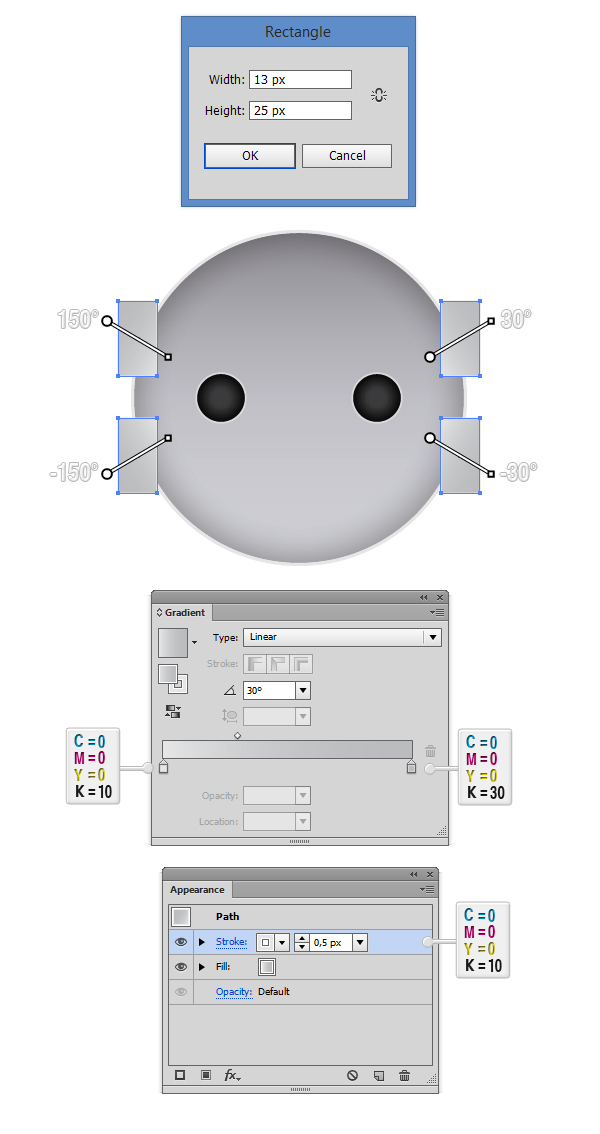
8. Pick the Rectangle Tool (M) and create four 13 x 25px rectangles. Fill the shapes with a linear gradient tool, then from the Gradient Panel set the angle for each shape like in the image below. After this add a 0,5px stroke then set it’s color to C=0 M=0 Y=0 K=10.
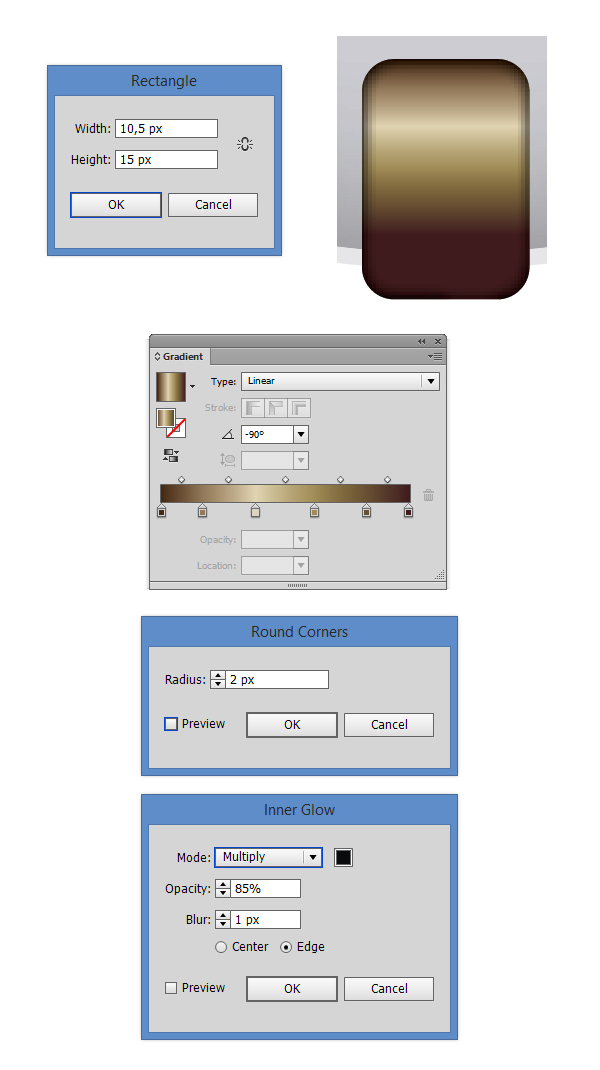
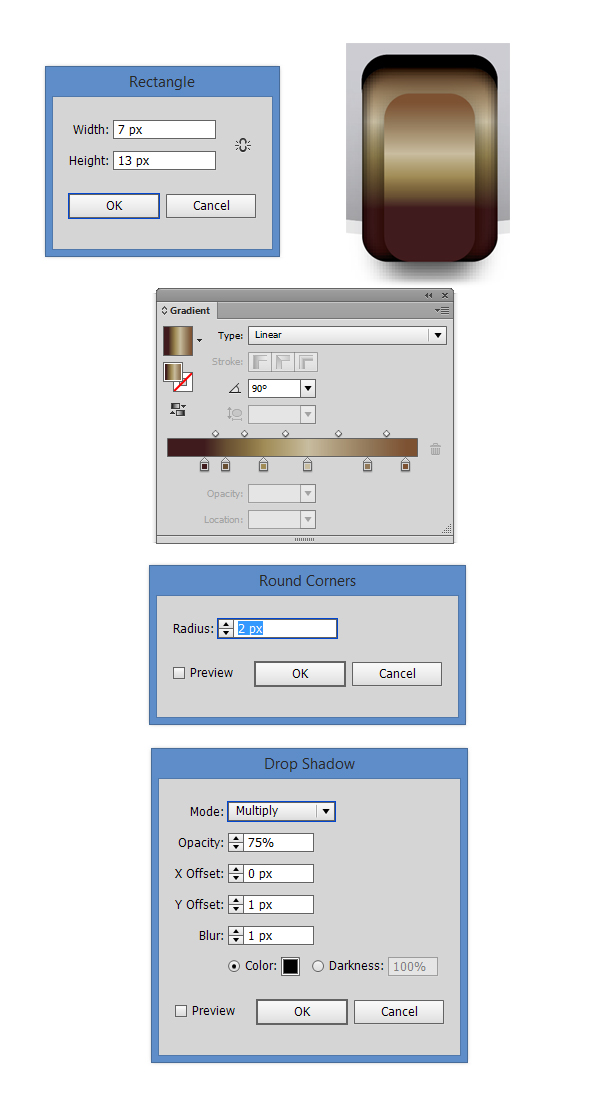
9. Pick again the Rectangle Tool (M) and draw a 10,5 x 15px rectangle. Fill it with a linear gradient fill, then set the angle to 90 degrees. Pick the rectangle and round the corners with 2px radius (Effect > Stylize > Round Corners). With the shape still selected add an Inner Glow (Effect > Stylize > Inner Glow).
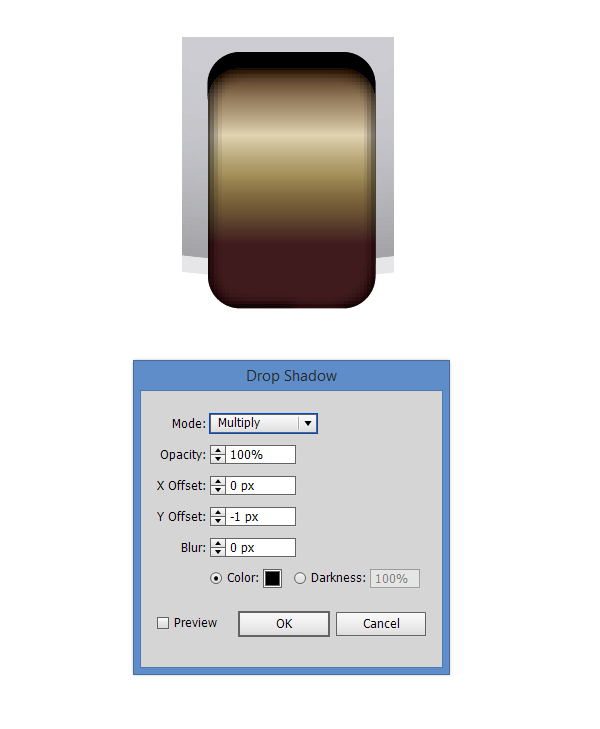
10. With the shape still selected, add a Drop Shadow (Effect > Stylize > Drop Shadow). In the dialog box set the Mode to Multiply, maximize the Opacity to 100%, then leave X Offset to 0px, then the Y Offset to -1px. Lower the Blur to 0px then set the color to Black.
11. Pick the Rectangle Tool (M) and draw a 7 x 13px rectangle. Using the Gradient Panel fill it with a linear gradient fill, then make sure you set the gradient angle to 90 degrees. Select the shape and round the corners with a 2px radius (Effect > Stylize > Round Corners). Last but not least, add a Drop Shadow (Effect > Stylize > Drop Shadow).
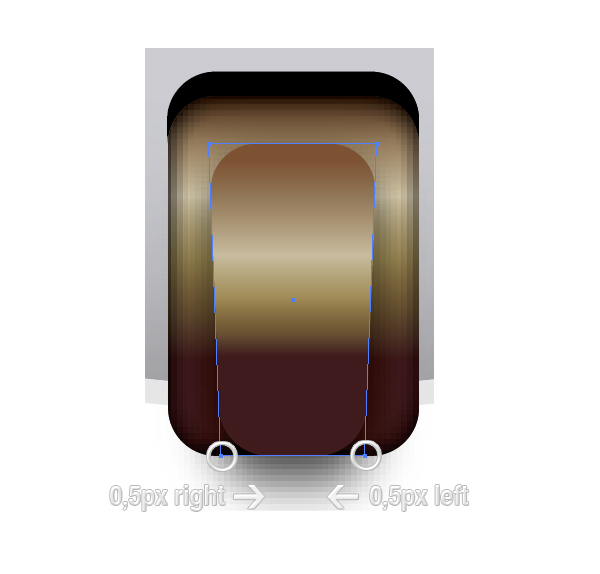
12. Using the Direct Selection Tool (A) nudge the lower right and left anchor points by 0,5px.
13. Now this is how your shapes should look like.
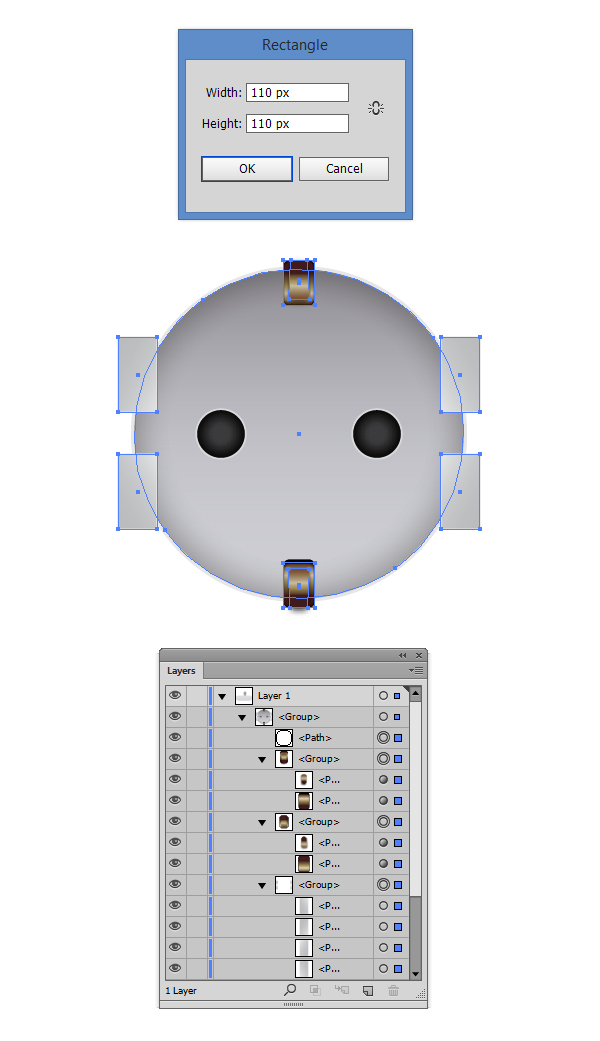
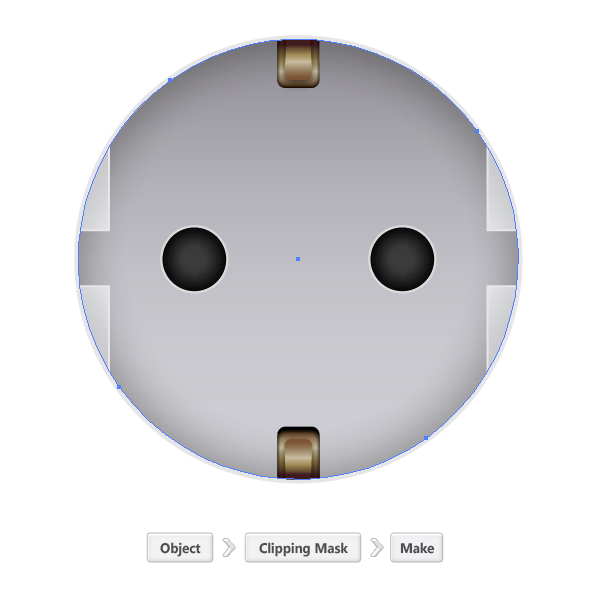
14. Draw a 110 x 110px ellipse with no fill and stroke. Focus on the Layers Panel and move the ellipse on front of the other shapes.
Select all the shapes, including the no fill and stroke ellipses and create a Clipping Mask (Object > Clipping Mask > Make).
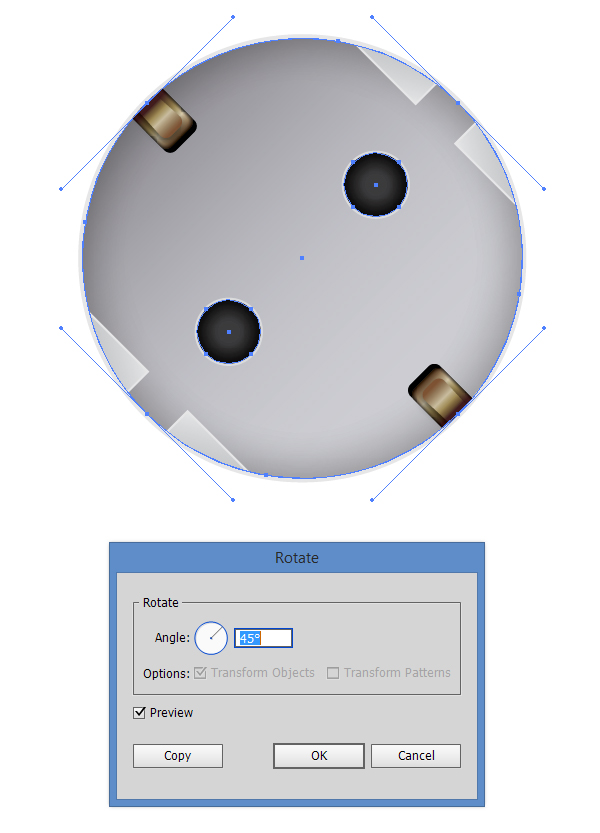
15. Now rotate the clipping mask by 45 degrees using the Rotate Tool (R).
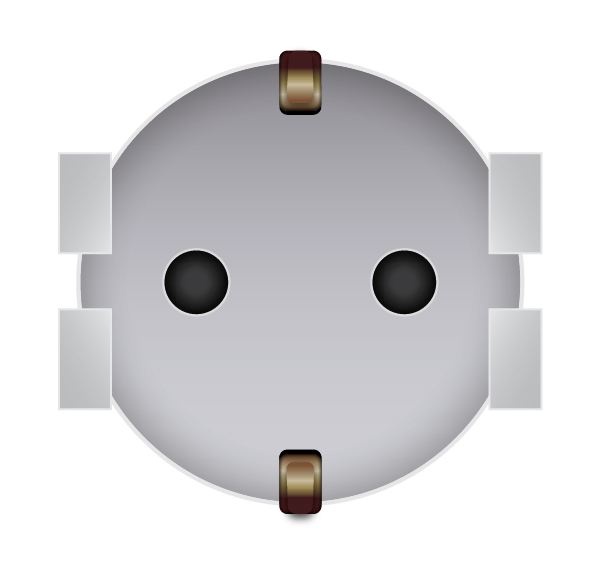
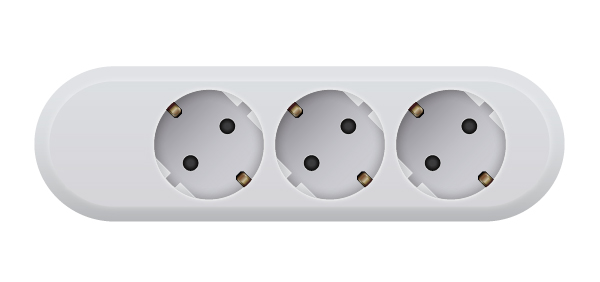
16. Copy then paste three times the group and your Extension Electric Cord should look like in the image below.
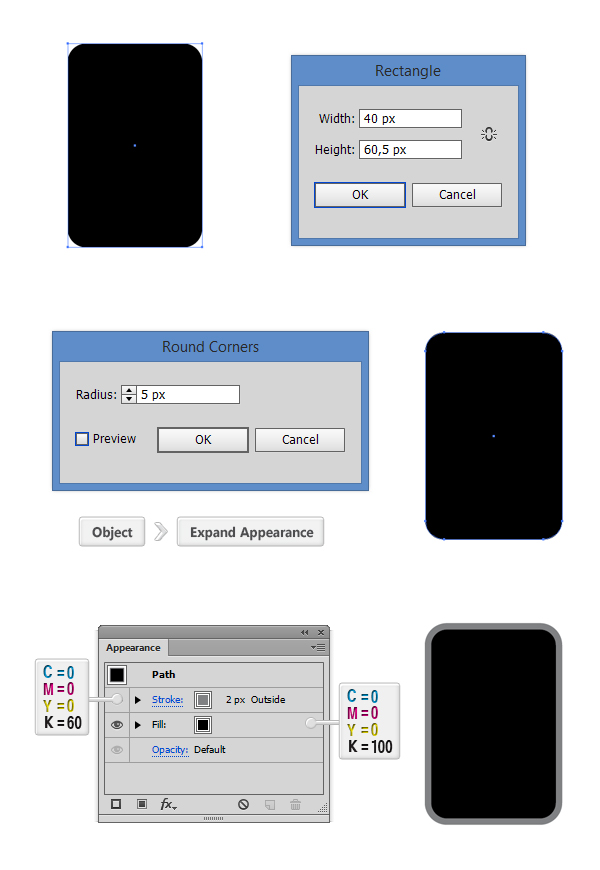
17. Now let’s create the ON/OFF button. Pick the Rectangle Tool (M) and create a 40 x 60.5px rectangle. Round the corners with a 5px radius (Effect > Stylize > Round Corners) then expand the effect (Object > Expand Appearance). Fill the shape with Black, then add a 2px stroke and set it’s color to C=0 M=0 Y=0 K=60. Make sure that from the Stroke Panel you set the mode to Outside Stoke.
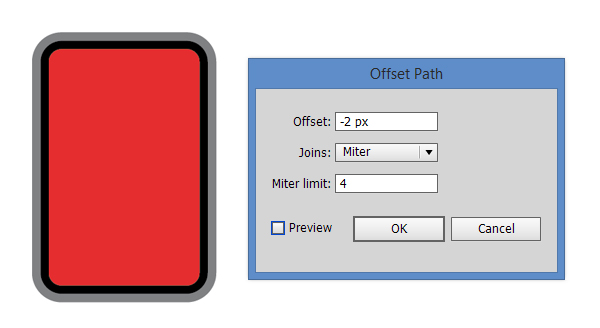
18. Select the previous shape and Offset it by -2px (Object > Path > Offset Path).
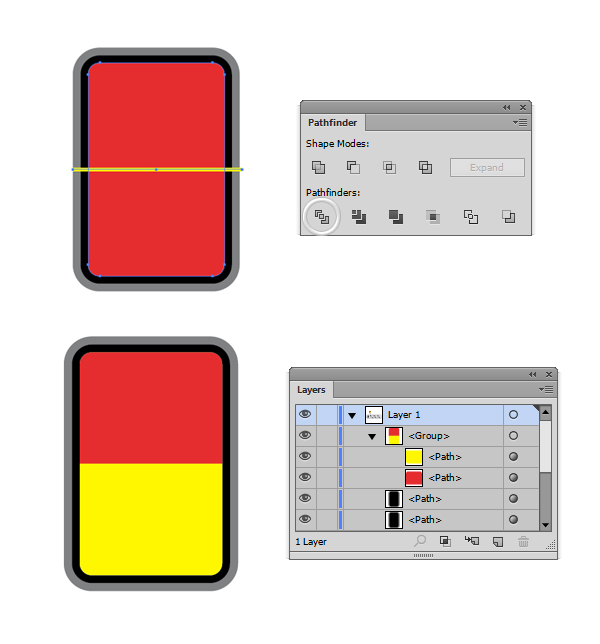
19. Using the Line Segment Tool (\) draw line, then using the Align Panel, align the line in the middle of the previous path. Select both the line and the shape and from the Pathfinder Panel hit the Divide Button. Now you should have a gropu with two shapes.
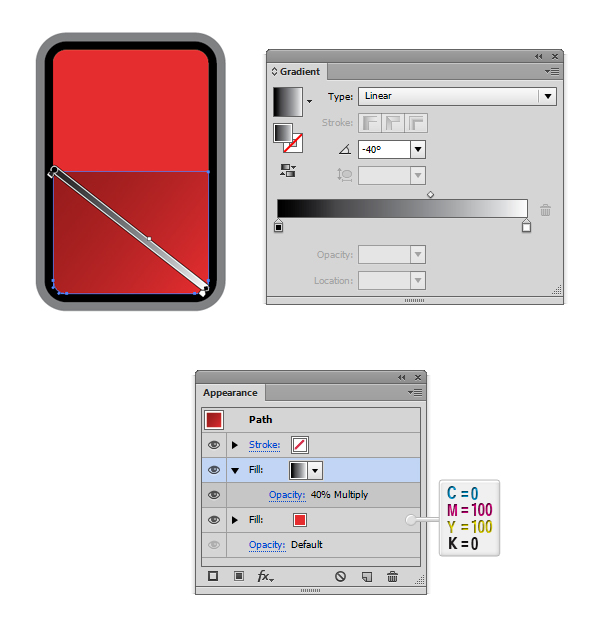
20. Select the bottom shape and focus on the Appearance Panel. Fill it ith C=0 M=100 Y=100 K=0. Add a second fill, this time a linear gradient fill from Black to White. Set it’s angle to -40 degrees, lower the Opacity to 40%, then set the Blending Mode to Multiply.
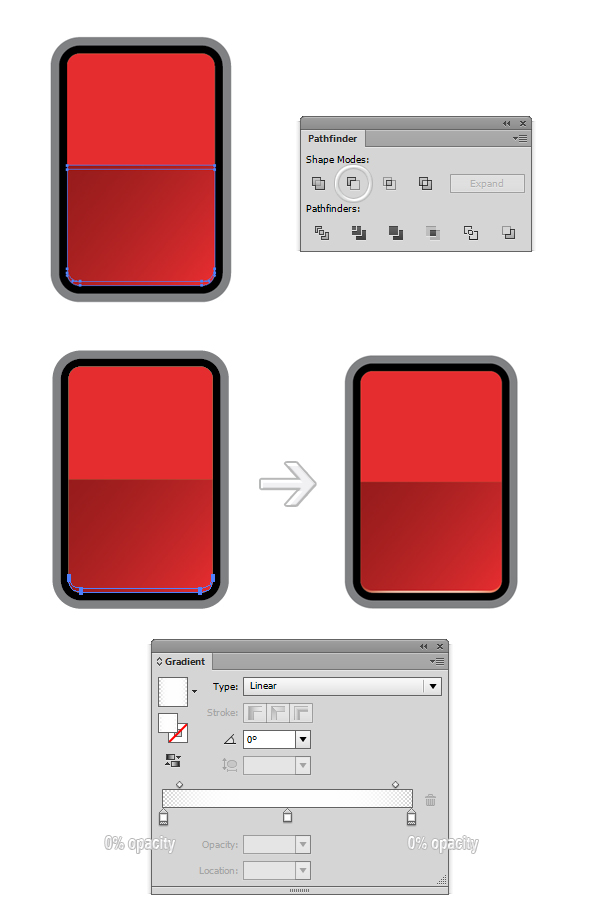
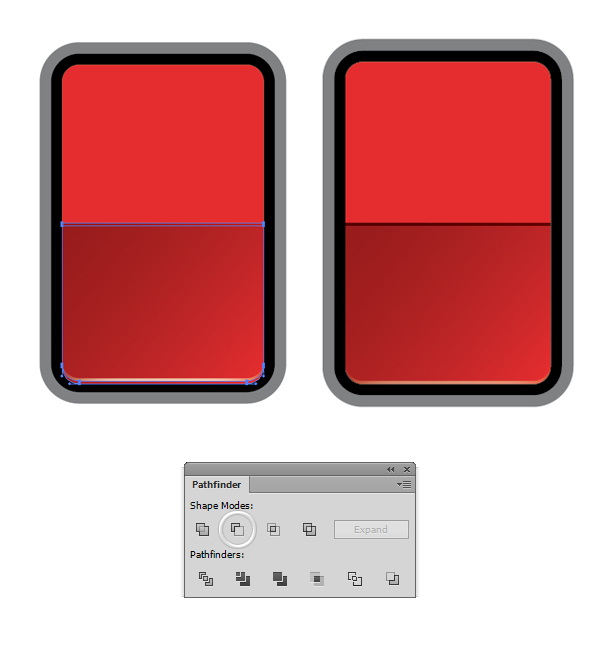
21. Select the previous shape and make two copies in front of it (Ctrl + C > Ctrl + F > Ctrl + F). Select the top copy and nudge it 0,5px up. Select both copies and from the Pathfinder Panel hit the Minus Front button. Fill the resulting shape with a linear gradient fill, with all color steps set to White. Set the opacity to 50%.
22. Select again the previous main shape and make two copies in front of it (Ctrl + C > Ctrl + F > Ctrl + F). Select the top copy and nudge it 0,5px down. Select both copies and from the Pathfinder Panel hit the Minus Front button. Fill the resulting shape with Black, lower the opacity to 60% and set the Blending Mode to Multiply.
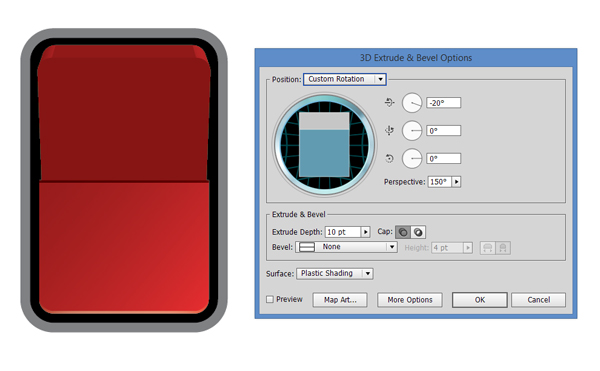
23. Now select the upper shape from Step 19 and apply a 3D effect (Effect > 3D > Extrude and Bevel). Enter the same values like in the screenshot below.
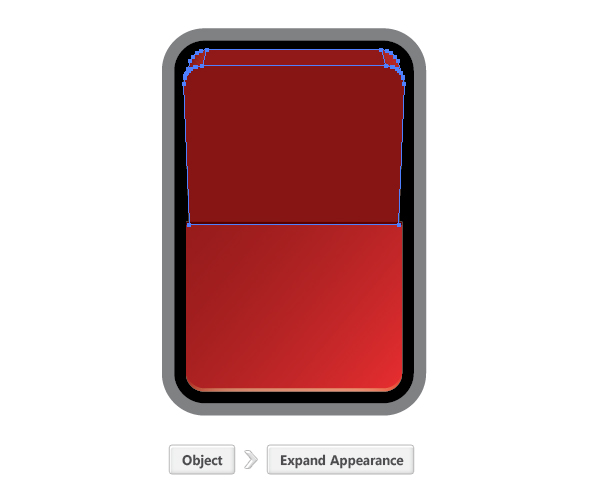
After you apply the 3D Effect, expand it (Object > Expand Appearance).
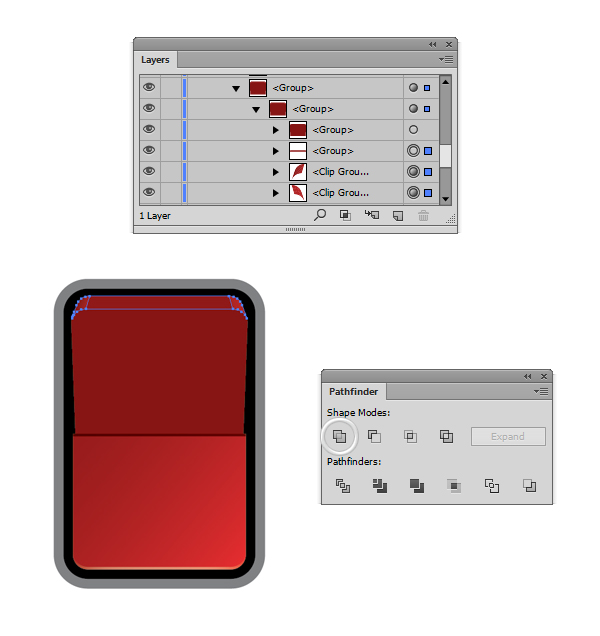
24. Focus on the Layers Panel and select the three groups as you see in the screenshot below, then from the Pathfinder Panel hit the Unite button.
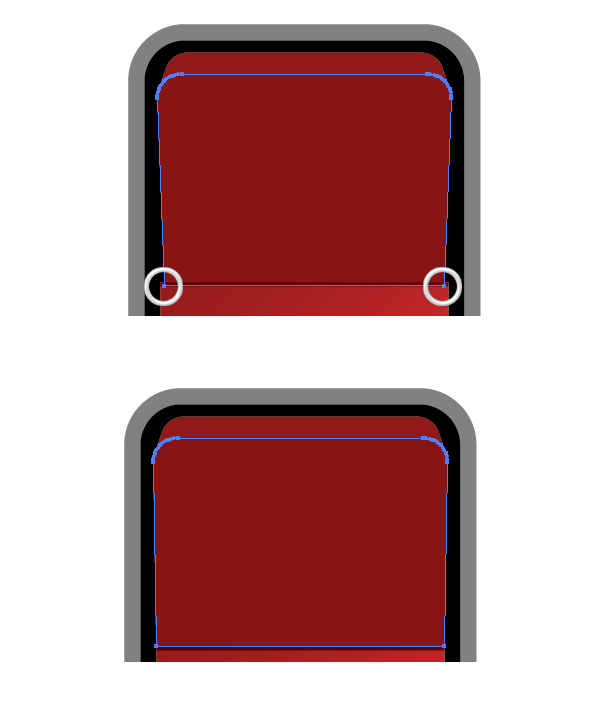
25.Enable the Snap to Grid, then using the Direct Selection Tool (A) move the lower anchor points as you see in the screenshot below.
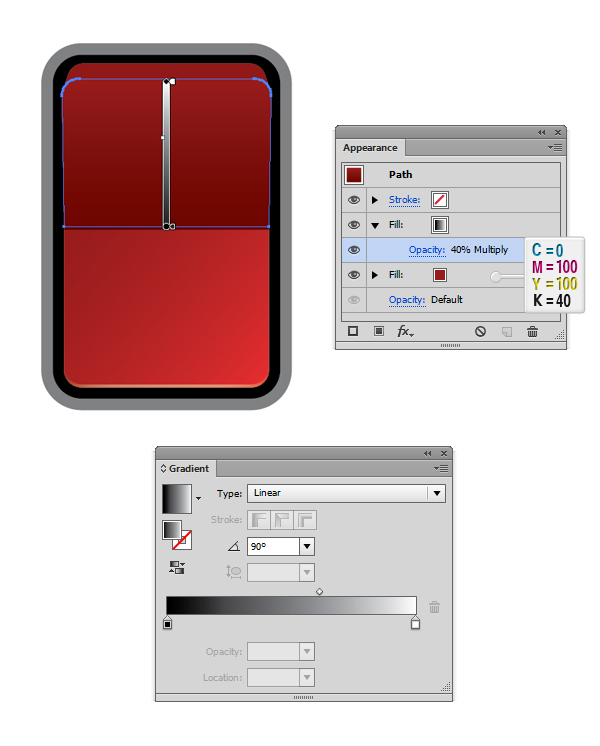
26. Select the shape and focus on the Appearance Panel. Fill it ith C=0 M=100 Y=100 K=40. Add a second fill, this time a linear gradient fill from Black to White. Set it’s angle to 90 degrees, lower the Opacity to 40%, then set the Blending Mode to Multiply.
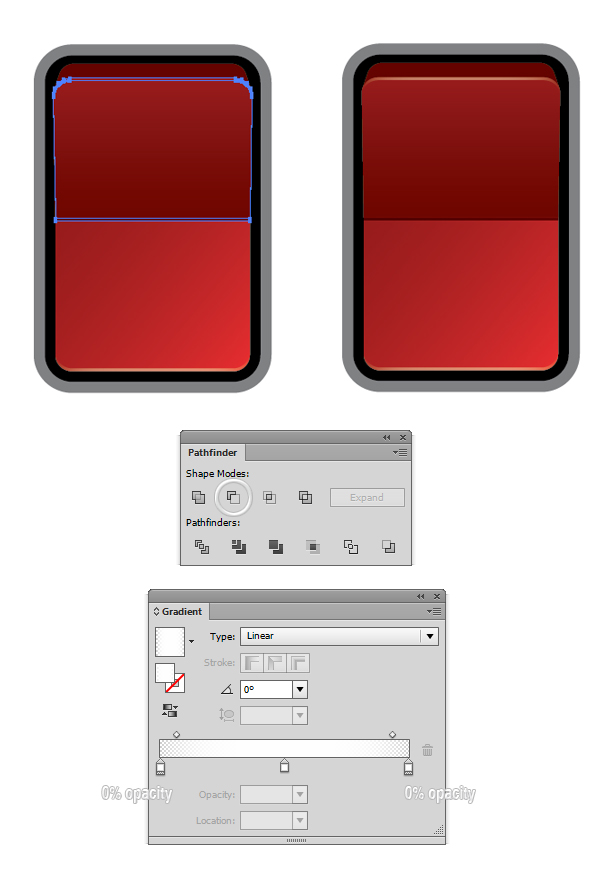
27. Select the previous shape and make two copies in front of it (Ctrl + C > Ctrl + F > Ctrl + F). Select the top copy and nudge it 0,5px down. Select both copies and from the Pathfinder Panel hit the Minus Front button. Fill the resulting shape with a linear gradient fill, with all color steps set to White. Set the opacity to 50%.
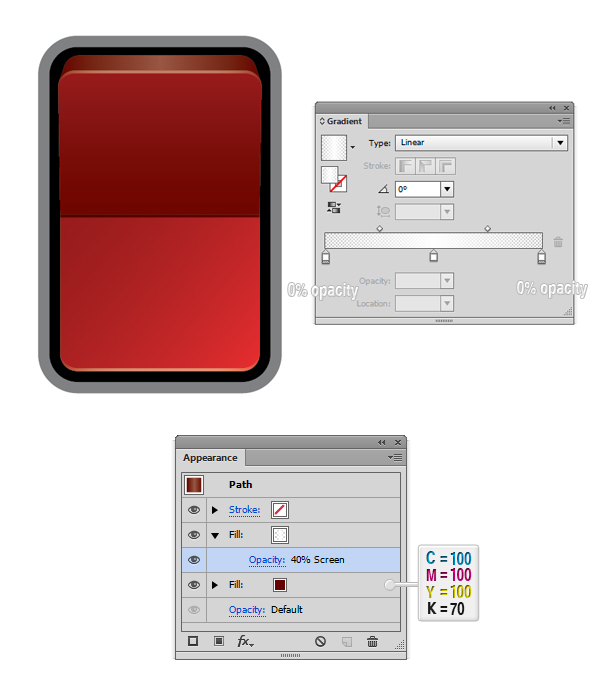
28. Select the upper shape and focus on the Appearance Panel. Fill it ith C=0 M=100 Y=100 K=70. Add a second fill, this time a linear gradient fill from Black to White. Set it’s angle to 0 degrees, lower the Opacity to 40%, then set the Blending Mode to Screen.
29. Now this is how your Electric Extension Cord should look like!
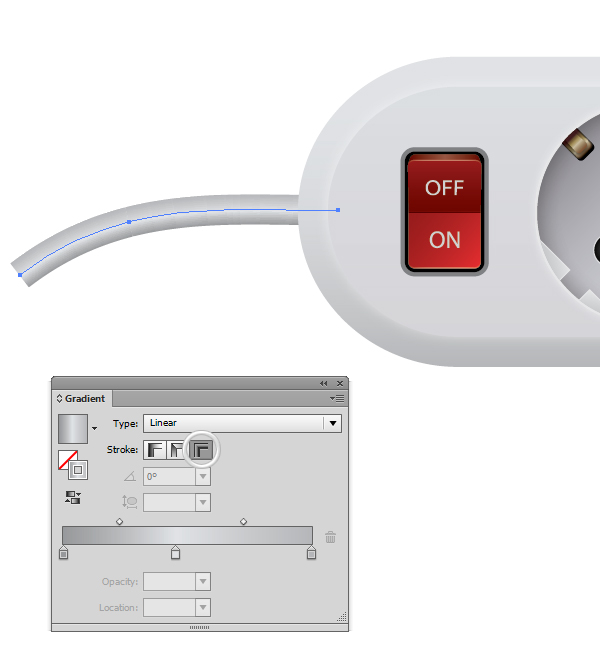
30. This is the last step, using the Pen Tool (P) draw a simple line, and from the Layers Panel, move it underneath (Ctrl + Shift + [ ), then fill it with a gradient stroke (Only for Adobe Illustrator CS6 and above).
Now just draw a simple background and add some shadows to create a realistic effect.
Here the final image of the Electric Extension Cord.
Download the free vector from 365vectors.com!
We’re working on many more tutorials, but suggestions are always welcome.
Request a Tutorial Here

